Point of Sale(POS) Plugin
The Point of Sale (POS) plugin for nopCommerce provides a complete in-store selling solution that seamlessly connects your physical store with your online system. It enables fast product browsing, customer management, order creation, multiple payment options, and real-time inventory updates—all from an intuitive POS interface. With support for suppliers, purchases, expenses, invoice types, kitchens, and customizable settings, this plugin gives store owners efficient control over retail, restaurant, or supermarket operations.
PRE-REQUISITES
· The plugin requires you to install the Nop-Station Core plugin first.
· Also required plugin Calculate tax by category percentage to be installed.
INSTALLATION
· Download the Point of Sale(POS) from our store https://www.nop-station.com/point-of-sale-pos-for-nopcommerce
· You can learn more about the installation and licensing here
· Go to Administration → Configuration → Local plugins
· Upload the .zip file using the "Upload plugin or theme" button
· Then click on ‘Reload list of plugins’

· Install 'Nop-Station Core' Plugin, 'Calculate tax by category percentage' plugin and then install 'Point of Sale (POS)'

· To make the plugins functional, restart the application

· Enable the plugin by clicking 'Edit' then select the enable button

· You can configure the plugin by clicking Configure from the Local Plugins page. Alternatively, go to nopStation → Plugins→ POS → Configure POS, enable the required options, and click Save

· Load Product Picture: After enabling it, it will show product picture in pos site
· Load Category Picture: After enabling it, it will show category picture in pos site
Setting up POS store
· Go to Administration → Configuration → Stores→Edit/Add new

· Scroll down to ‘POS Store’
· Store Type: Select the store type from drop down(e.g., Online, SuperMarketStore, RestaurantStore)
· Store Warehouse: Select warehouse from dropdown
· Then fill in the required and other fields, then click Save

Setting up Pos
· To set up Pos user, go to Administration → nopStation → Pos→ Pos Users
· From there, you can add a new user or edit an existing one.
· To add new Pos user you have to choose Email from existing, also select option from Assigned to store, also must enable Is Active

· To add or edit Suppliers, Purchases, Purchase Returns, Expenses, Expense Categories, Units, Kitchen and Pos invoice type , click Add New to create a record or Edit to modify an existing one, then click Save
· Suppliers: This provides the vendor details needed to manage purchases and maintain accurate inventory in the POS system.
· Purchases: Purchases provides you to record and manage product buying transactions from suppliers to update stock levels in the POS system.
· Purchase Returns: Purchase returns allow you to record and process products returned to suppliers, updating stock and financial adjustments in the POS system.
· Expenses: Expenses allow you to record and track store-related costs for accurate financial management within the POS system.
· Units: Units define the measurement type (such as pieces, boxes, or kilograms) used for products to ensure accurate quantity and inventory management in the POS system.
· Kitchen: Kitchen allows you to manage their assigned printers for processing and routing order tickets within the POS system.
· Pos invoice type: POS Invoice Type defines the different billing or order types (such as dine-in, takeaway, delivery) to control how sales are processed and printed in the POS system.

Pos Payment option:
· To add a POS payment type, create a new option or edit an existing one. Examples of POS payment types include Cash, Card, Mobile Pay etc. , based on your preference.
· This feature also supports dual payment, allowing customers to pay using two methods in a single transaction.

· Here must use system name in Pos Payment option
Public View
· Here is the public view of our pos plugin:

Checkout
· After adding a product in the POS screen, you can add a note, apply a discount, add an extra fee, or apply a coupon to customize the order before placing it.

· Invoice type: You can also select an invoice type, such as Dine-in, Takeaway, or Delivery
· Shipping address: For shippable products, you can add a delivery address
· Customer info: You can place an order for an existing customer by searching and selecting their profile
· Hold customer: It temporarily saves the current customer’s order without completing the payment.

Multiple payment:
· Allows splitting the total amount into multiple payment methods.
· Add different payment options such as Cash, Card, or Mobile Pay.
· Enter individual amounts for each payment method.
· The system automatically calculates the remaining balance and change.
· Click Apply to confirm the multiple payments.

Order List:
· View all completed, processing, and paid orders in one place.
· Search orders by date range, order number, invoice type, or customer details.
· Check order status, payment status, shipping status, and order total.
· Click View to see full order details.
· Use Return to process item returns directly from the list.

Customer List:
· View all customers with details like email, name, roles, and company.
· Search customers by name, email, company, date of birth, IP address, or role.
· Add new customers using the Add New button.
· Edit customer information directly from the list.
· Use Place Order to quickly create an order for a selected customer.

Customer Queue:
· Shows customers whose orders were placed on Hold.
· Displays basic details such as name, guest status, items in cart, and last activity.
· Allows you to Restore a held customer to continue their order.
· You can Delete entries that are no longer needed.
· Search customers in the queue by name, email, phone, username, or role.

Generate Barcode:
To generate barcode follow the steps below:
· Install ‘Misc.GenerateProductBarcode’ plugin

· Click ‘Restart application to apply changes’

· Now goto NopStation>Plugins>Generate barcode>Product list templates>Add new

· Give Template Name and then click Save

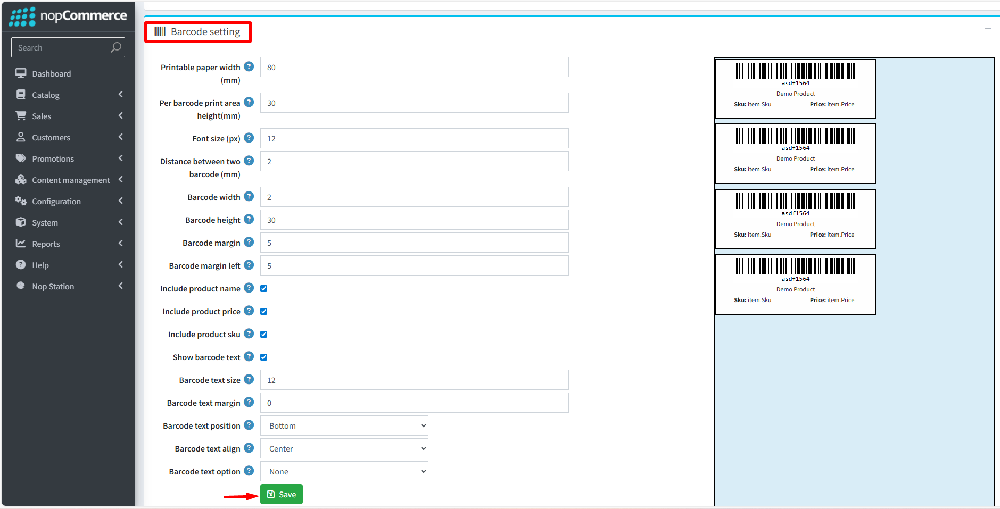
· You can modify your barcode setting based on your preferences
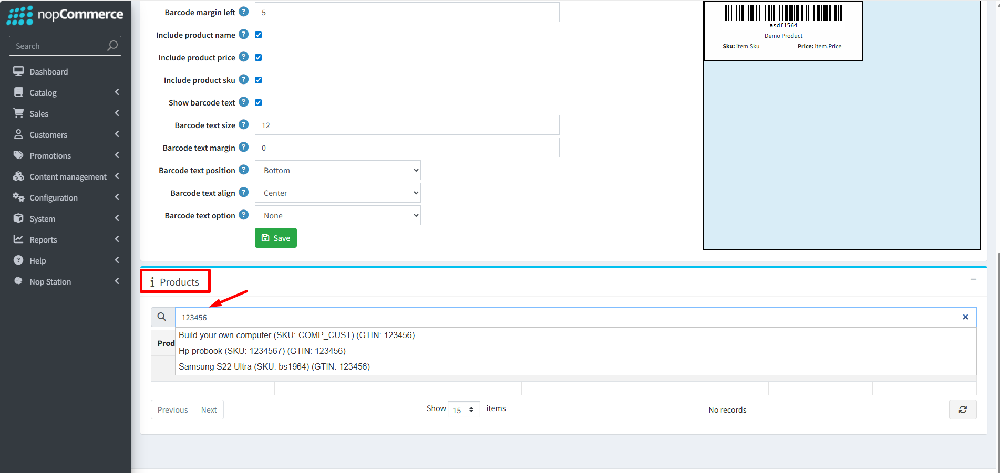
· You can add product to the bar code using Name, SKU or GTIN
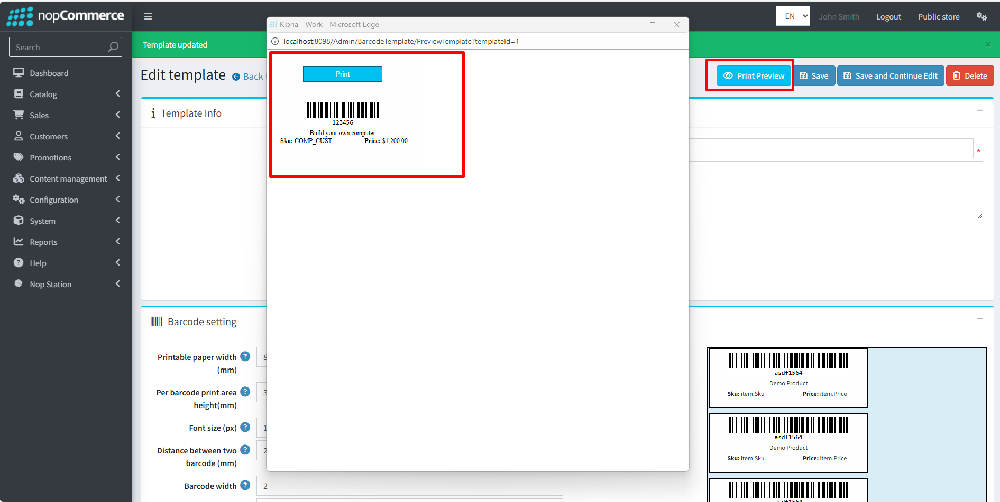
· After adding product to the barcode click on Print Preview.