

nopStation's Database Backup plugin for nopCommerce allows store owners to automate and manage database backups with ease. Back up your store's database on demand or on a schedule, and store backup files on your host server, Google Drive, OneDrive, or Dropbox. With built-in compression, cloud authorization, email invites, and a real-time progress tracker, this plugin provides a complete backup solution for nopCommerce-powered online stores.
PRE-REQUISITES
- The plugin requires nopCommerce with SQL Server as the database provider. PostgreSQL and MySQL are not supported for backup operations.
- You must install the Nop-Station Core plugin before installing this plugin.
- If you plan to use a cloud storage provider (Google Drive, OneDrive, or Dropbox), you will need an active account with that provider and appropriate API credentials (details covered in later sections).
INSTALLATION
- Download the Database Backup Plugin from the nopStation store: https://nop-station.com/customer/downloadableproducts
- Go to Administration → Configuration → Local plugins
- Upload the .zip file using the "Upload plugin or theme" button
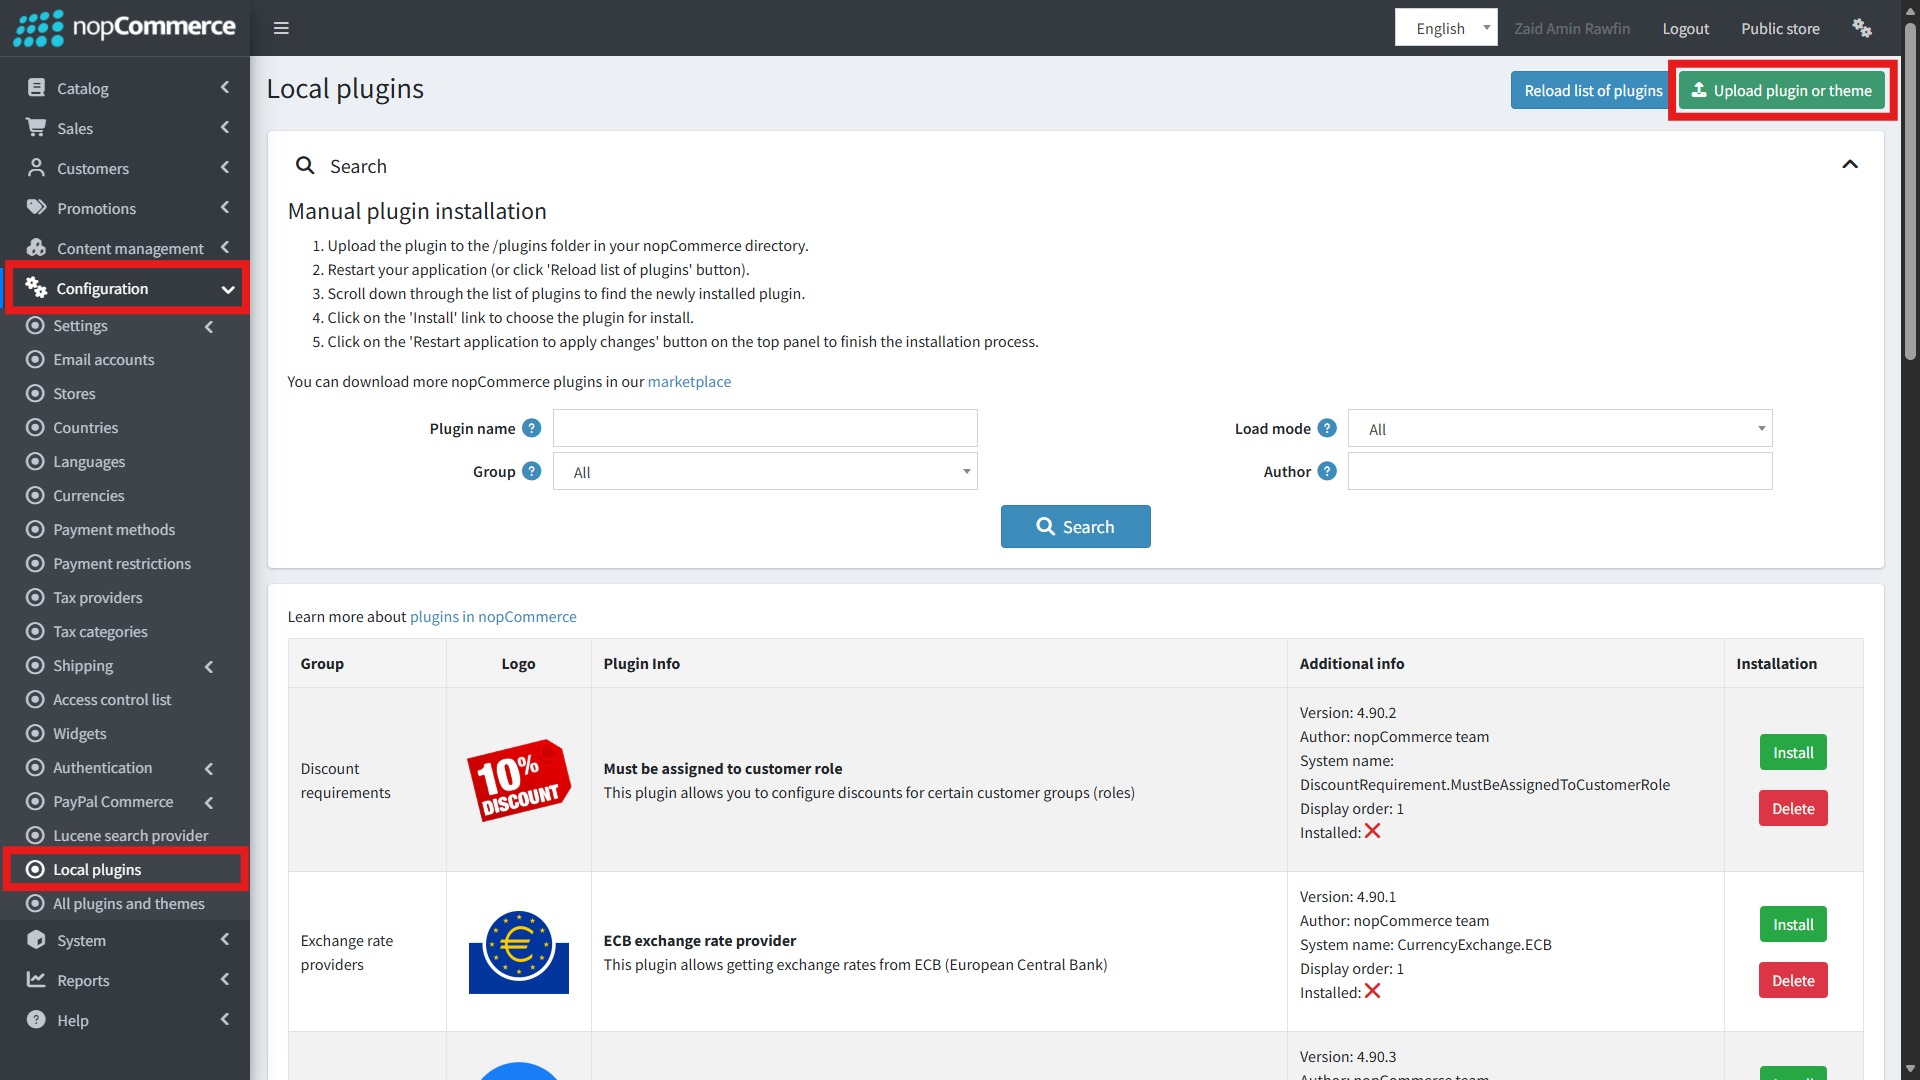
- Go to Administration, and reload the 'list of plugins'. Install 'Nop-Station Core' plugin first (if not already installed), and then install 'Nop-Station Database Backup'
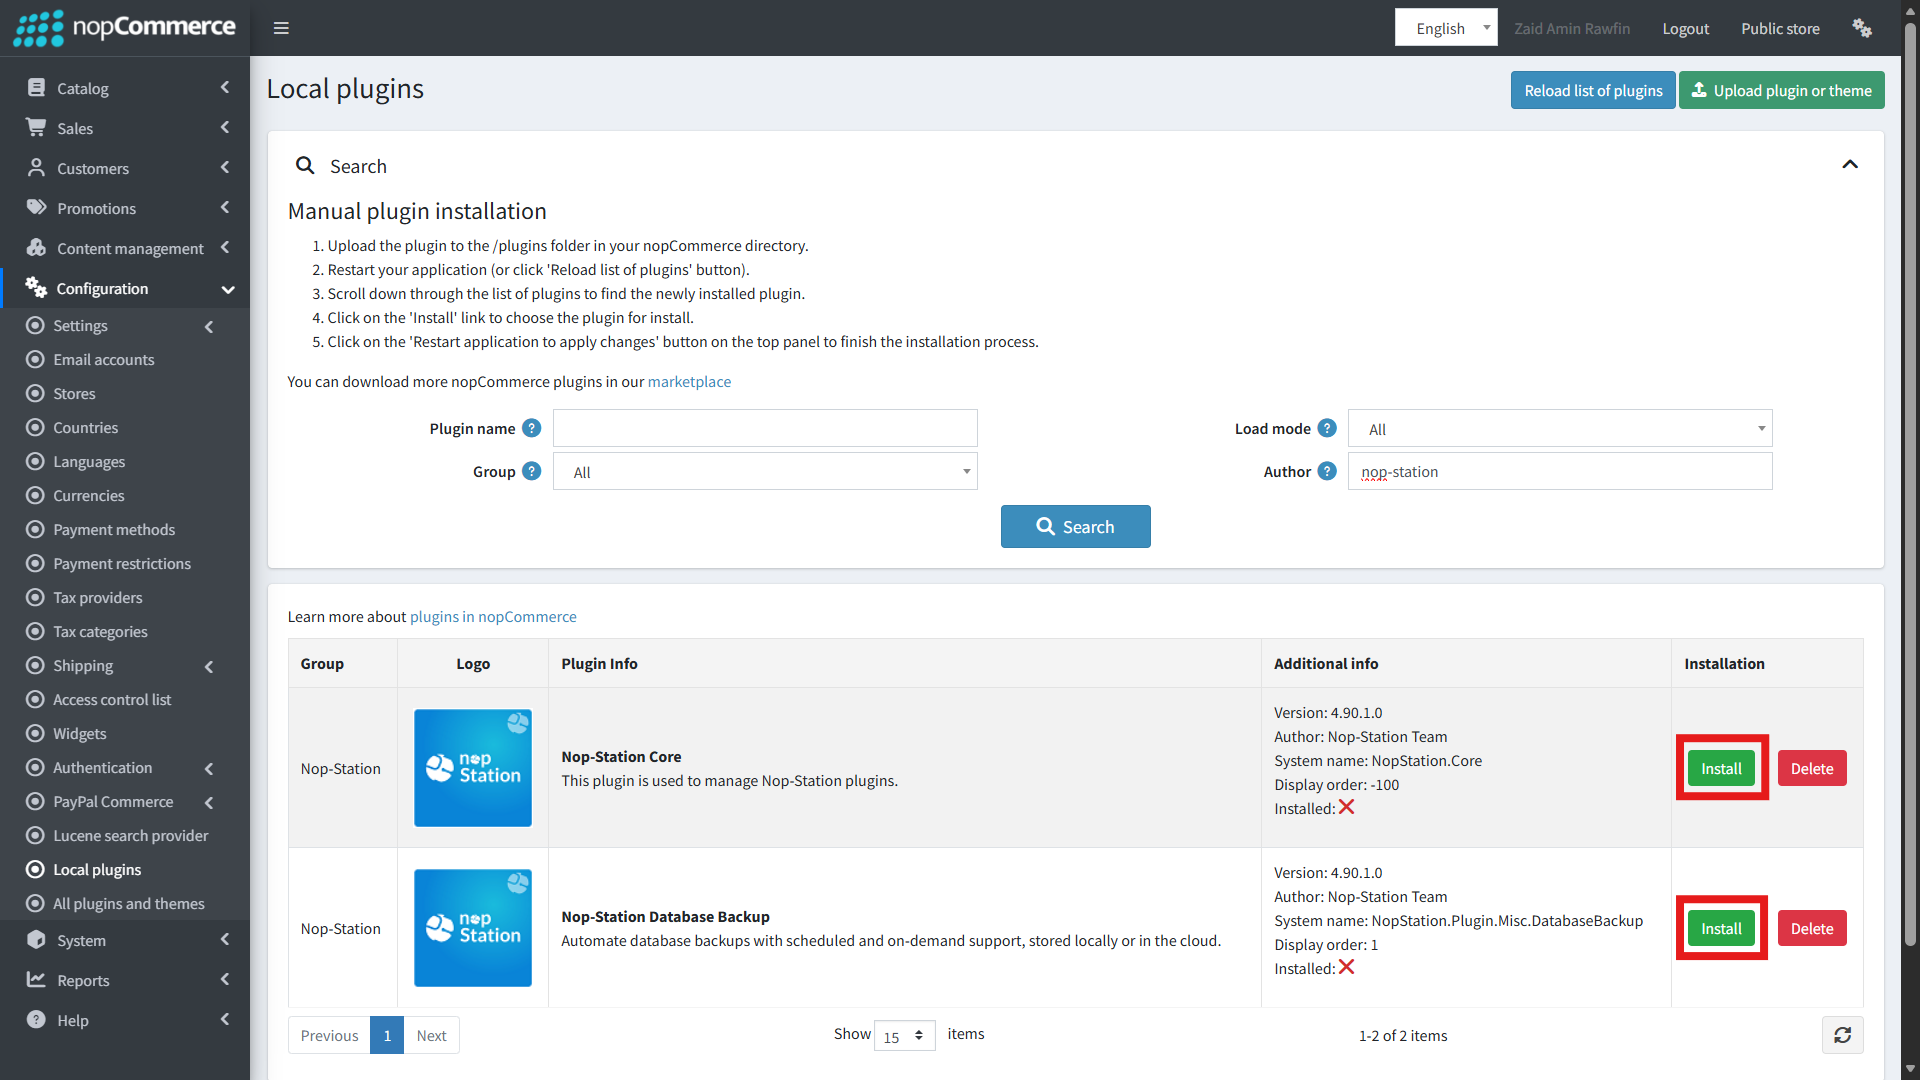
- To make the plugin functional, restart the application
- Enable the plugin with the 'Edit' option and Configure it
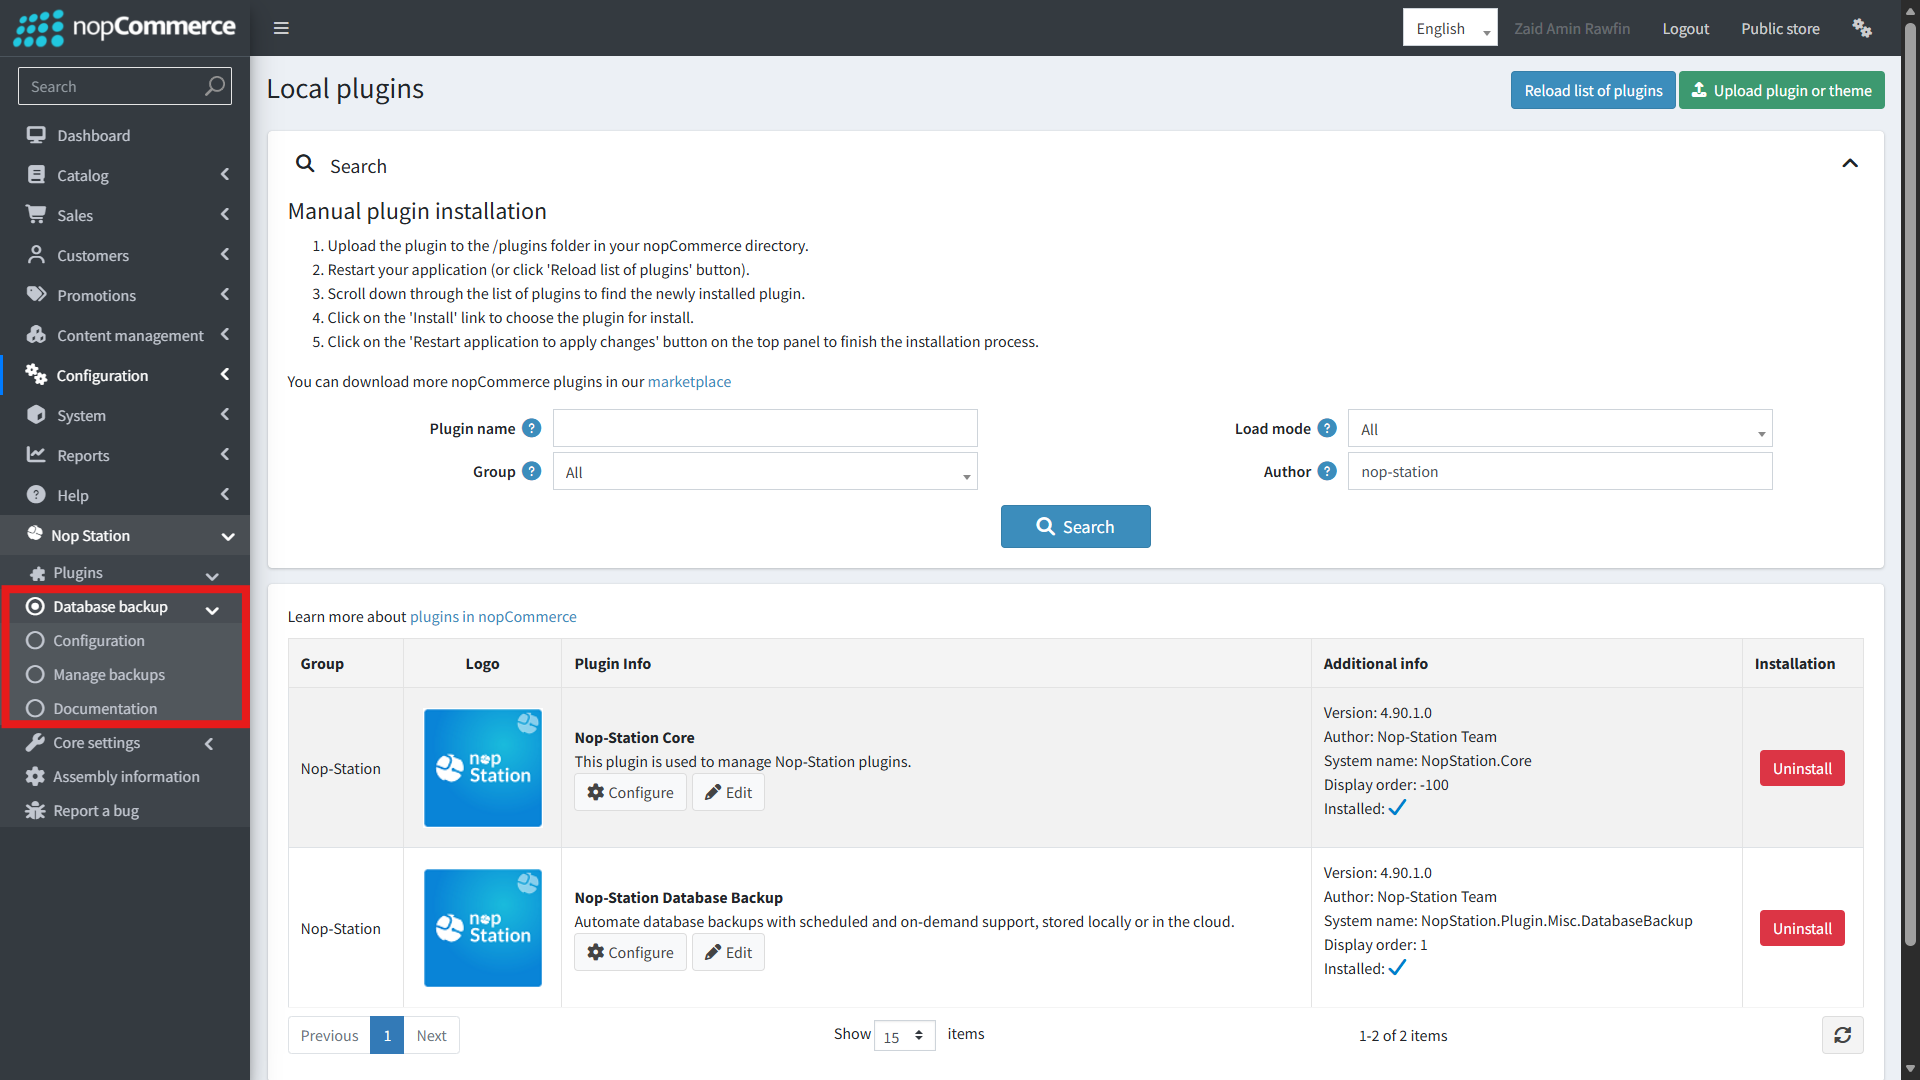
After successful installation, you should see a new "Database backup" menu under Nop Station in the admin sidebar with two sub-menus: Configuration and Manage backups.
CONFIGURATION
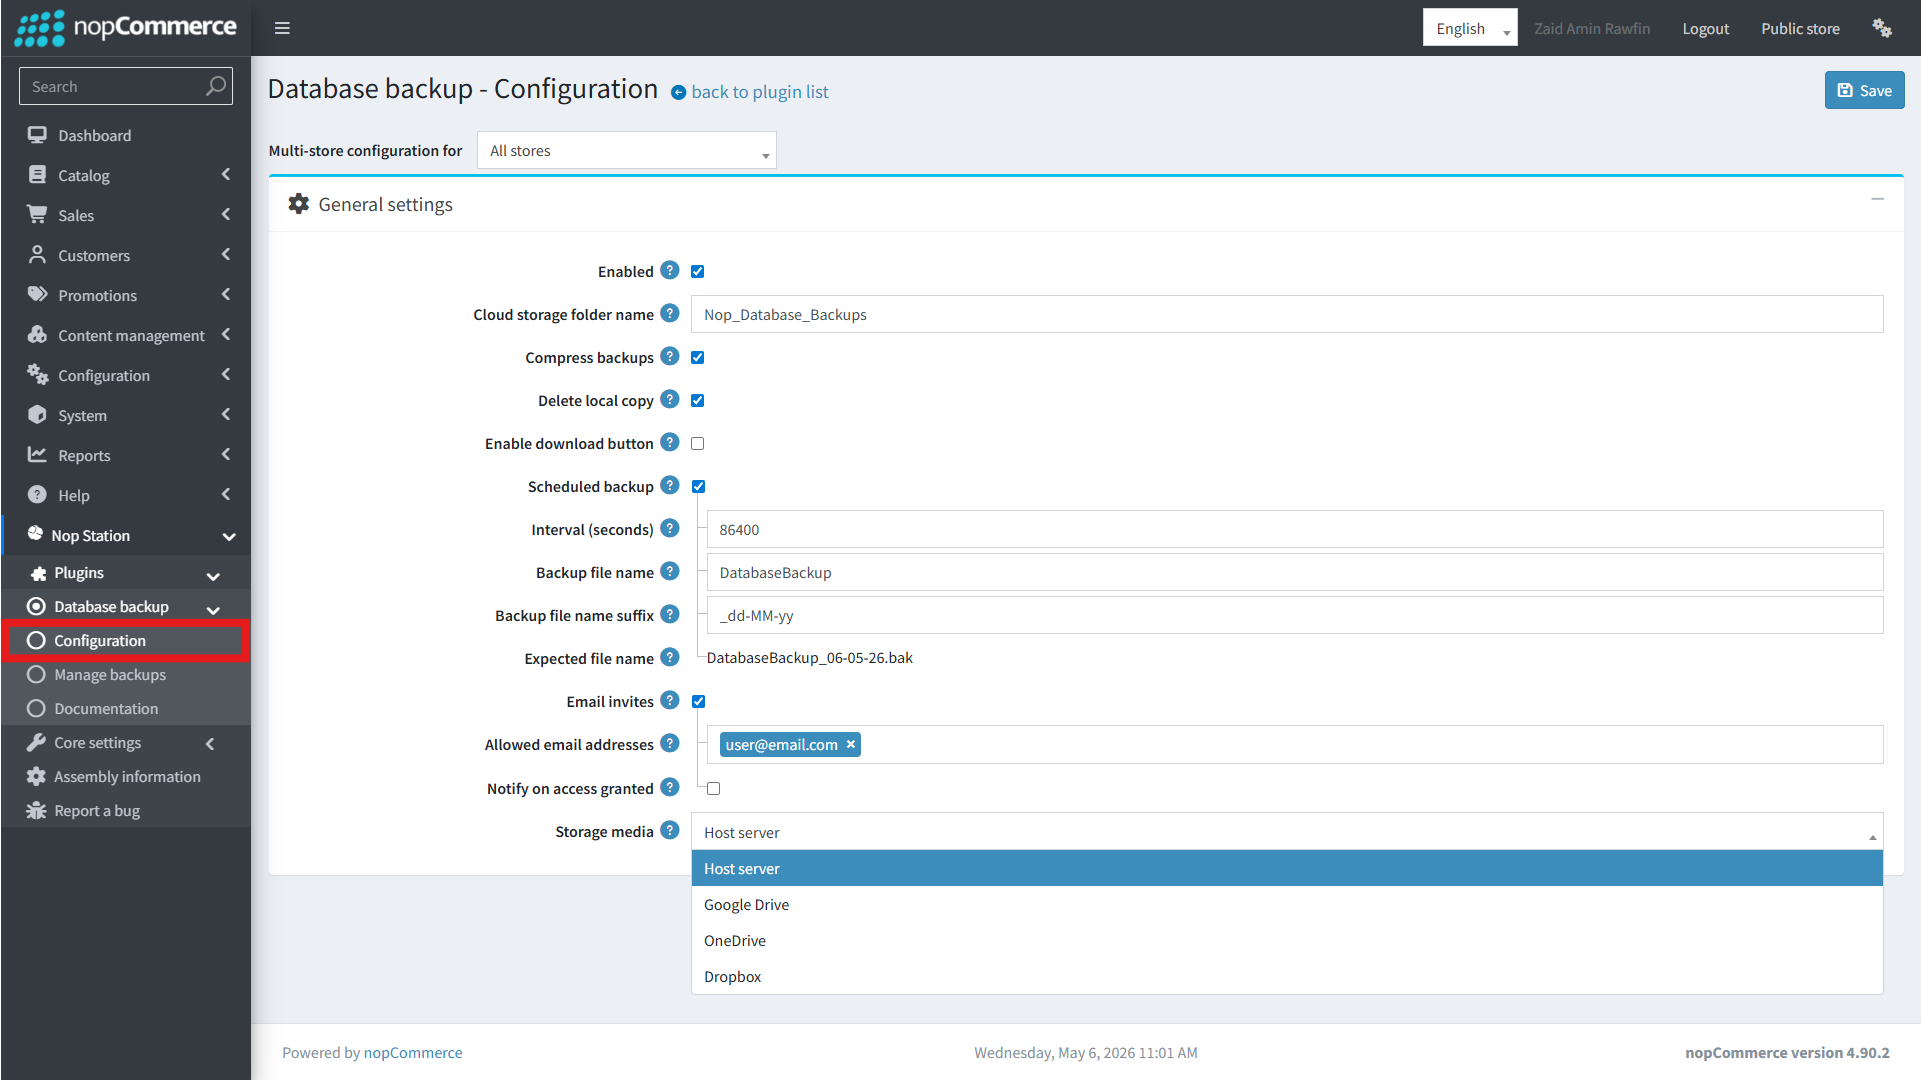
Go to Admin → Nop Station → Database backup → Configuration to access the plugin settings.
General settings
- Enabled: Enable or disable the database backup plugin. When disabled, all backup operations (manual and scheduled) are suspended and the Manage backups page will display an informational notice
- Cloud storage folder name: The name of the folder in your cloud storage where backup files will be saved. The folder is created automatically if it does not exist. Default value is Nop_Database_Backups
- Compress backups: When enabled, backup files are compressed before being uploaded to cloud storage. This reduces file size and upload time
- Delete local copy: Automatically remove the local backup file from the server after it has been successfully uploaded to cloud storage
- Enable download button: Display a download button alongside each file in the backup list on the Manage backups page, allowing admins to download backup files directly
Scheduled backup
- Scheduled backup: Enable or disable automatic scheduled backups. When enabled, the plugin will create backups at the configured interval automatically
- Interval (seconds): The number of seconds between each scheduled backup. The minimum interval is 1,800 seconds (30 minutes) and the maximum is 2,147,483 seconds
- Backup file name: The base file name applied when creating a new backup (e.g., DatabaseBackup)
- Backup file name suffix: A .NET date format string appended to the file name. For example, _dd-MM-yy produces a file name like DatabaseBackup_11-12-25.bak
- Expected file name: A read-only preview showing how the backup file name will appear based on the configured base name and suffix
Storage media
- Storage media: Select the destination where backup files will be stored. Available options are:
- Host server — stores backups on the local web server
- Google Drive — stores backups in your authorized Google Drive account
- OneDrive — stores backups in your authorized OneDrive account
- Dropbox — stores backups in your authorized Dropbox account
When you select a cloud storage option, the corresponding authorization panel (Google Drive, OneDrive, or Dropbox) will appear below. You must complete the authorization steps before backups can be saved to that provider.
Email invites
The Email invites section is visible only when a cloud storage provider is selected (not Host server).
- Email invites: When enabled, viewer access is granted to uploaded backup files for the specified email addresses
- Allowed email addresses: A comma-separated list of email addresses permitted to view backup files in the cloud storage
- Notify on access granted: When enabled, an email notification is automatically sent to the allowed email addresses when access to a backup file is granted
Click the Save button at the top of the page to save your configuration changes.
USING HOST SERVER STORAGE
The Host server option stores backup files directly on your web server. This is the simplest option and requires no external account setup.
- Go to Admin → Nop Station → Database backup → Configuration
- Set the Storage media to Host server
- Click Save
Backup files will be saved to the server's local file system. You can view and manage these files from the Manage backups page.
MANAGING BACKUPS
Go to Admin → Nop Station → Database backup → Manage backups to view and manage all backup files.
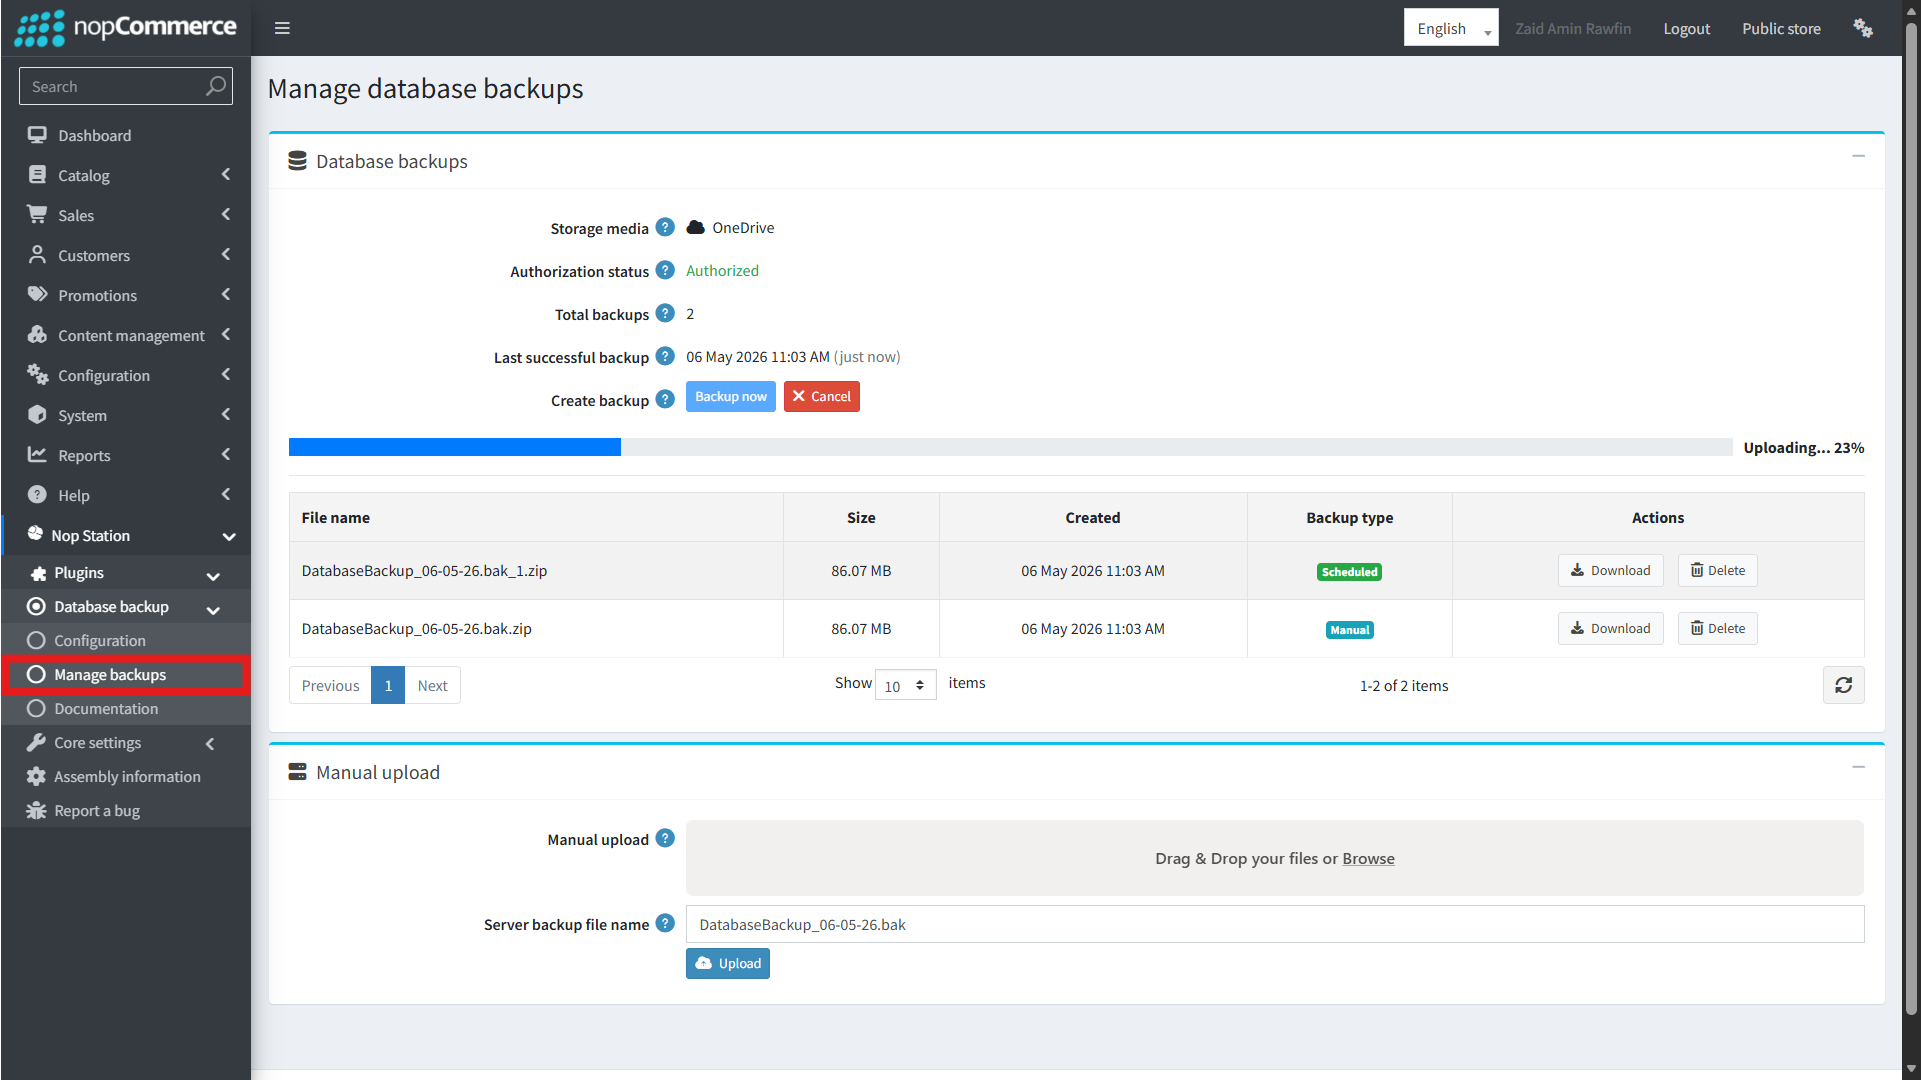
Summary information
At the top of the backup files panel, you will see a summary section displaying:
- Storage media: The currently configured backup storage destination
- Authorization status: The authorization status for the selected cloud storage provider (shown only for cloud storage options)
- Total backups: The total number of backup files in the selected storage
- Last successful backup: The date and time of the most recent successful backup
Creating a backup
- Click the "Backup now" button to immediately initiate a new database backup
- A real-time progress bar will appear showing the backup status (backing up database, compressing, uploading)
- Once complete, a success notification will appear and the new backup file will be listed in the data table
Backup files table
The data table displays the following columns for each backup file:
- File name: The name of the backup file
- Size: The file size
- Created: The date and time the backup was created
- Backup type: Indicates whether the backup was created manually, by the scheduler, or was uploaded
- Actions: Available actions including Download (if enabled) and Delete
Manual upload
You can manually upload backup files to your selected storage media in two ways:
- Drag & Drop upload: In the "Manual upload" panel, drag and drop a backup file or click Browse to select a file from your computer. The file will be uploaded directly to the configured storage
- Upload from server: If you have backup files already on the server, use the "Upload from server" section. Enter the file name of an existing backup file in the server's backup folder and click Upload to transfer it to the cloud storage
Downloading backups
If the "Enable download button" option is turned on in the configuration, a Download button will appear next to each backup file in the data table. Click it to download the file directly to your computer.
Deleting backups
Click the Delete button next to any backup file to permanently remove it from the storage. A confirmation dialog will appear before the file is deleted.
SETTING UP GOOGLE DRIVE
To use Google Drive as your backup storage, you need to create a Google Cloud project and configure OAuth 2.0 credentials. Follow these steps:

Step 1: Create a Google Cloud project
- Go to the Google Cloud Console
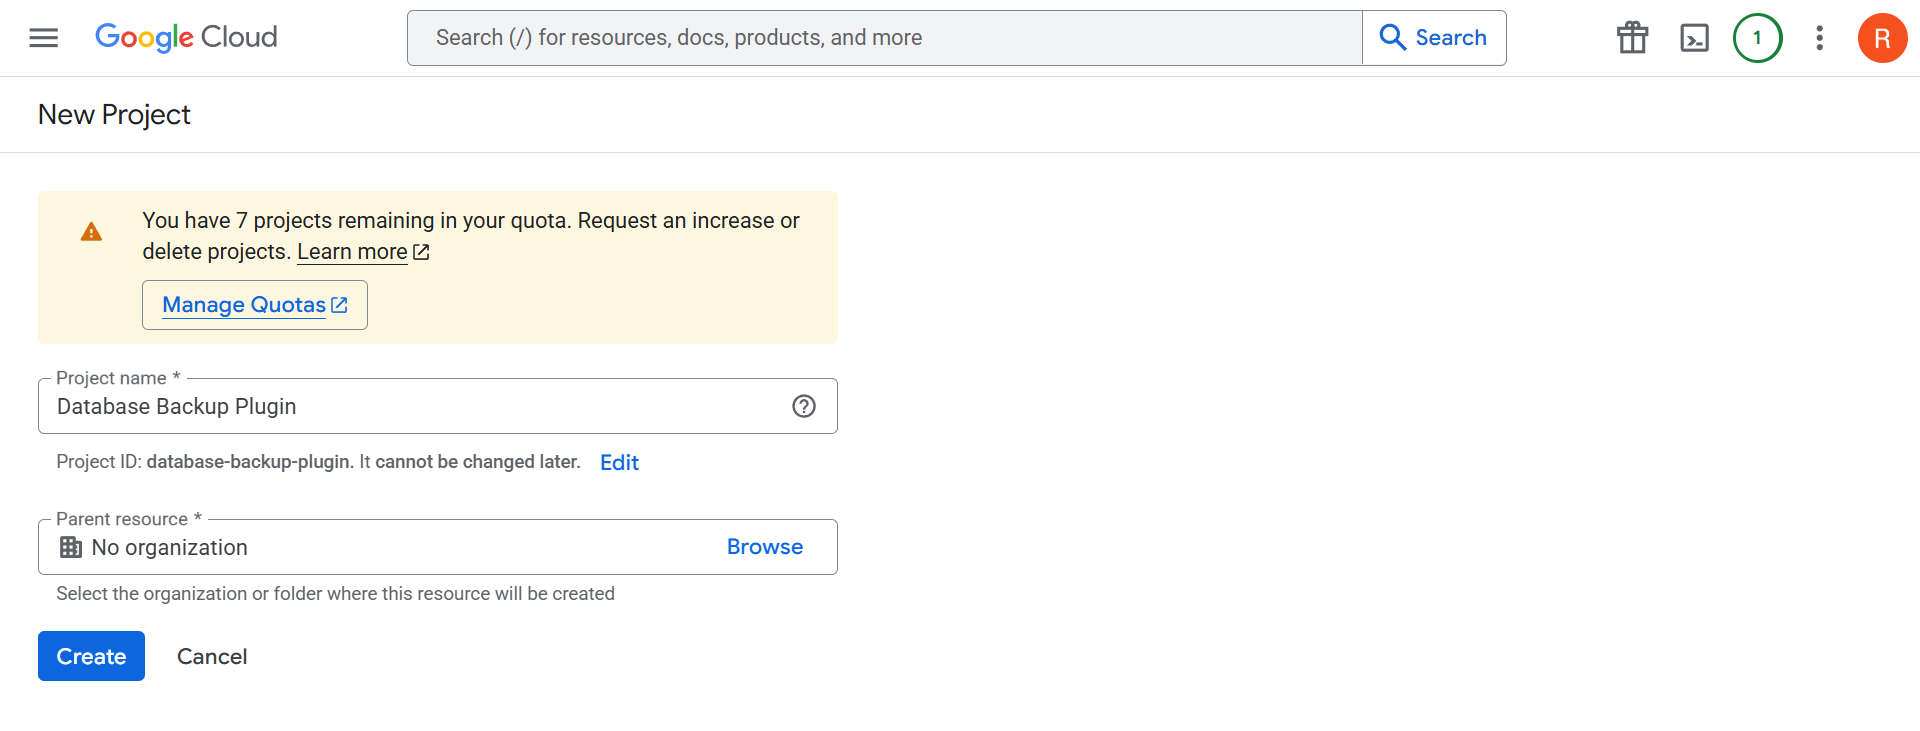
- Click the project dropdown at the top of the page and select "New Project"
- Enter a project name (e.g., NopCommerce Backup) and click Create
Step 2: Enable the Google Drive API
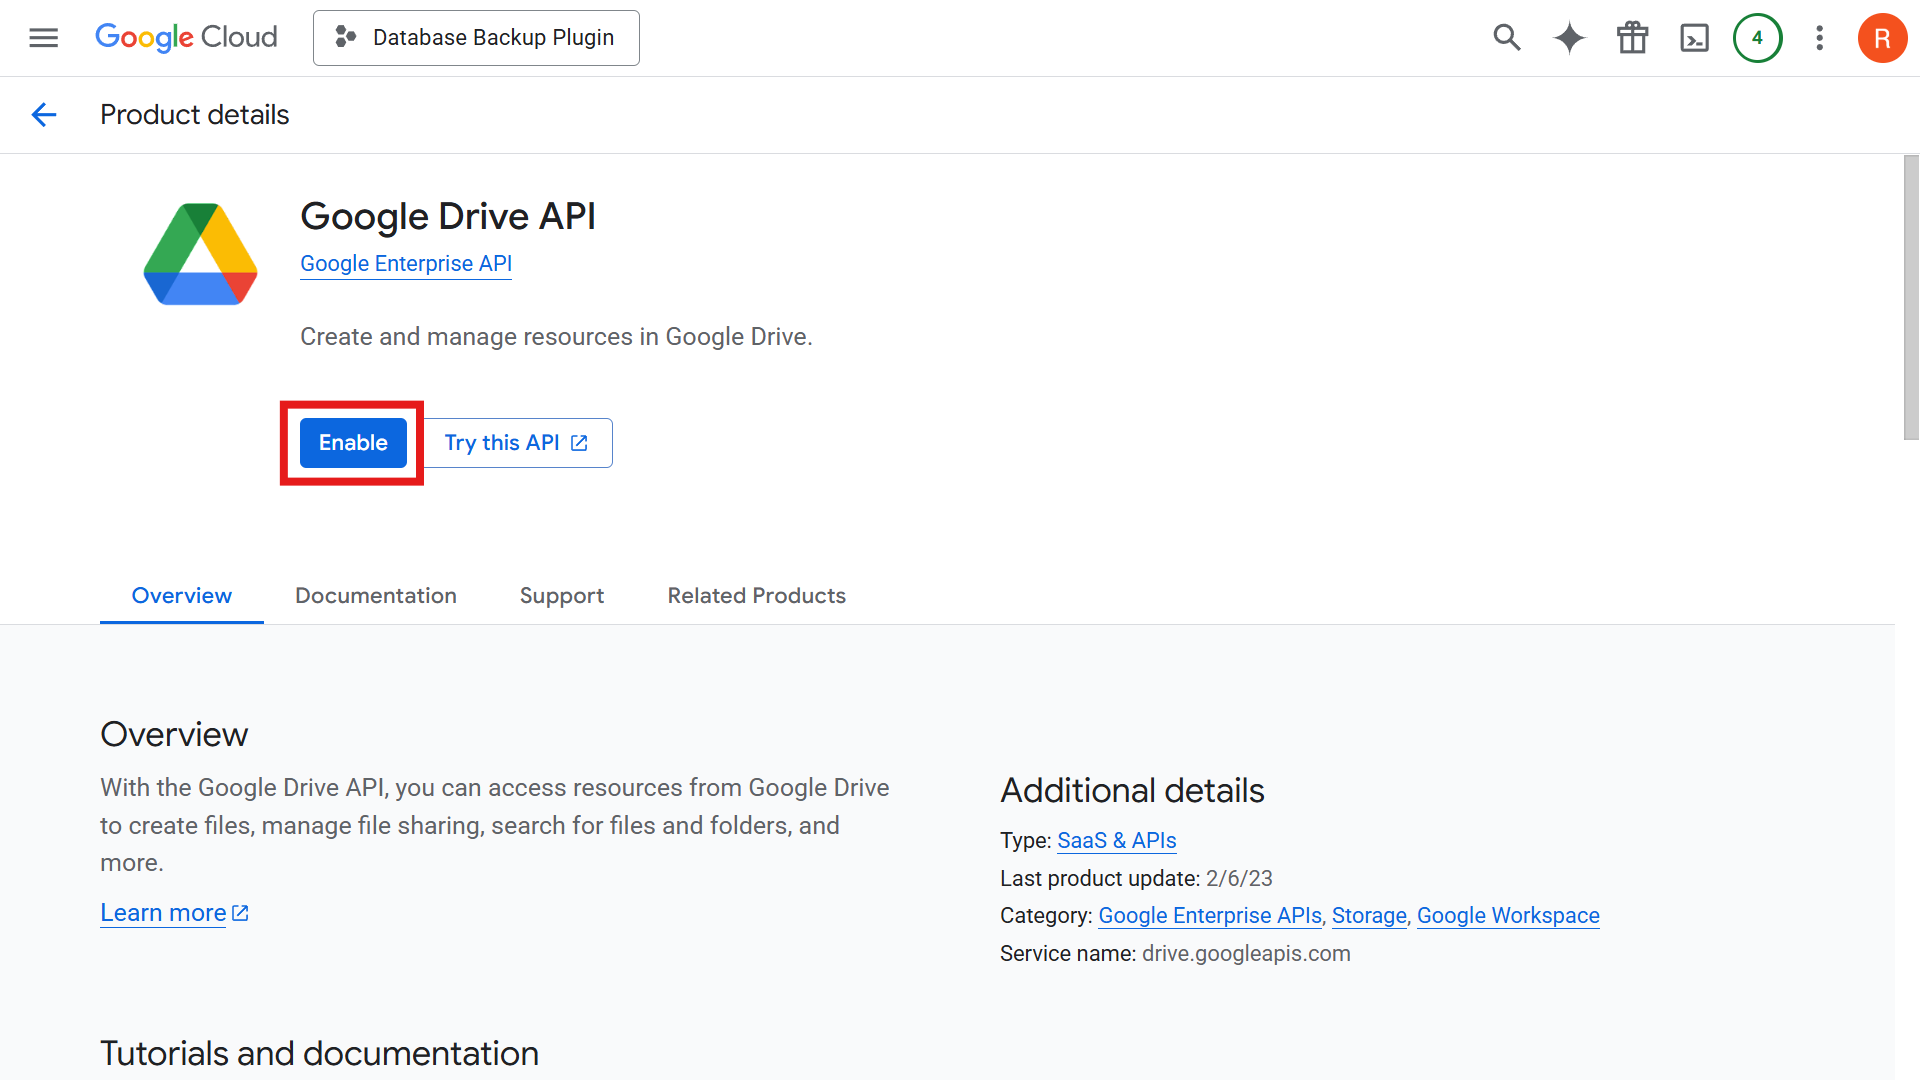
- In your new project, go to APIs & Services → Library
- Search for "Google Drive API"
- Click on it and then click Enable
Step 3: Configure the OAuth consent screen
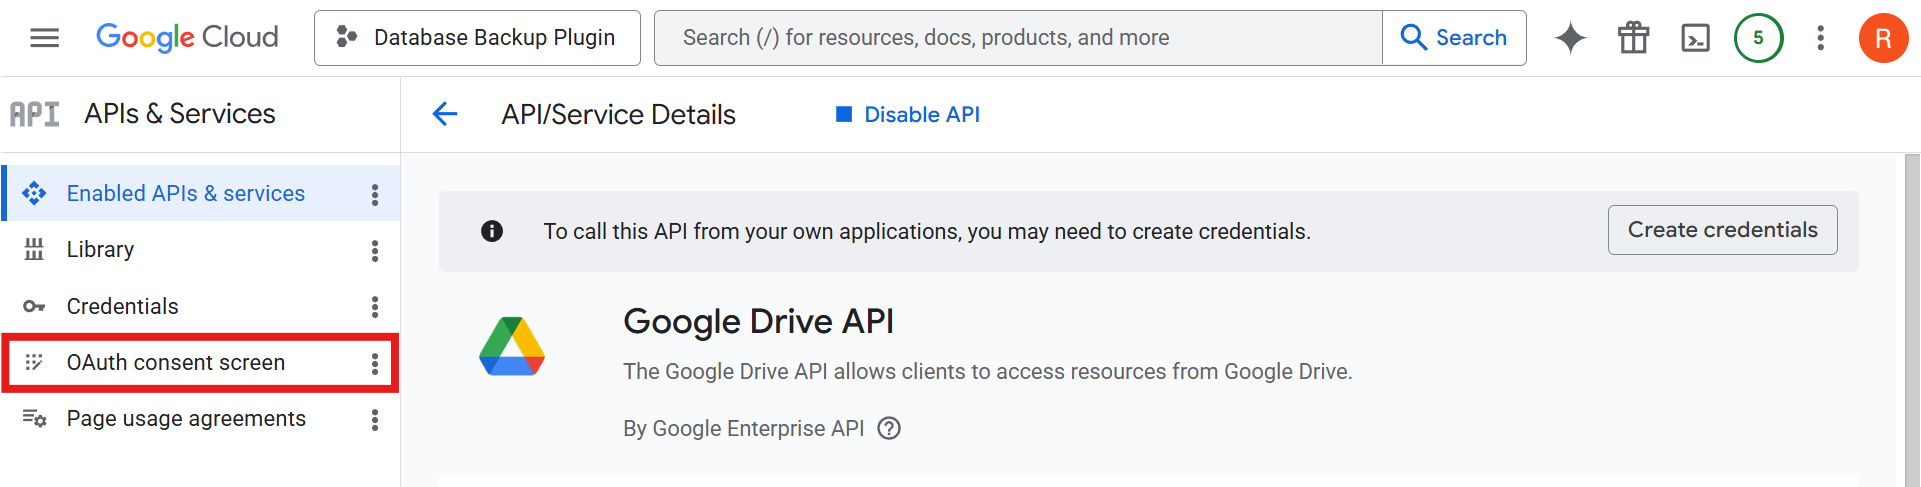
- Go to APIs & Services → OAuth consent screen
- Click Get Started
- Fill out the required app information (App name, User support email, etc.)
- Complete the configuration steps as prompted
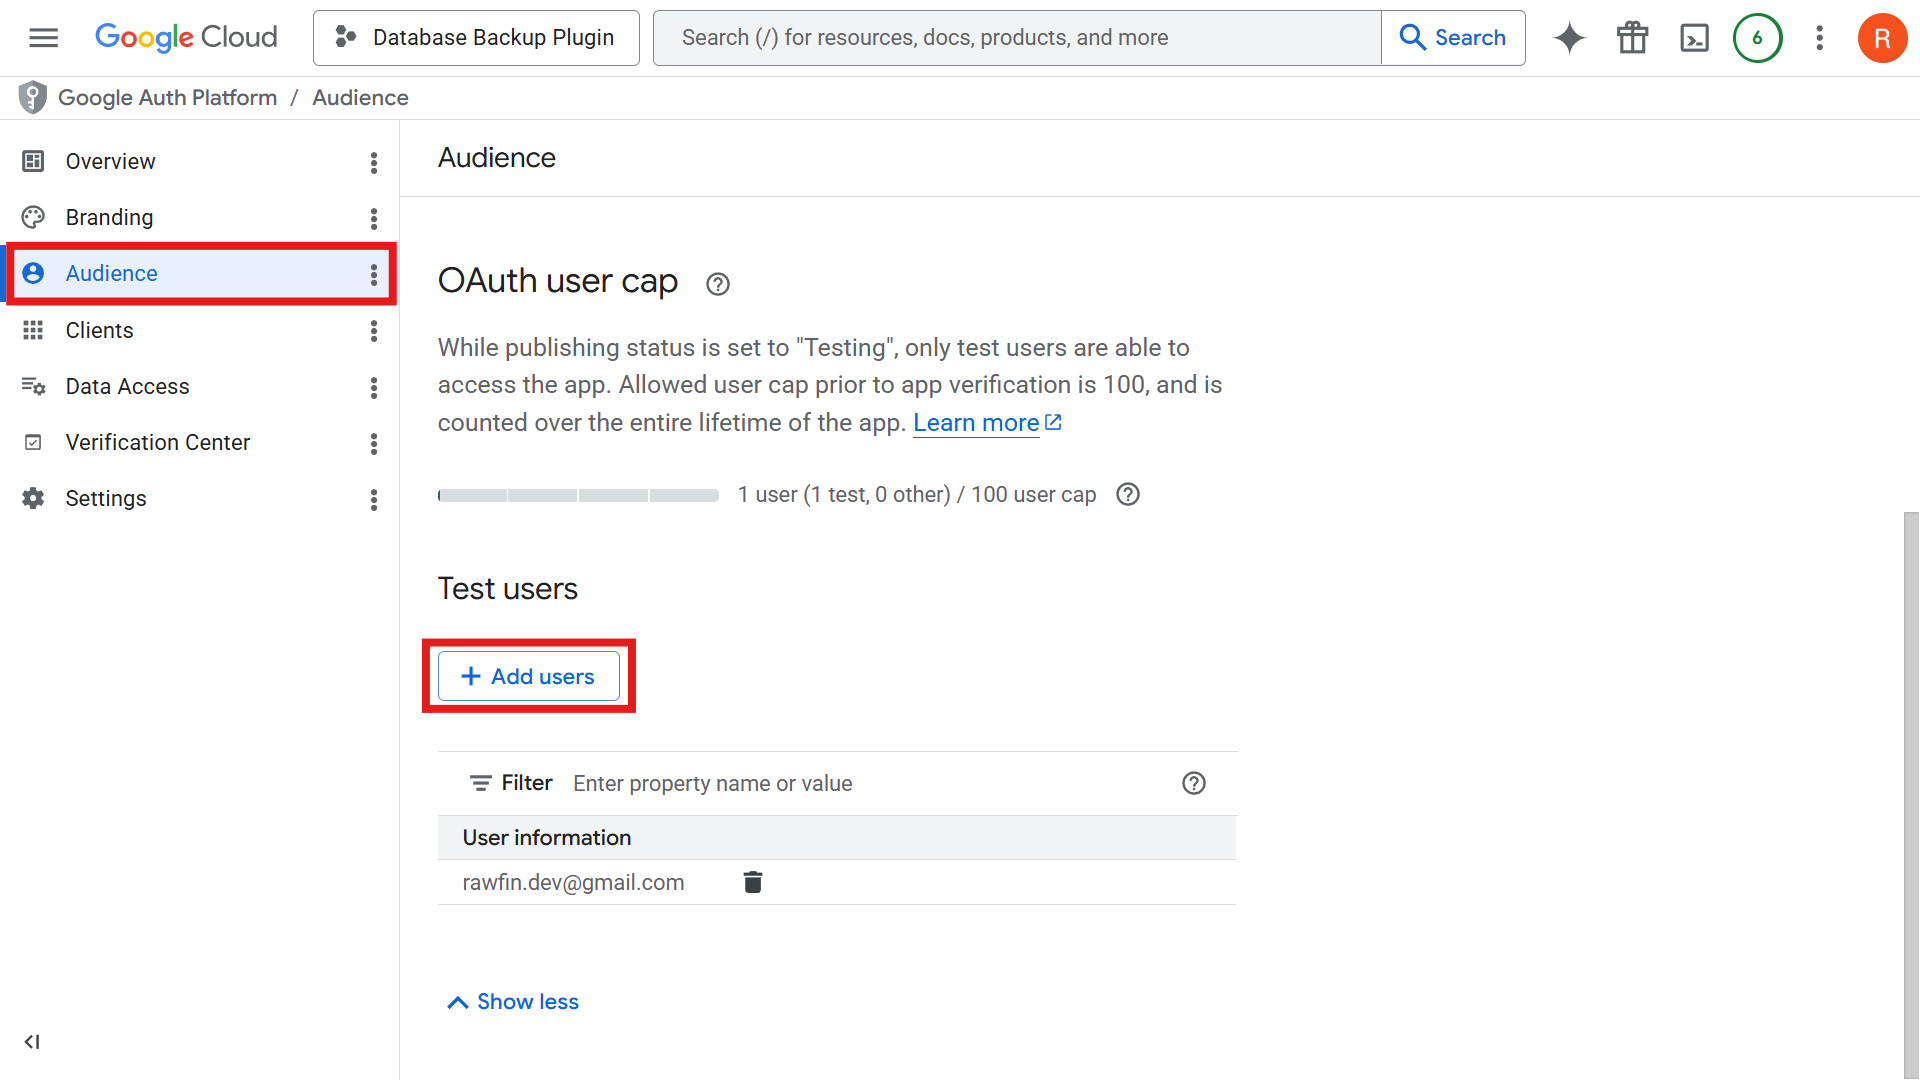
Step 4: Add test users
- Go to the Audience section in the OAuth consent screen
- Add the Gmail address of the Google account whose Google Drive you will be using to store backup files
- For production use, you may publish the app to skip this step
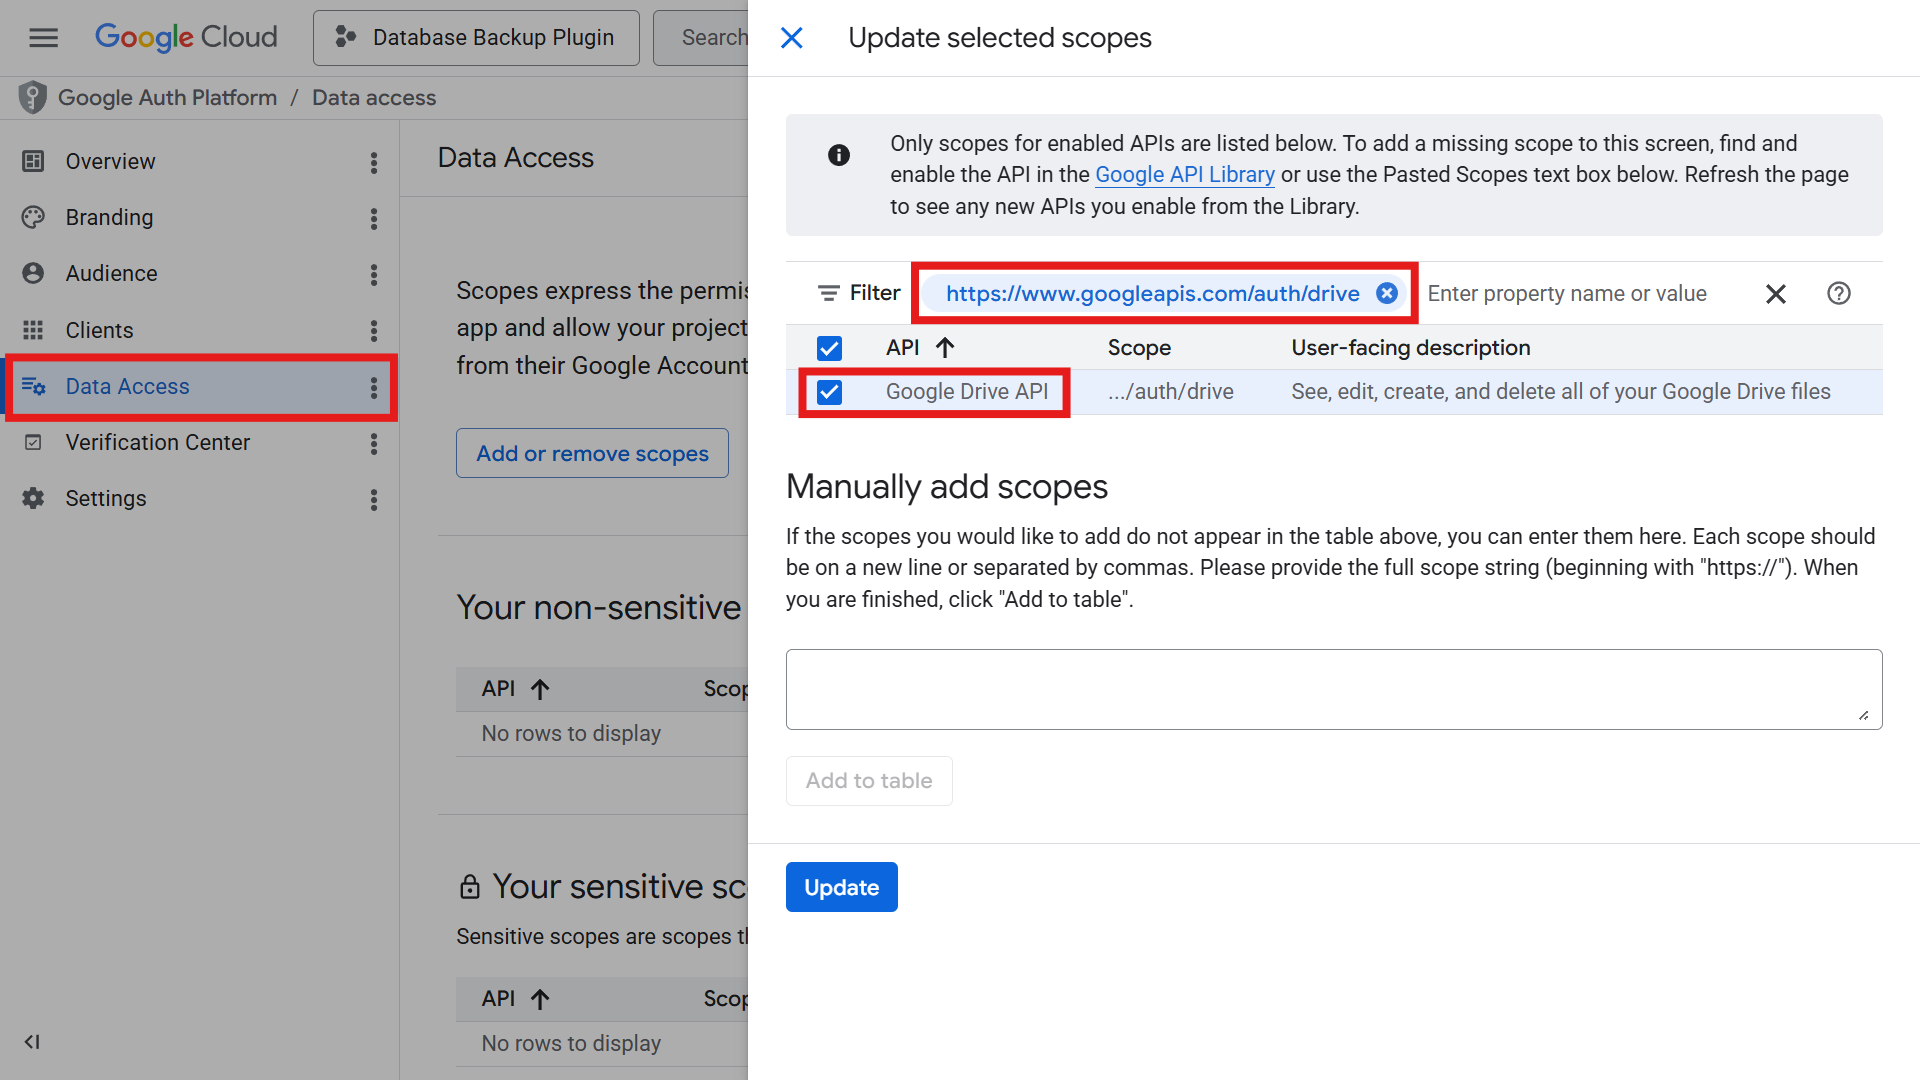
Step 5: Configure data access scopes
- Go to Data Access (or Add or remove scopes)
- Search for auth/drive
- Enable it and save the changes
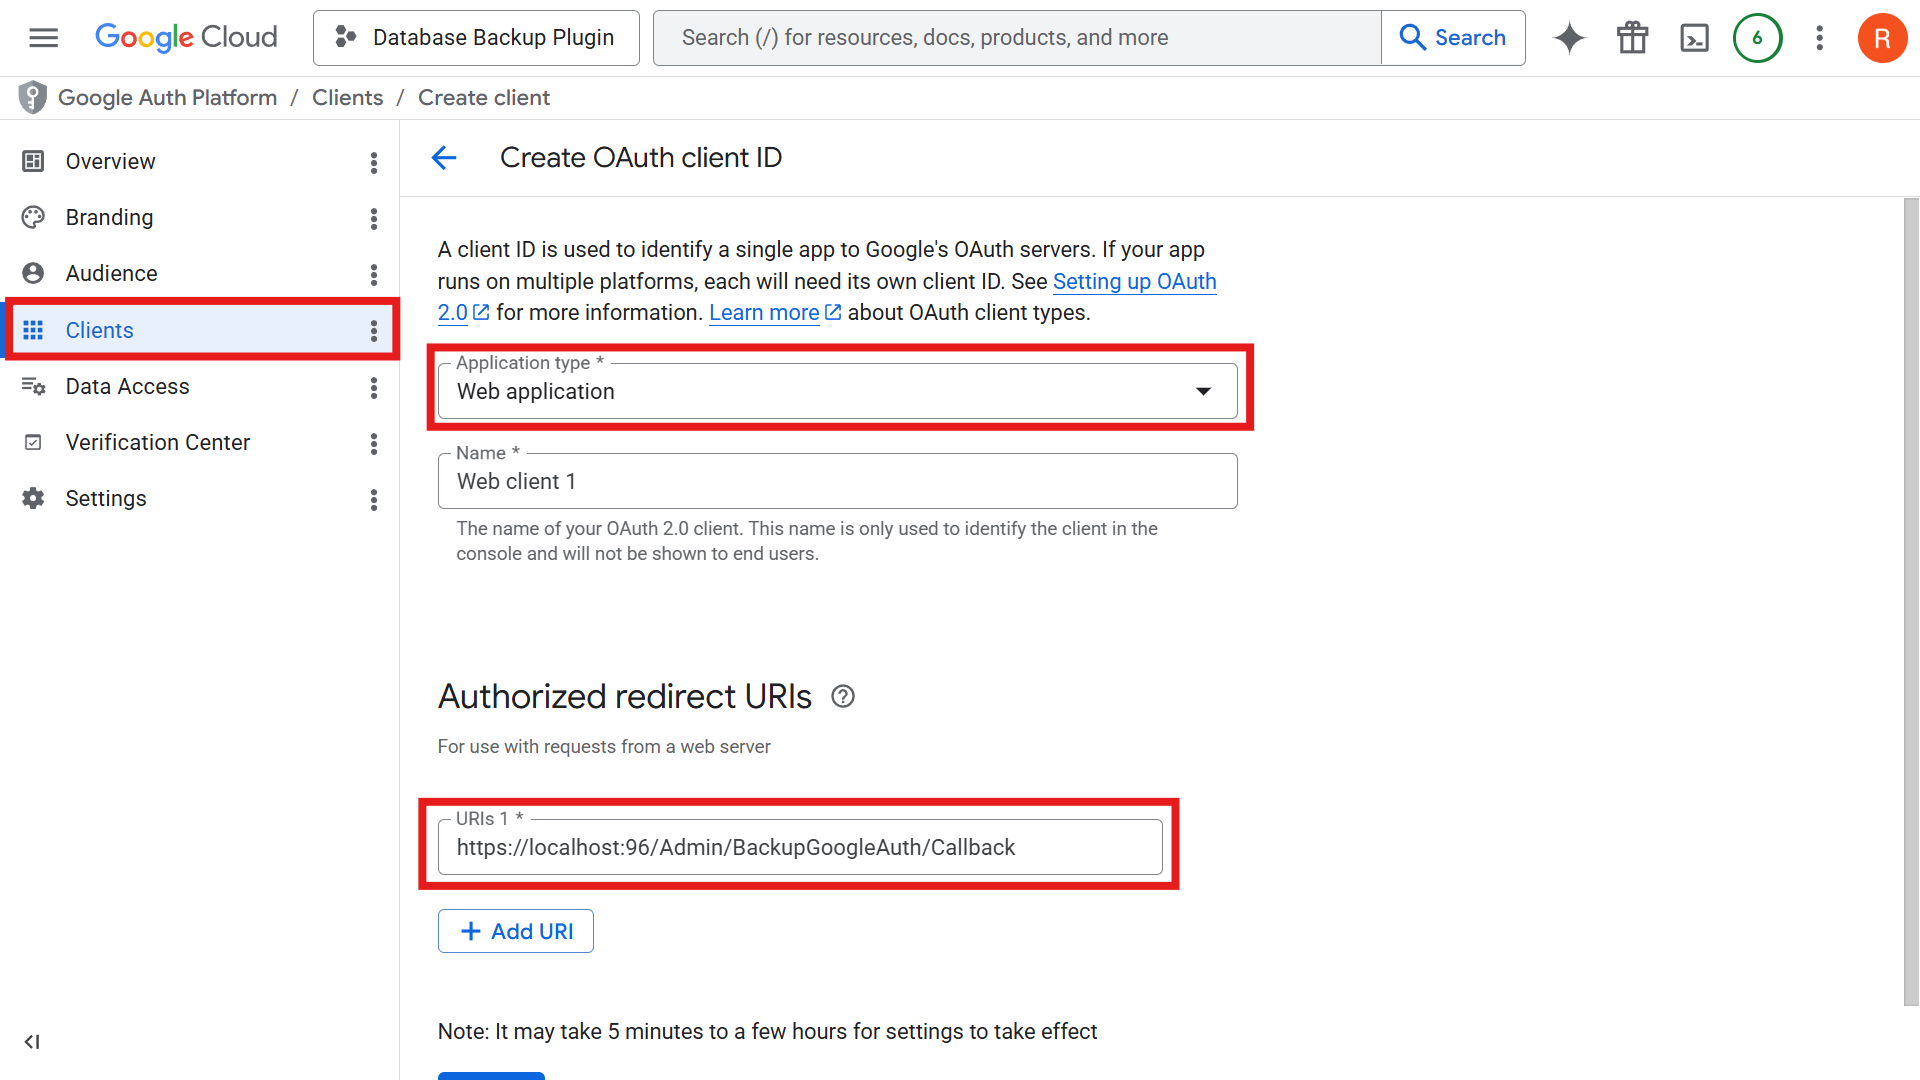
Step 6: Create OAuth 2.0 credentials
- Go to Clients (under the OAuth consent screen section) and click Create Client, or go to APIs & Services → Credentials → + Create Credentials → OAuth 2.0 Client ID
- Select Web application as the application type
- Under Authorized redirect URIs, paste the Redirect URI displayed in the plugin's Google Drive configuration panel
- Click Create
Step 7: Configure the plugin
- Copy the generated Client ID and Client Secret from the Google Cloud Console
- Go to Admin → Nop Station → Database backup → Configuration
- Set the Storage media to Google Drive
- The Google Drive panel will appear — paste the Client ID and Client Secret into the corresponding fields
- Click the Authorize button
Step 8: Authorize your Google account
- After clicking Authorize, a Google sign-in window will open
- Select the Google account that you added as a test user (or any account if the app is published)
- Grant the requested permissions
- You will be redirected back to the plugin — a success notification will confirm that Google Drive is authorized
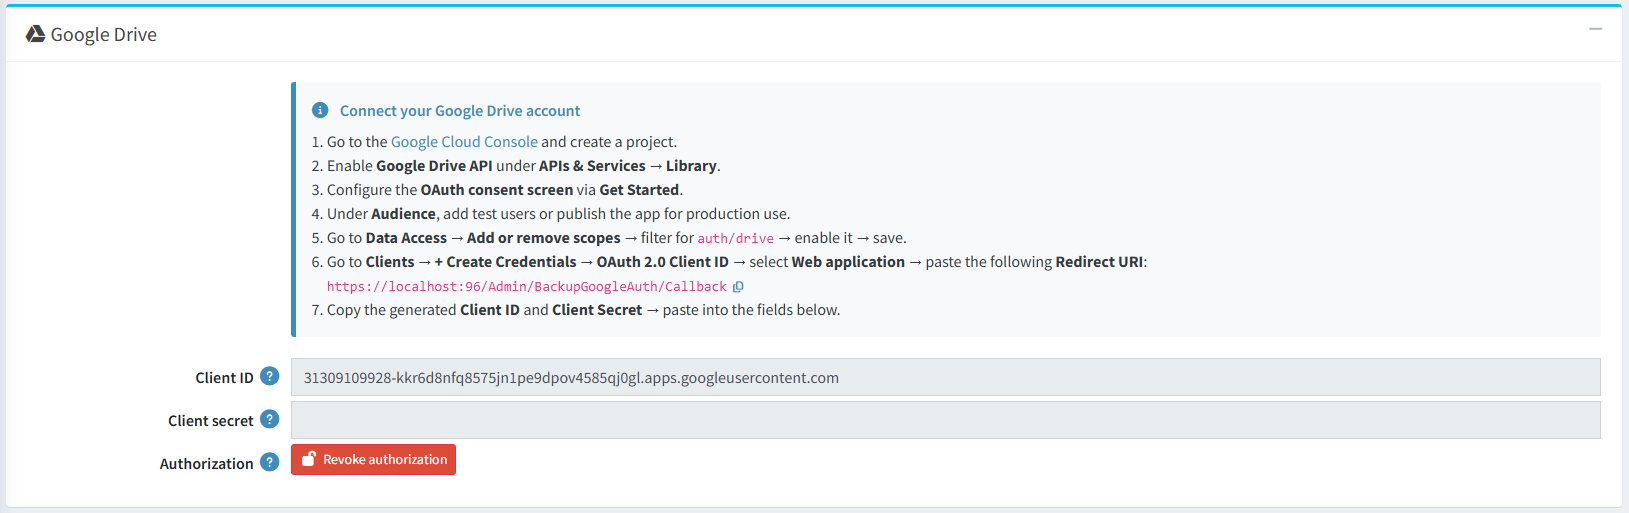
Your backups will now be automatically saved to your Google Drive account in the configured folder.
SETTING UP ONEDRIVE
To use OneDrive as your backup storage, you need to register an application in the Azure Portal. Follow these steps:
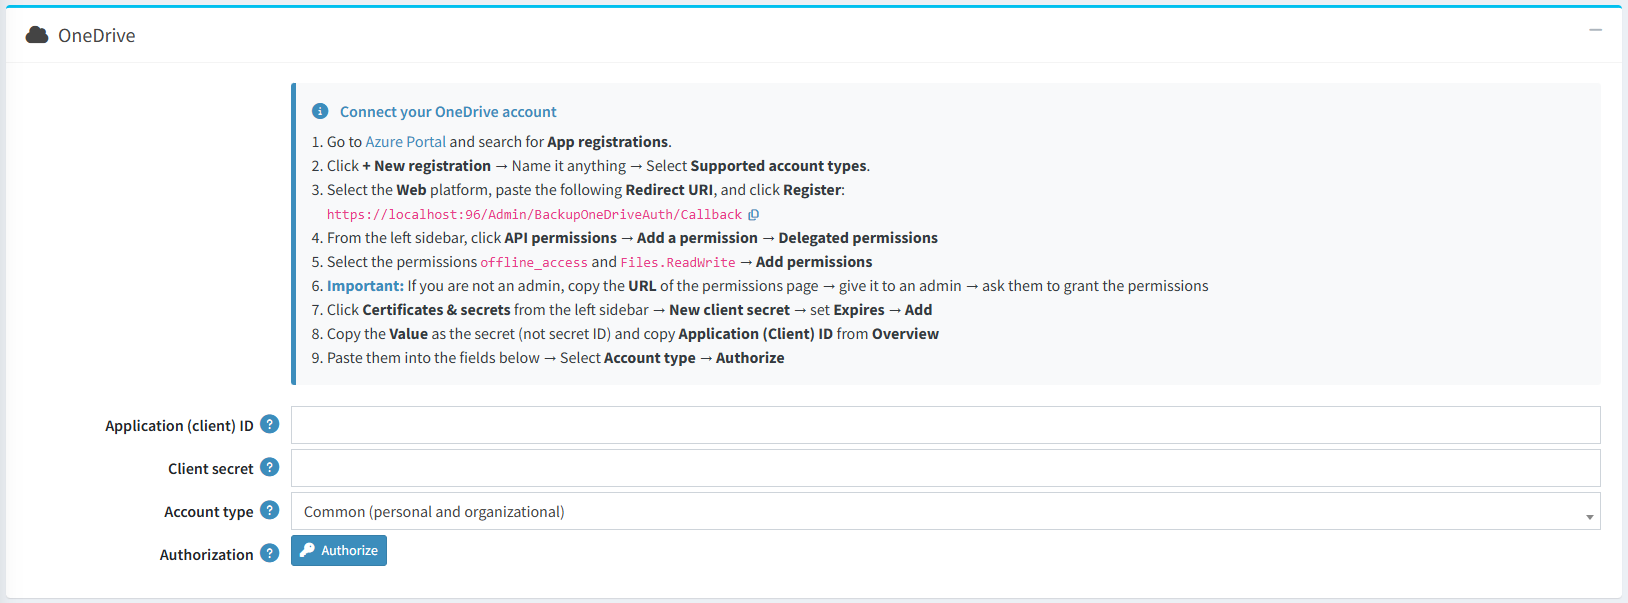
Step 1: Register an app in Azure Portal
- Go to the Azure Portal
- Search for "App registrations" in the top search bar
- Click "+ New registration"
- Enter a name for the app (e.g., NopCommerce Backup)
- Under Supported account types, select the appropriate option based on your organization
- Under Redirect URI, select Web as the platform and paste the Redirect URI displayed in the plugin's OneDrive configuration panel
- Click Register

Step 2: Configure API permissions
- From the left sidebar of your registered app, click API permissions
- Click Add a permission
- Select Microsoft Graph
- Choose Delegated permissions
- Search for and select the following permissions:
- offline_access
- Files.ReadWrite
- Click Add permissions

Step 3: Grant admin consent (if required)
- Important: If you are not a tenant admin, copy the URL of the API permissions page and send it to one of your tenant admins
- Ask the admin to click "Grant admin consent" for the configured permissions
- The permissions status should show a green checkmark indicating consent has been granted

Step 4: Create a client secret
- From the left sidebar, click Certificates & secrets
- Click "New client secret"
- Enter a description and set an expiry period
- Click Add
- Important: Copy the Value immediately — this is your client secret. Do not copy the "Secret ID" — you need the Value column

Step 5: Copy the Application (Client) ID
- Go to the Overview page of your registered app
- Copy the Application (client) ID value

Step 6: Configure the plugin
- Go to Admin → Nop Station → Database backup → Configuration
- Set the Storage media to OneDrive
- The OneDrive panel will appear — paste the Application (client) ID and Client secret (the value you copied) into the corresponding fields
- Select the appropriate Account type:
- Common — supports both personal and organizational accounts
- Organizations only — work or school accounts only
- Consumers only — personal Microsoft accounts only
- Click the Authorize button
Step 7: Authorize your Microsoft account
- After clicking Authorize, a Microsoft sign-in window will open
- Sign in with your Microsoft account and grant the requested permissions
- You will be redirected back to the plugin — a success notification will confirm that OneDrive is authorized

Your backups will now be automatically saved to your OneDrive account in the configured folder.
SETTING UP DROPBOX
To use Dropbox as your backup storage, you need to create an app in the Dropbox App Console. Follow these steps:

Step 1: Create a Dropbox app
- Go to the Dropbox App Console
- Click "Create app"
- Select "Scoped access"
- Choose the access type:
- App folder — the app can only access a single folder in your Dropbox
- Full Dropbox — the app can access all files and folders in your Dropbox
- Enter an app name and click "Create app"

Step 2: Configure permissions
- After creating the app, go to the Permissions tab
- Enable the following permissions:
- files.metadata.read
- files.content.write
- files.content.read
- sharing.write (only required if you are using the email invites feature)
- Click "Submit" to save the permissions
Note: You must submit the permissions before authorizing the app in the plugin. If permissions are changed after authorization, you will need to revoke and re-authorize.

Step 3: Add the redirect URI
- Go to the Settings tab of your Dropbox app
- Scroll down to the OAuth 2 section
- Under Redirect URIs, paste the Redirect URI displayed in the plugin's Dropbox configuration panel
- Click Add

Step 4: Copy the app key and app secret
- On the Settings tab, locate the App key and App secret fields
- Click "Show" to reveal the App secret if it is hidden
- Copy both values
Step 5: Configure the plugin
- Go to Admin → Nop Station → Database backup → Configuration
- Set the Storage media to Dropbox
- The Dropbox panel will appear — paste the App key and App secret into the corresponding fields
- Click the Authorize button
Step 6: Authorize your Dropbox account
- After clicking Authorize, a Dropbox sign-in window will open
- Sign in with your Dropbox account and allow the requested access
- You will be redirected back to the plugin — a success notification will confirm that Dropbox is authorized

Your backups will now be automatically saved to your Dropbox account in the configured folder.
REVOKING AUTHORIZATION
If you need to disconnect a cloud storage provider or switch to a different account, you can revoke the authorization:
- Go to Admin → Nop Station → Database backup → Configuration
- Set the Storage media to the cloud provider you want to disconnect
- In the provider's panel, click the "Revoke authorization" button
- Confirm the action in the dialog that appears
- The provider will return to an unauthorized state, and you can re-authorize with the same or a different account
Note: Revoking authorization will stop cloud backups until a new account is authorized. Existing backup files in the cloud will not be deleted.