
The Sendcloud Shipping Plugin for nopCommerce provides an enterprise-grade, multi-carrier shipping integration between nopCommerce 4.90 and Sendcloud, Europe's leading shipping aggregator. It connects your store to 80+ parcel carriers — including PostNL, DHL, DPD, UPS, FedEx, and GLS — under a single contract or your own direct carrier agreements, eliminating the need to install and maintain standalone carrier plugins.
PRE-REQUISITES
- This plugin requires the Nop-Station Core plugin to be installed and enabled.
INSTALLATION
- Download the Sendcloud Shipping Plugin from our store.
- Go to Administration → Configuration → Local plugins.
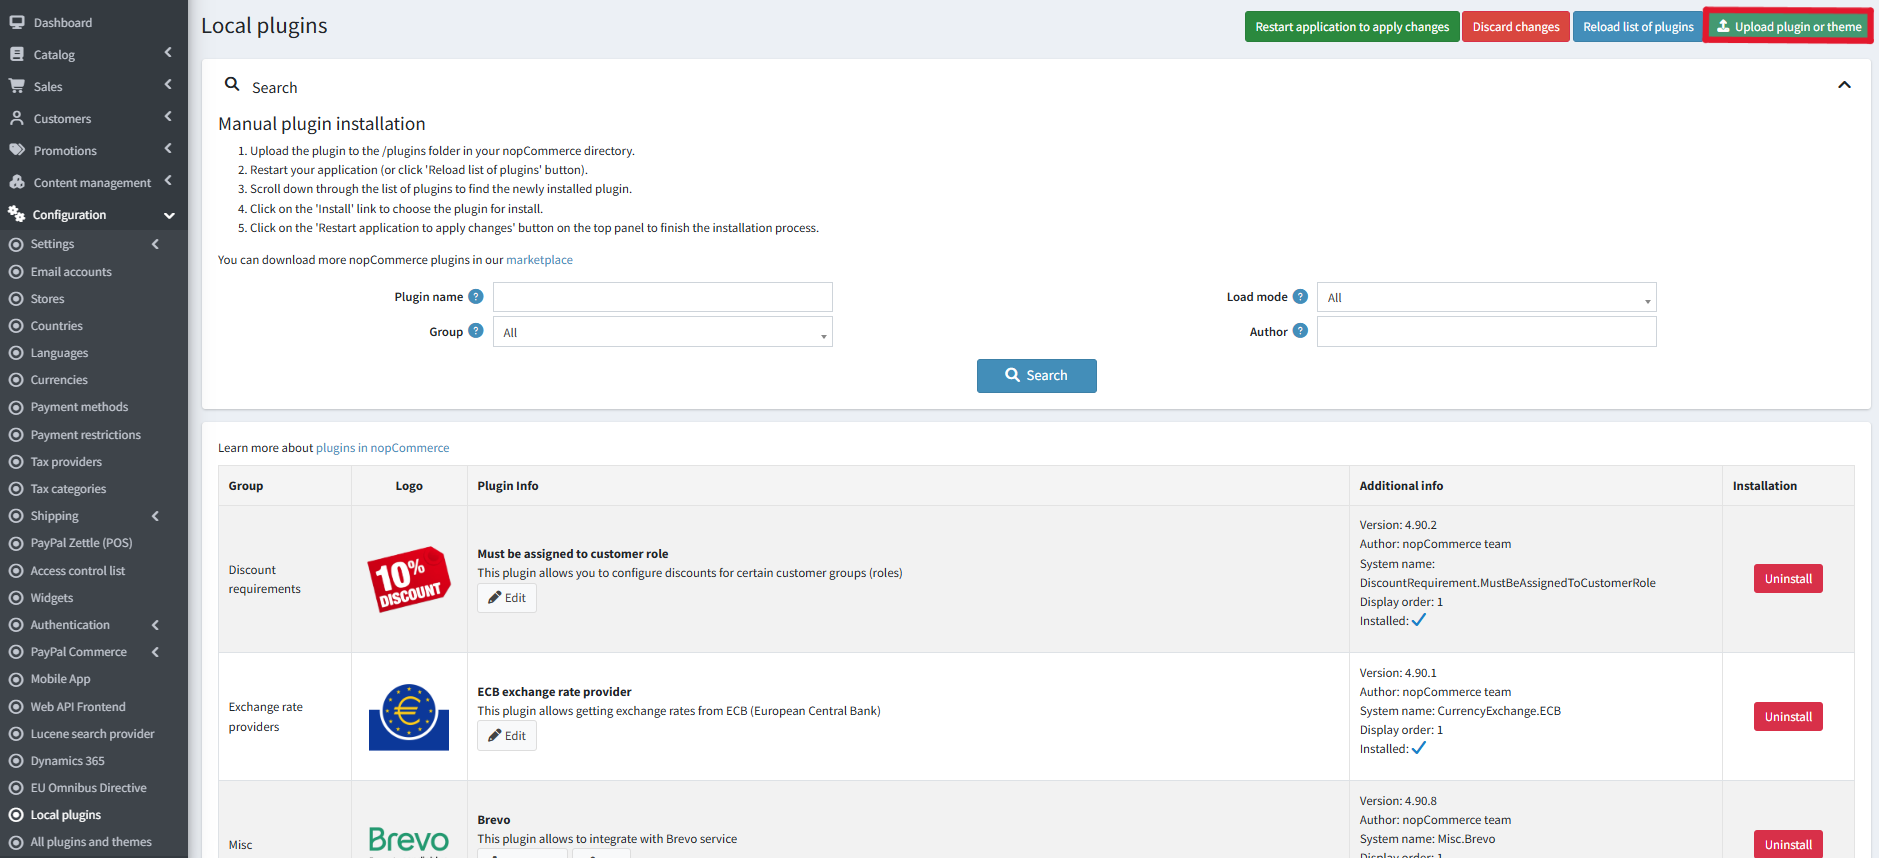
- Click Upload plugin or theme and upload the NopStation.Plugin.Shipping.Sendcloud.zip file.
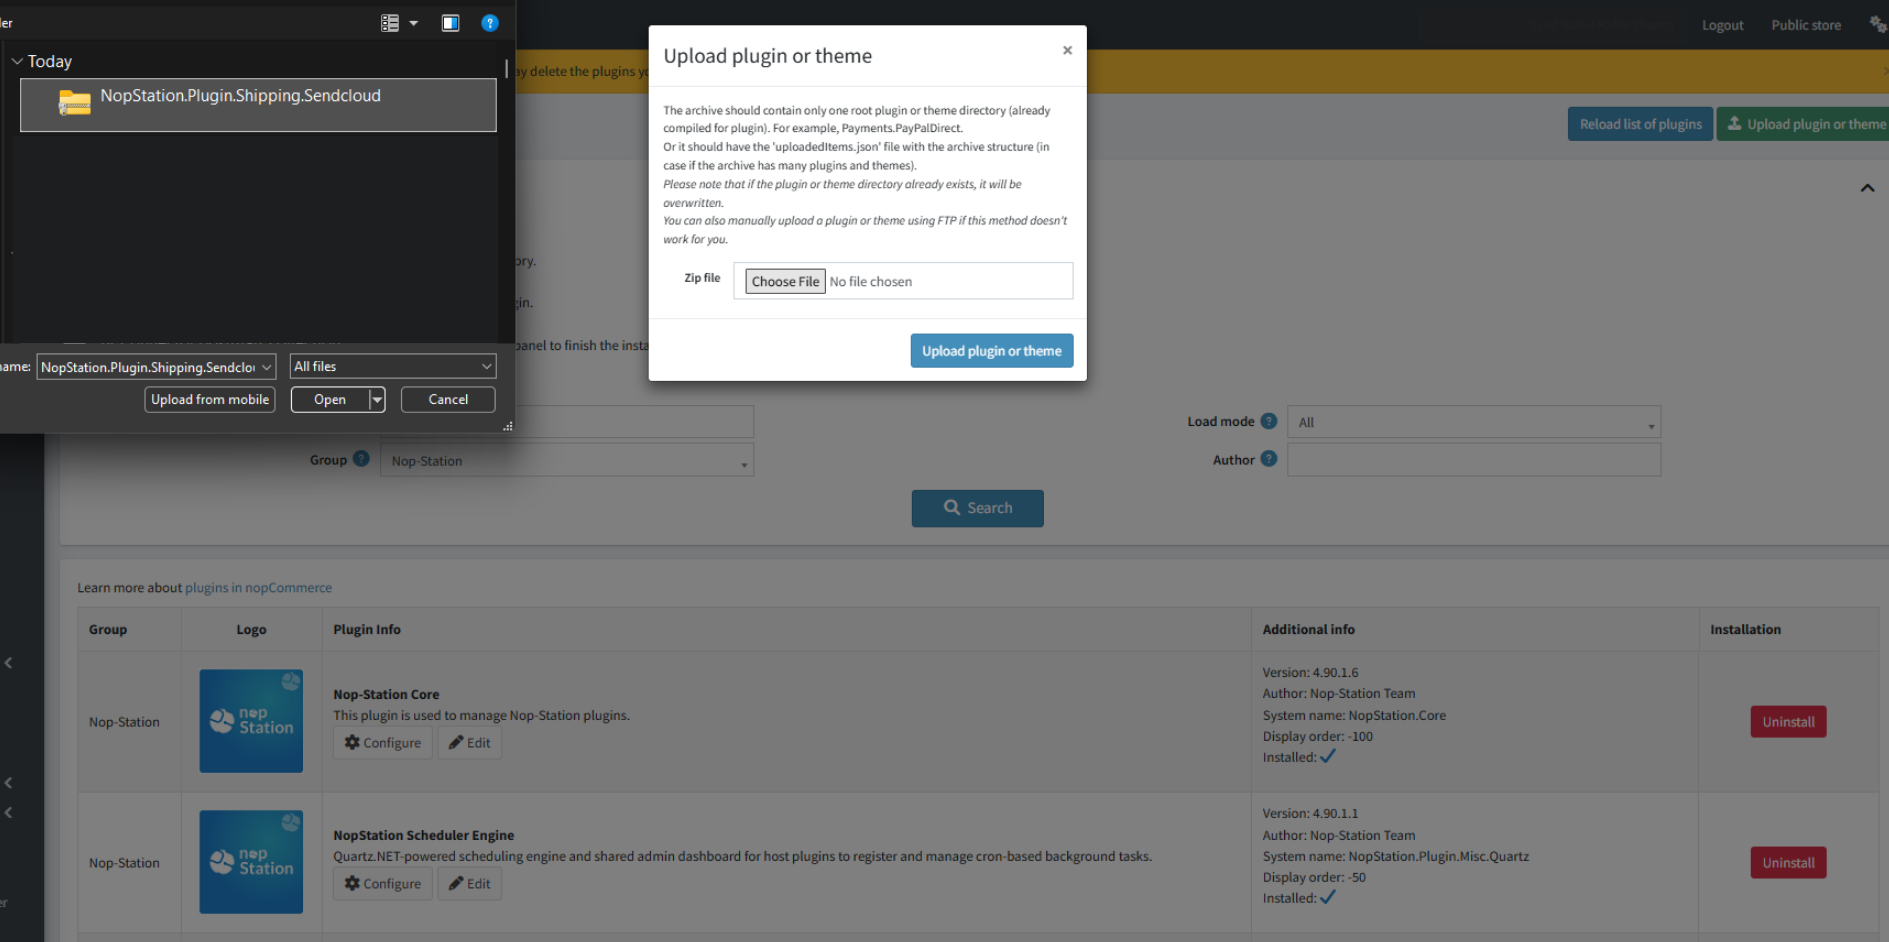
- In the list of plugins, locate Sendcloud Shipping Plugin for nopCommerce and click Install.
- To make the plugin functional, restart the application.
- After restarting, go to Administration → Configuration → Shipping → Shipping Providers.
- Locate Sendcloud Shipping Plugin for nopCommerce, make sure it is Active, and click Configure.
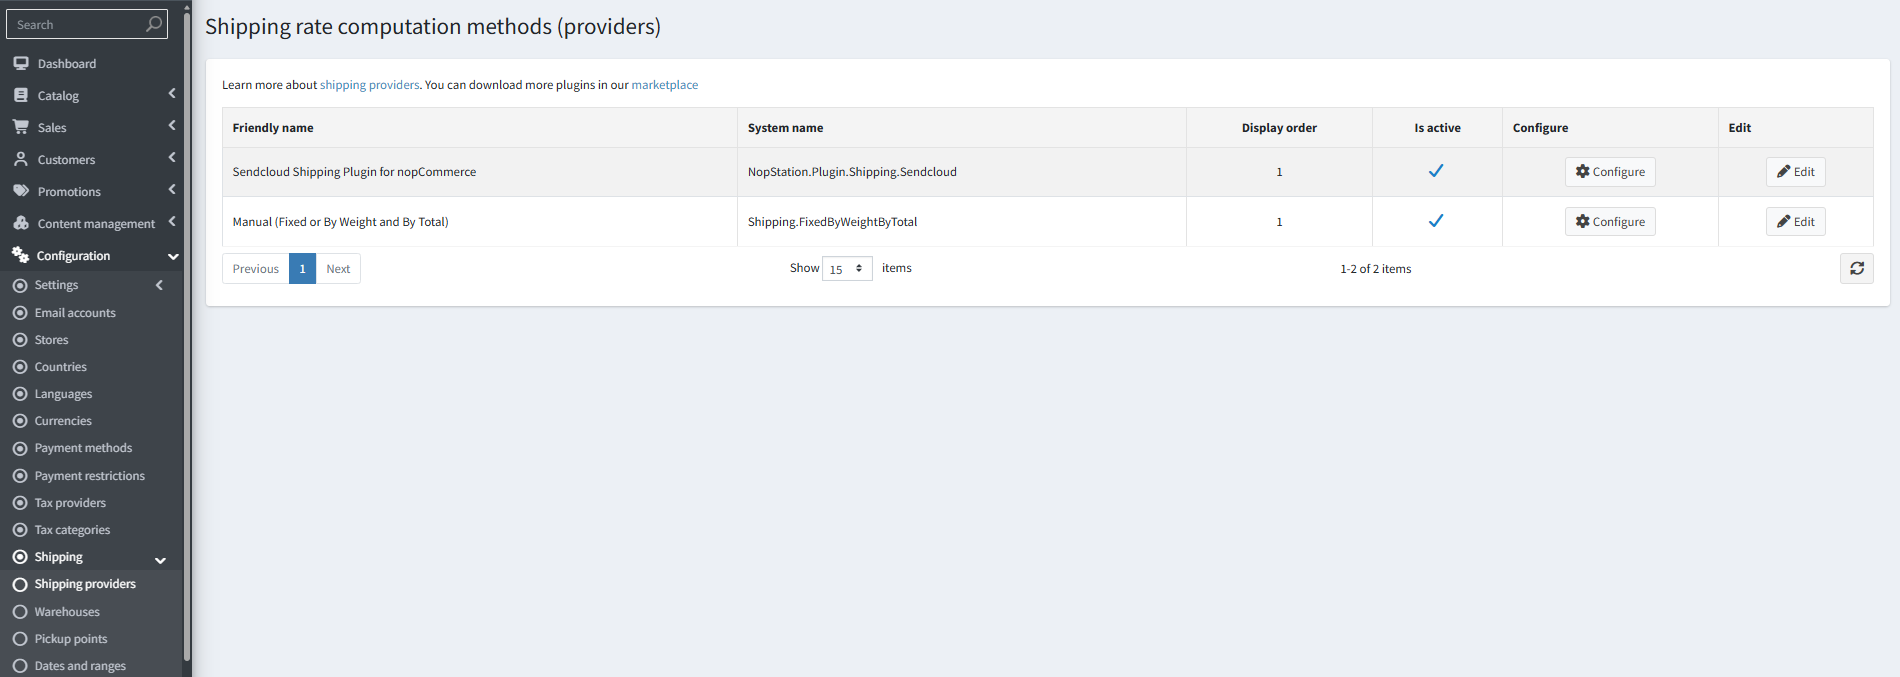
Note: The plugin automatically installs required permissions, localization resources, and database tables during installation.
Admin Panel Operations
CONFIGURATION
- Go to Administration → Configuration → Shipping → Shipping Providers → Sendcloud Shipping Plugin for nopCommerce and click Configure to open the plugin configuration page.
The configuration page contains three sections.
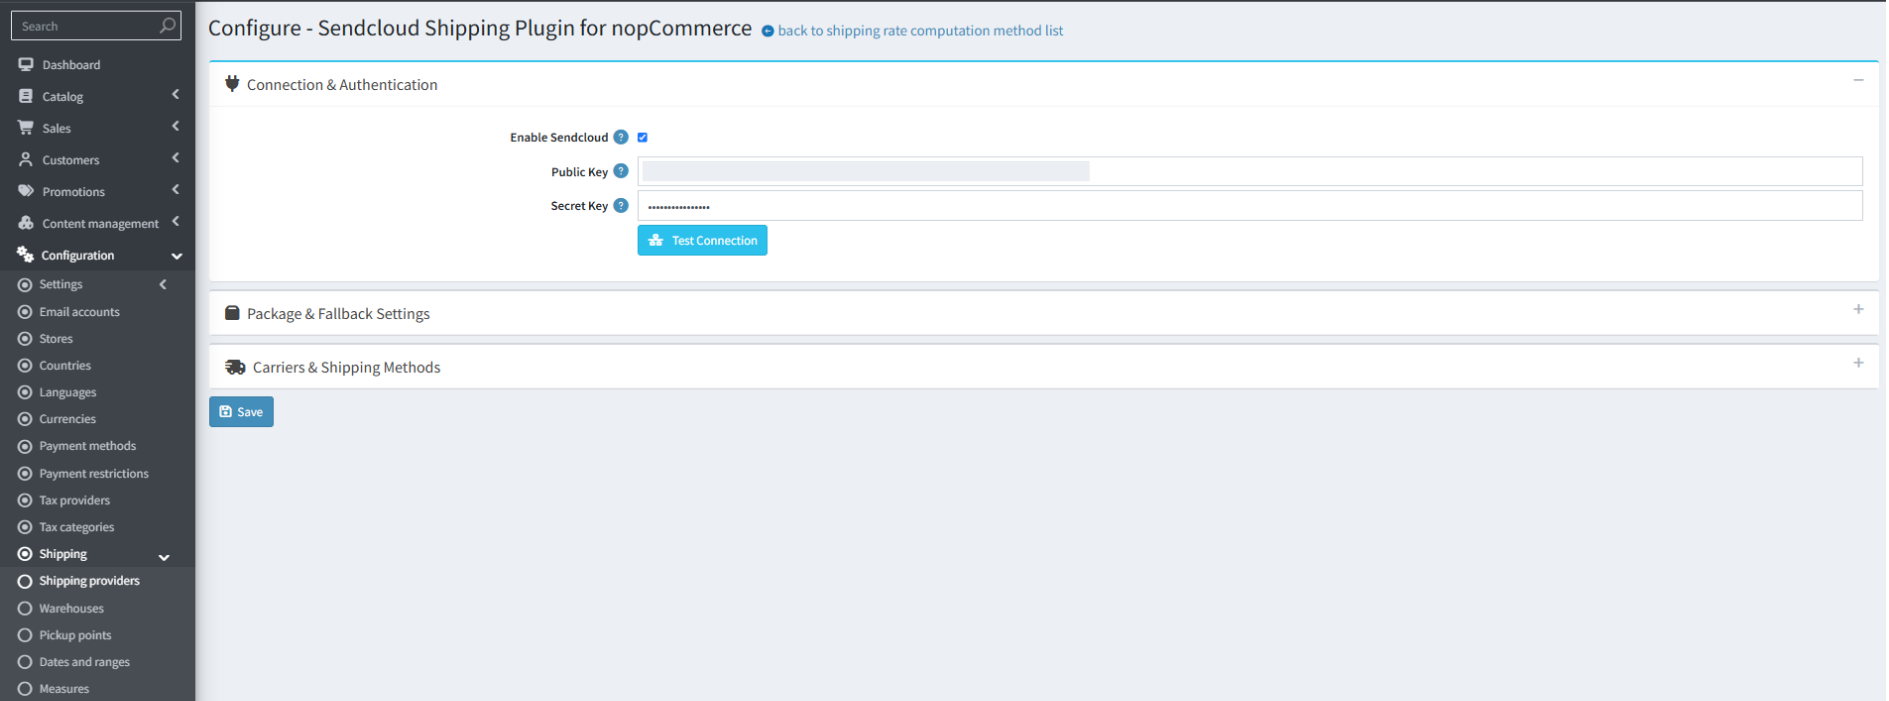
1: Connection & Authentication
- Enable Sendcloud: Enable or disable Sendcloud shipping rate calculations.
- Public Key: Enter the Sendcloud API Public Key. You can get this from your Sendcloud account under Settings → Integrations → Sendcloud API.
- Secret Key: Enter the Sendcloud API Secret Key.
- Test Connection: Click Test Connection to verify the connection with the Sendcloud API. A success notification will be displayed when the connection is established successfully.
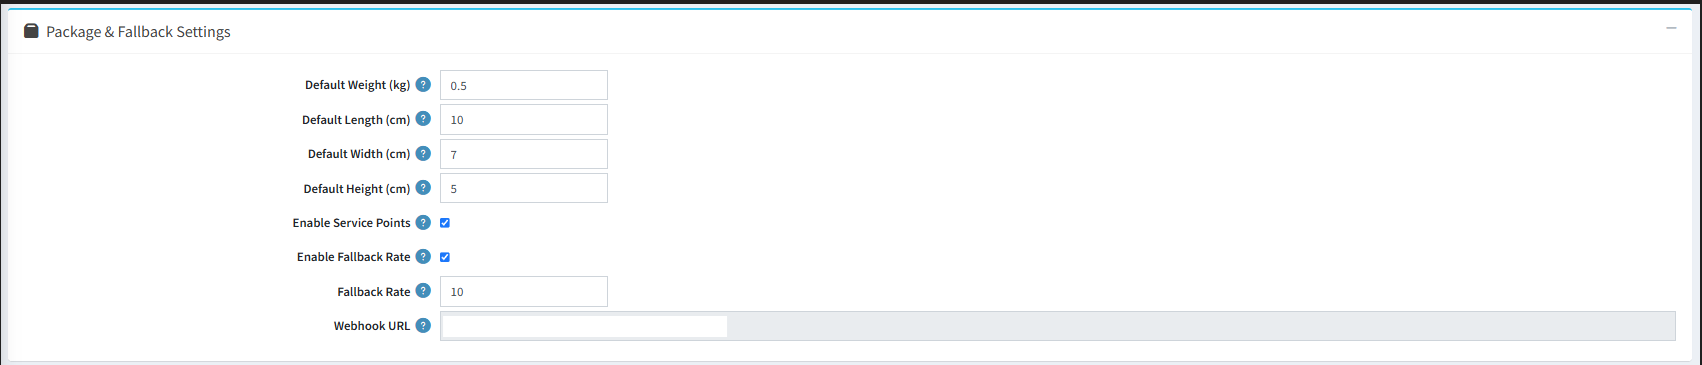
2: Package & Fallback Settings
- Default Weight (kg): Set the default parcel weight when a product in the cart does not have a weight defined.
- Default Length (cm): Set the default package length.
- Default Width (cm): Set the default package width.
- Default Height (cm): Set the default package height.
- Enable Service Points: Enable this option to allow customers to select a nearby pickup point or parcel shop during checkout.
- Enable Fallback Rate: Enable this option to provide a fallback shipping method when the Sendcloud API is unavailable or does not return a suitable shipping method.
- Fallback Shipping Rate: Set the shipping fee that will be applied when the fallback shipping method is used.
- Webhook URL: Displays the webhook endpoint that should be registered in the Sendcloud panel under Settings → Integrations → Webhooks.
3: Carriers & Method Mappings
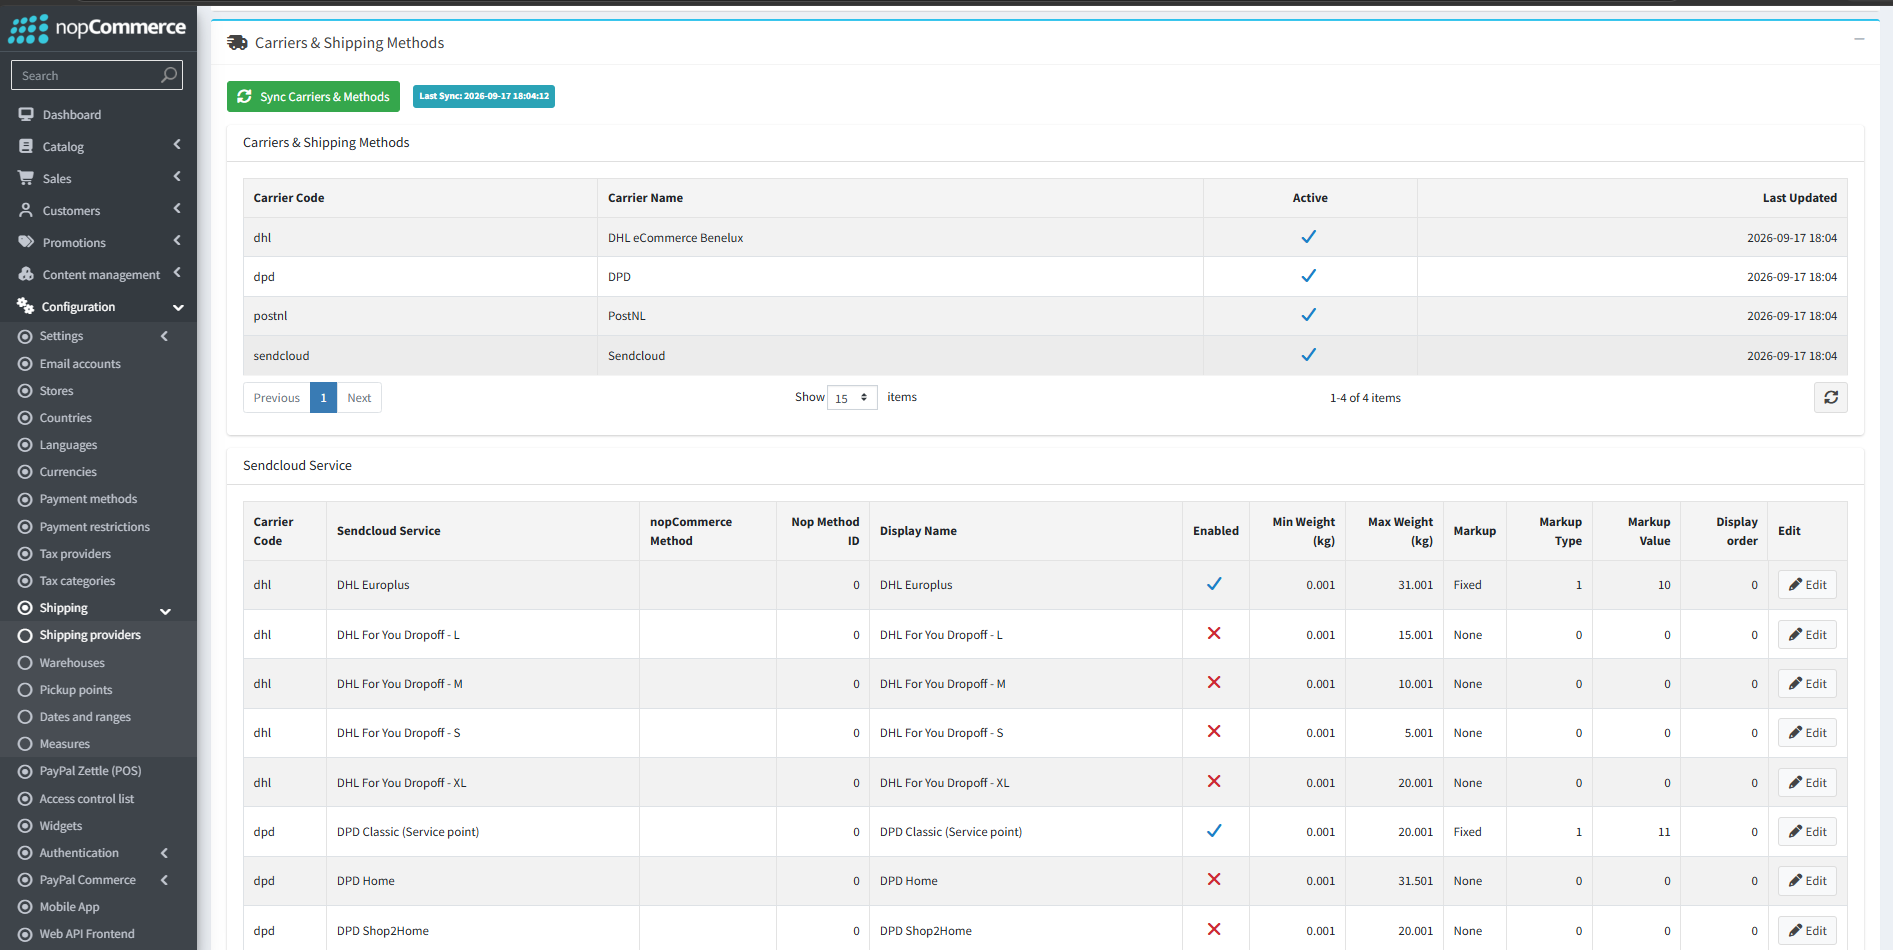
- Click Sync Carriers & Methods to connect to Sendcloud and synchronize the available carriers and shipping methods.
- The Available Carriers section displays the active carriers available through Sendcloud.
- The Shipping Method Mappings section allows you to configure how Sendcloud shipping methods are displayed and used in nopCommerce.
Shipping method mappings table showing:
- Carrier Code: Displays the carrier identifier provided by Sendcloud.
- Sendcloud Method Name: Displays the shipping method name provided by Sendcloud.
- nopCommerce Shipping Method: Select the nopCommerce shipping method associated with the Sendcloud method.
- Display Name: Set the name that will be displayed to customers during checkout.
- Is Enabled: Enable or disable the shipping method.
- Min / Max Weight (kg): Set the minimum and maximum cart weight allowed for the shipping method.
- Markup Type: Select whether the markup is a fixed amount or a percentage.
- Markup Value: Enter the markup amount or percentage added to the carrier shipping rate.
- Display Order: Set the order in which the shipping method appears during checkout.
After completing the configuration, click the Save button.
HOW TO USE SENDCLOUD SHIPPING
1. Select Shipping Method
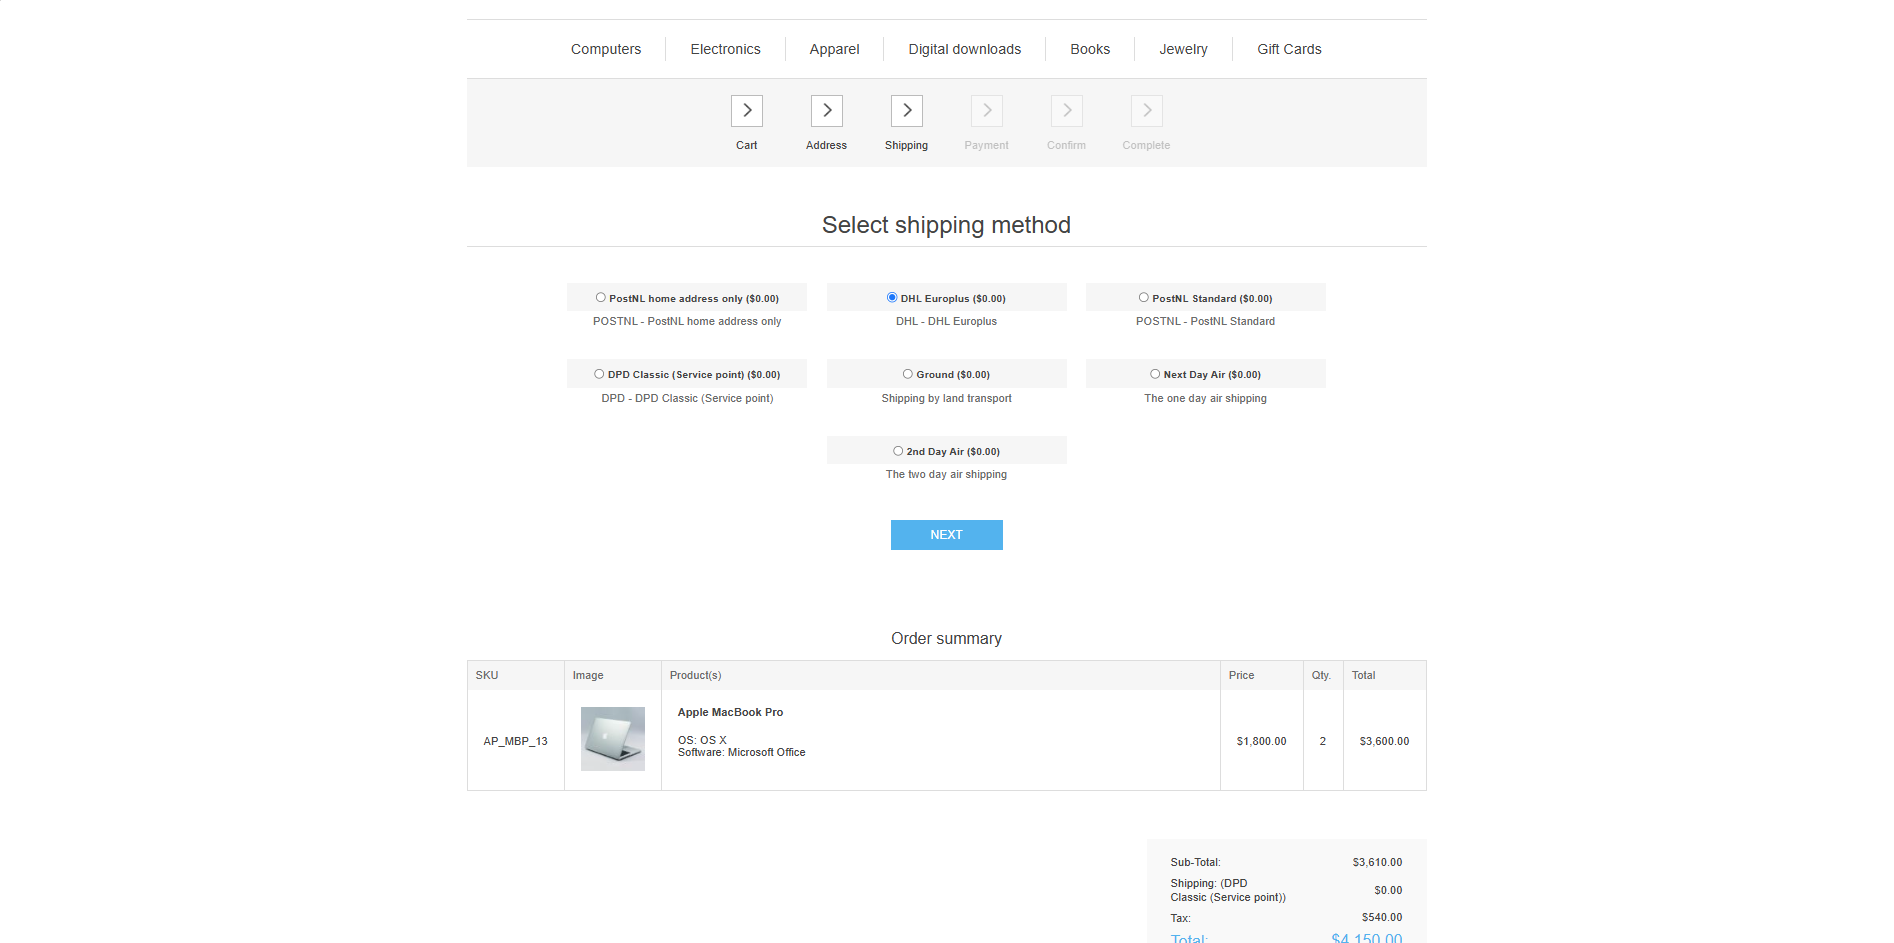
When Sendcloud Shipping is enabled, available shipping methods are displayed during checkout.
- At Checkout → Shipping Method, the plugin sends the customer's delivery address and package information to Sendcloud.
- Sendcloud returns the available shipping methods and rates based on the destination and package details.
- The plugin applies the configured weight restrictions and markup before displaying the available methods to the customer.
- If Enable Service Points is enabled and the selected carrier supports service points, customers can select a nearby parcel shop.
- The customer selects a shipping method and continues with the checkout.
TRACKING & SHIPMENT
1. Create Sendcloud Parcel
After an order is ready to ship:
- Go to Administration → Sales → Orders and open the required order.
- Go to the Shipments tab and create a shipment.
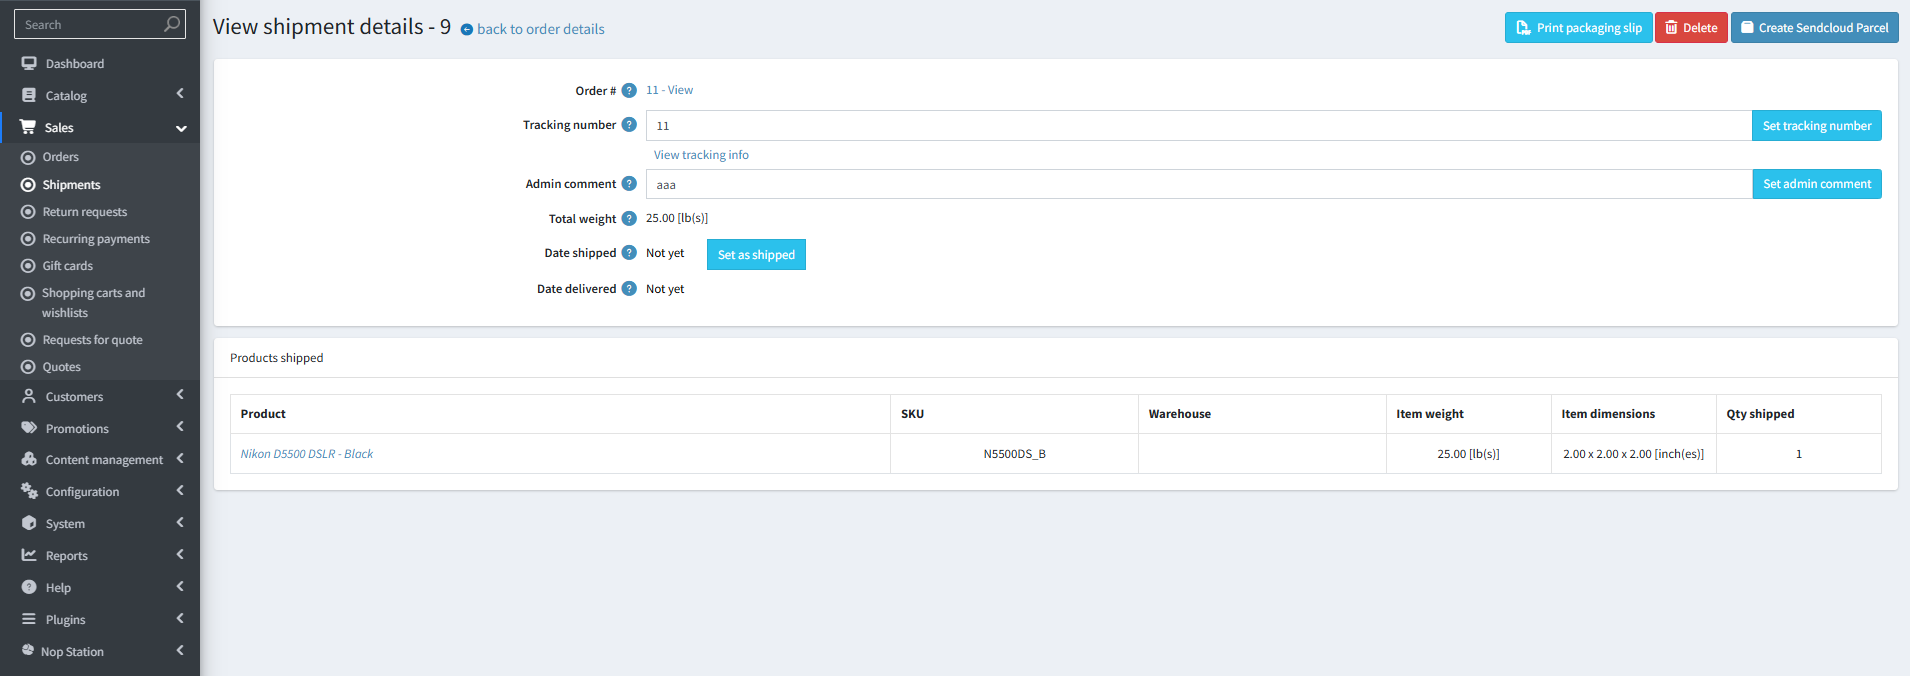
- Open the Shipment Details page.
- Click Create Sendcloud Parcel.
- The plugin sends the shipment information to Sendcloud and creates the parcel.
Once the parcel is created, the Shipment Details page displays the following options:
- Download Sendcloud Label: Download the shipping label provided by Sendcloud.
- Track Parcel: Open the Sendcloud tracking page for the parcel.
The tracking number is also automatically assigned to the nopCommerce shipment.
2. Parcel Tracking
- Once a tracking number has been assigned to the shipment, the tracking number can be opened from the order or shipment page.
- Clicking the tracking number opens the Sendcloud tracking page, where the current parcel status can be viewed.
3. Inbound Webhook
Sendcloud can send parcel status updates to nopCommerce through the configured webhook.
- Webhook Endpoint: The webhook endpoint generated for your store.
- Supported Event: parcel_status_changed
- Security: The webhook request is verified using the Sendcloud signature and the configured Secret Key.
- The plugin automatically updates the shipment status based on the status received from Sendcloud.
- Out for Delivery: The nopCommerce shipment is marked as Shipped.
- Delivered: The nopCommerce shipment is marked as Delivered.