
ERP Integration Plugin For NopCommerce
Tuesday, September 1, 2026
The ERP Integration Plugin is a nopCommerce plugin that automatically syncs products, orders, prices, stock, images, and customers between your store and Odoo (your back-office ERP), so staff don't have to copy data by hand. It's built as a generic framework — not hard-wired to Odoo — so other ERPs could be added later without a redesign. In live testing, product/price/stock/image sync and two-way customer sync both worked reliably, and admins can manually push data or retry a failed sync with one click; every sync attempt is logged in detail with no passwords ever exposed. Orders are protected by design — Odoo can never create a duplicate order on the website. The two gaps against the original spec: it checks in with Odoo every few minutes rather than getting instant push notifications ("webhooks"), and Odoo-side order updates (like shipping status) don't yet flow back to nopCommerce. Overall, it's a working, well-tested integration with two clear next-step improvements rather than a finished, fully-spec'd system.
PRE-REQUISITES
- The plugin requires you to install the Nop-Station Core plugin first
INSTALLATION
- Download the ERP Intergration Plugin from our store https://www.nop-station.com/nopstation-plugins
- Go to Administration → Configuration → Local plugins
- Upload the NopStation.Plugin.Misc.ERPConnector zip file using the "Upload plugin or theme" button
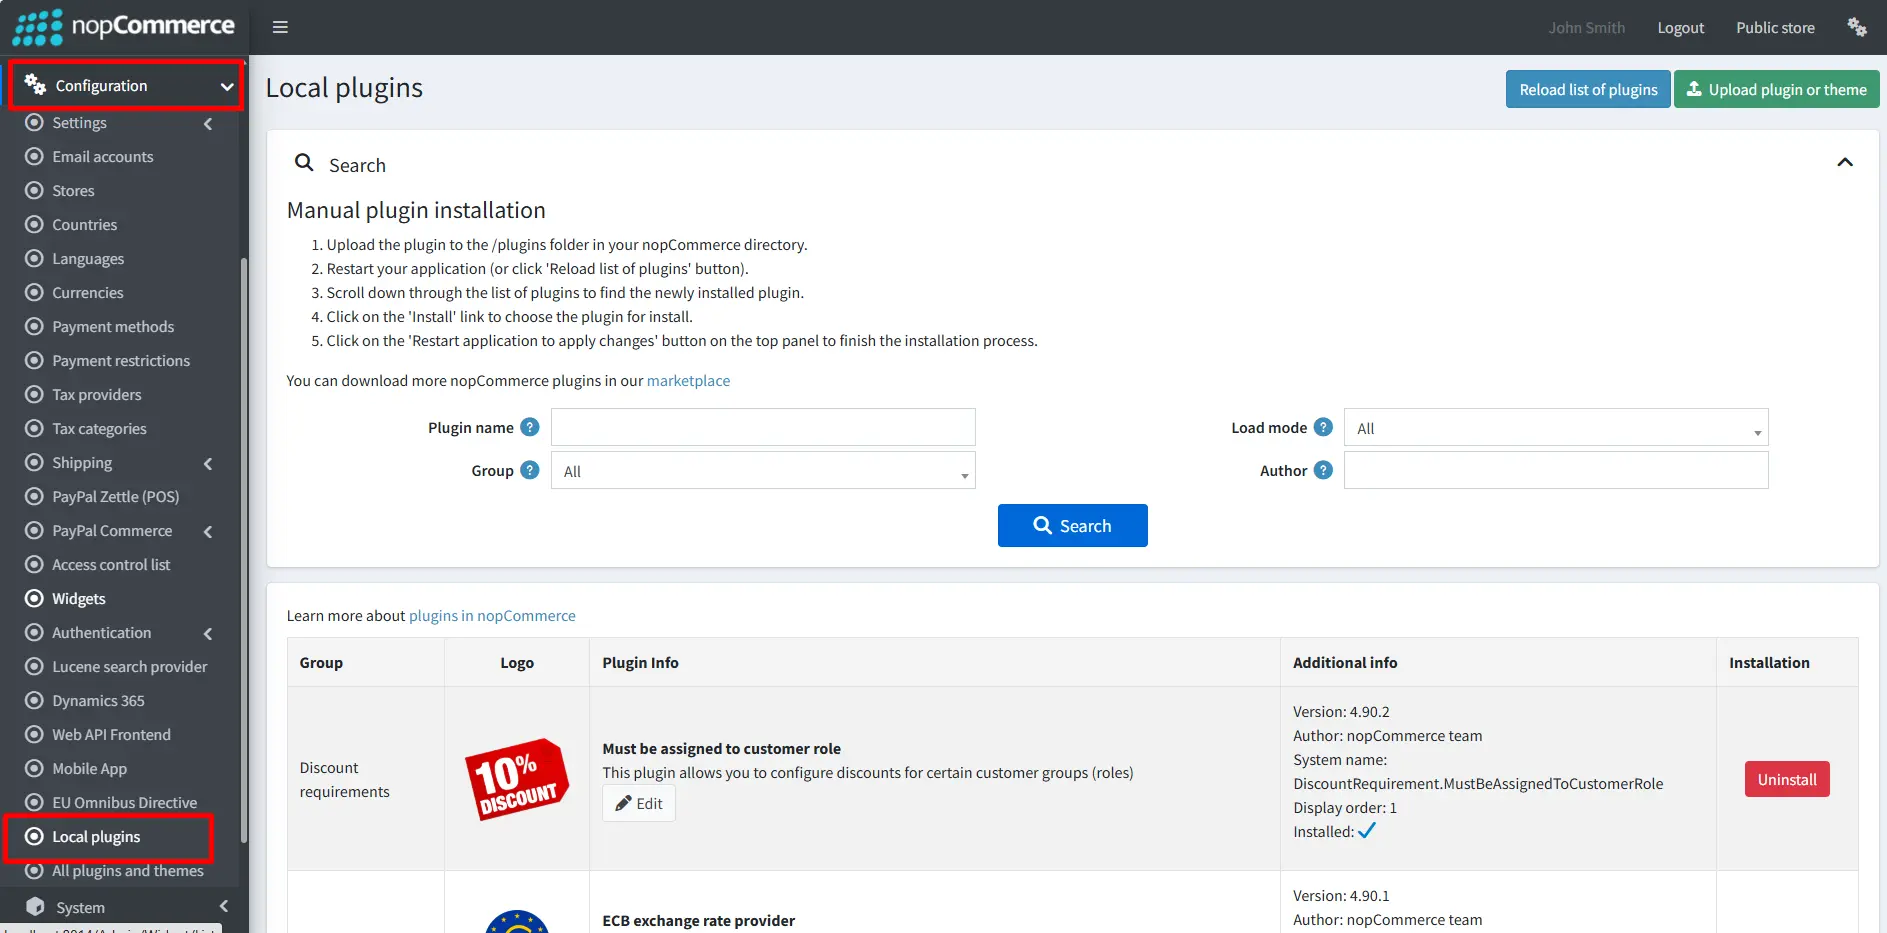
- Go to Local Plugins, reload the 'list of plugins'. Install 'Nop-Station Core' Plugin first and then install 'ERP Connector Plugin'
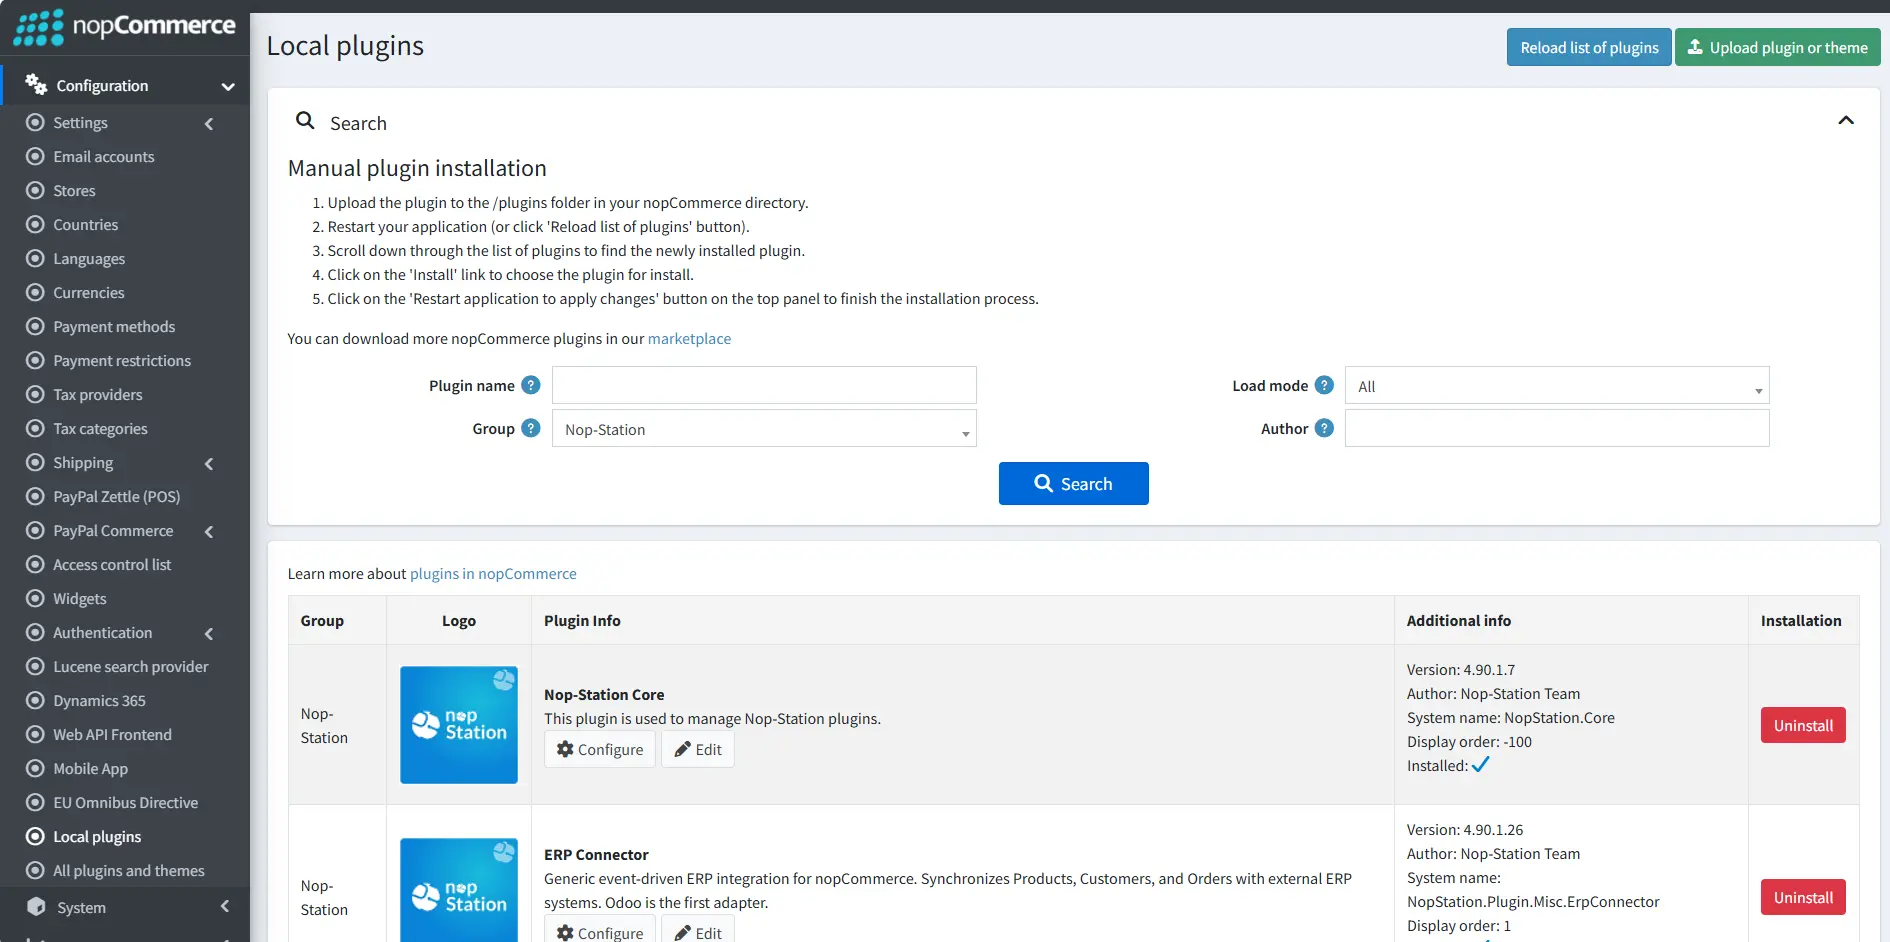
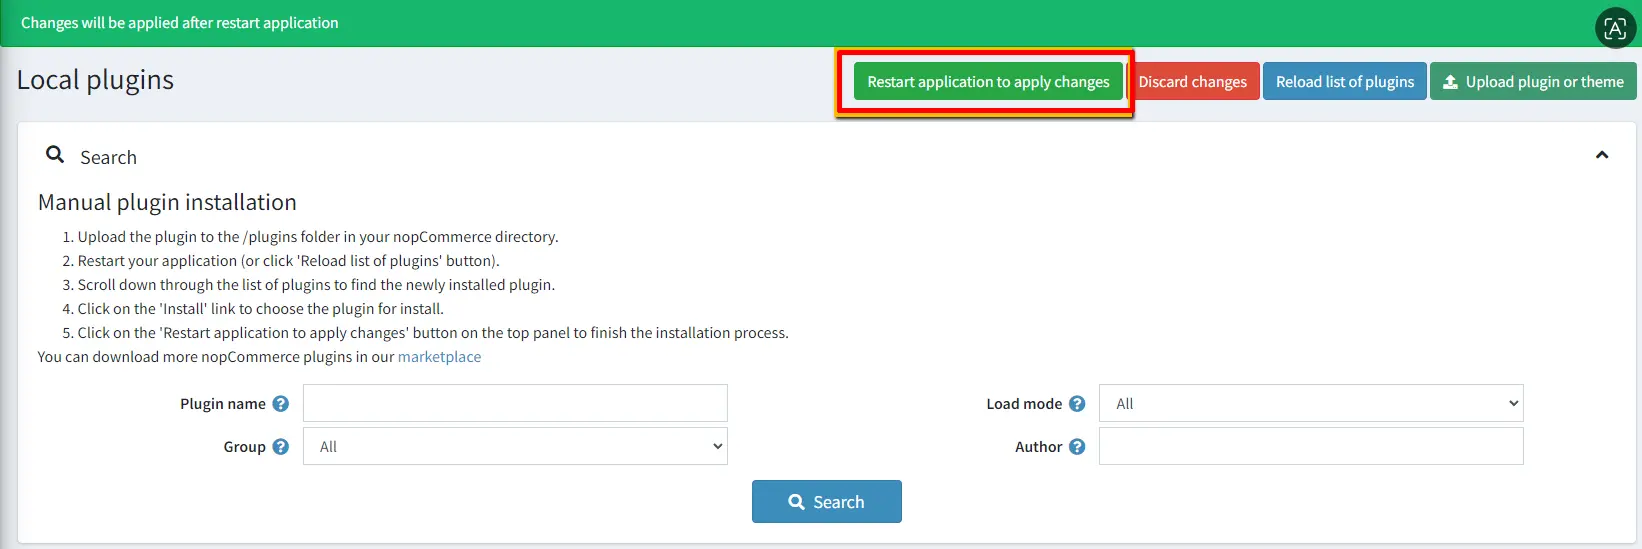
- To make the plugins functional, restart the application
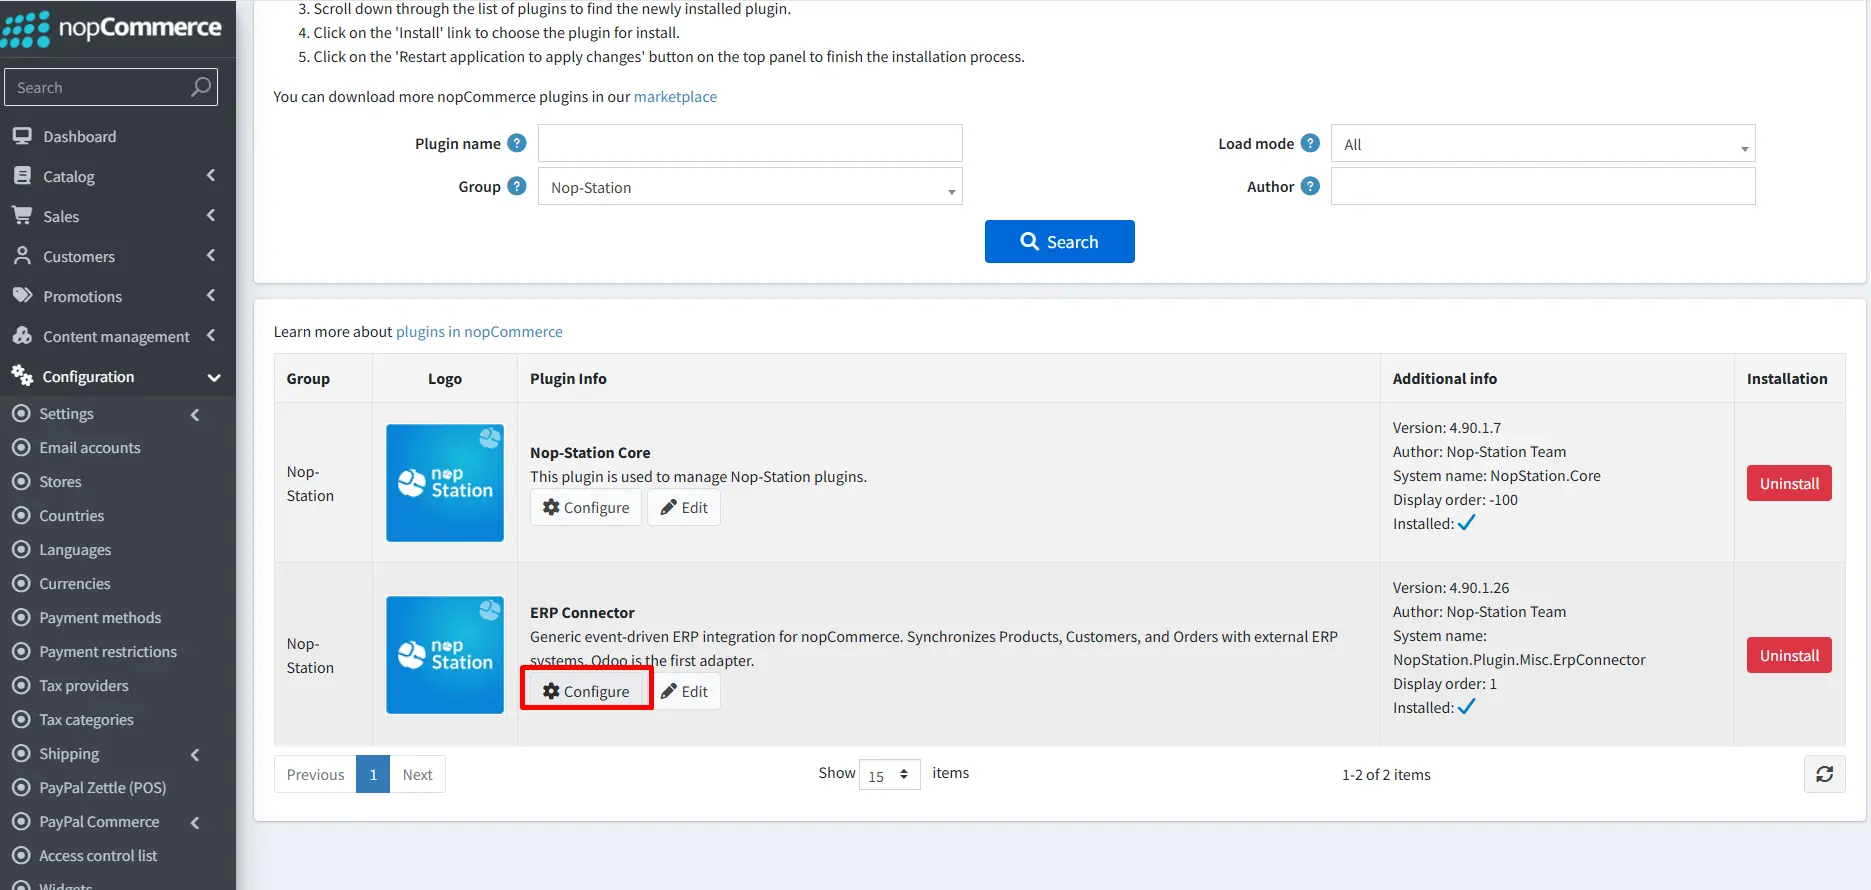
- Enable the plugin with option Configure. Also Provide license string to enable the plugin.
CONFIGURATION & FEATURES:
ERP Connector Settings:
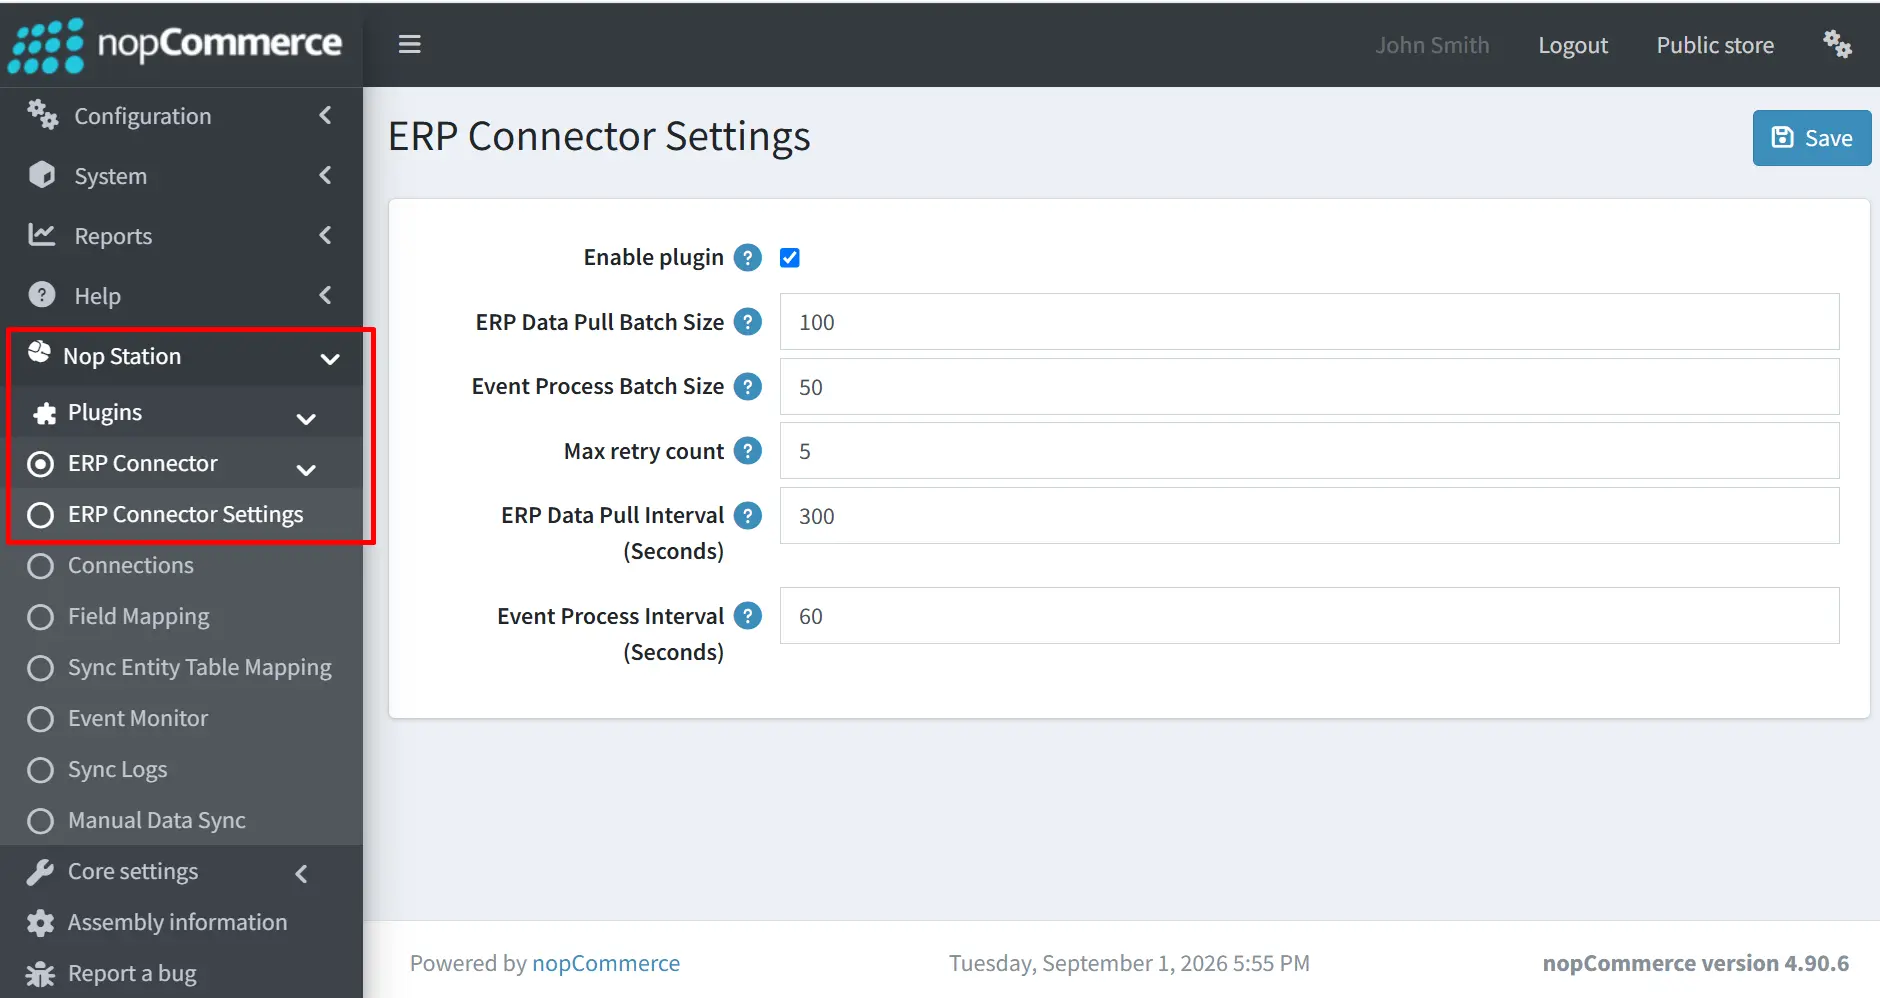
- Go to Admin → NopStation → Plugins → ERP Connector→ ERP Connector Settings
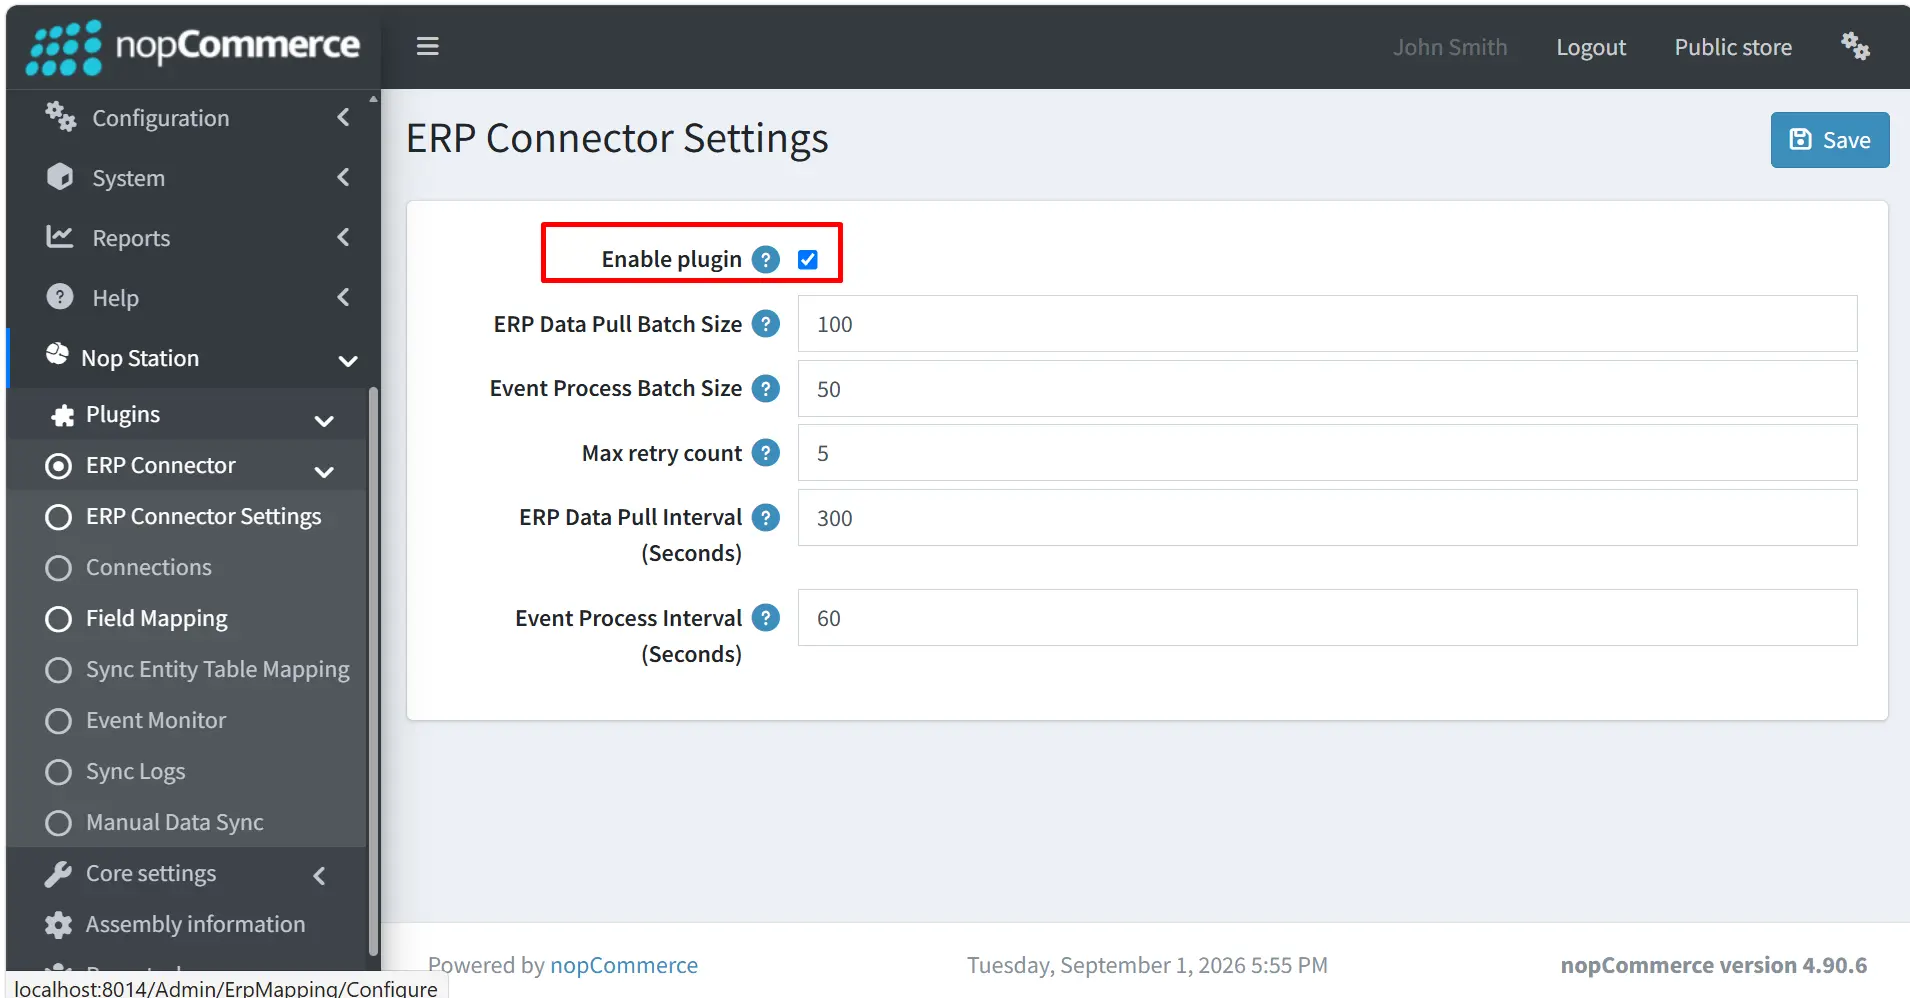
- Enable Plugin: Enables or disables the ERP Connector plugin.
- ERP Data Pull Batch Size: Defines the maximum number of ERP records retrieved in each batch.
- Event Process Batch Size: Defines the maximum number of events processed in each batch.
- Max Retry Count: Defines the maximum number of times a failed event can be retried.
- ERP Data Pull Interval (Seconds): Defines how frequently the system checks the ERP for new or updated data.
- Event Process Interval (Seconds): Defines how frequently the system checks for pending events to process.
ERP Connections:
- Go to Admin → NopStation → Plugins → ERP Connector→ Connections
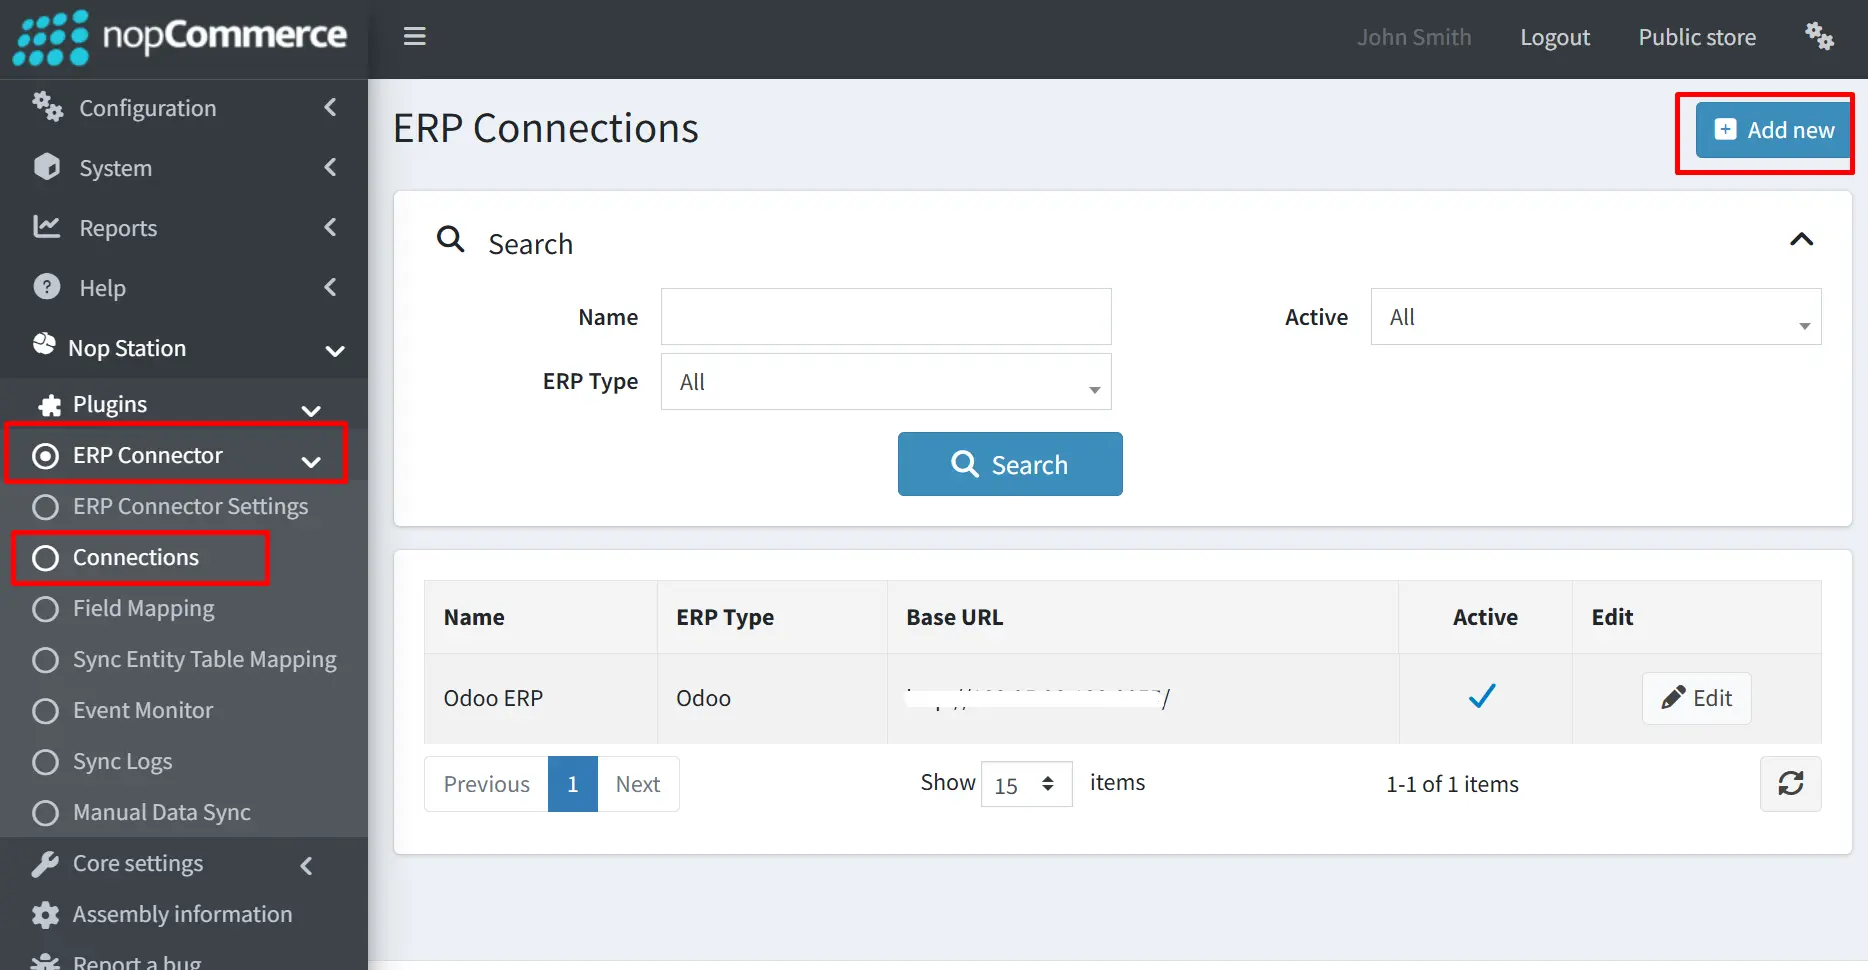
- Click on Add New button to create new erp connection
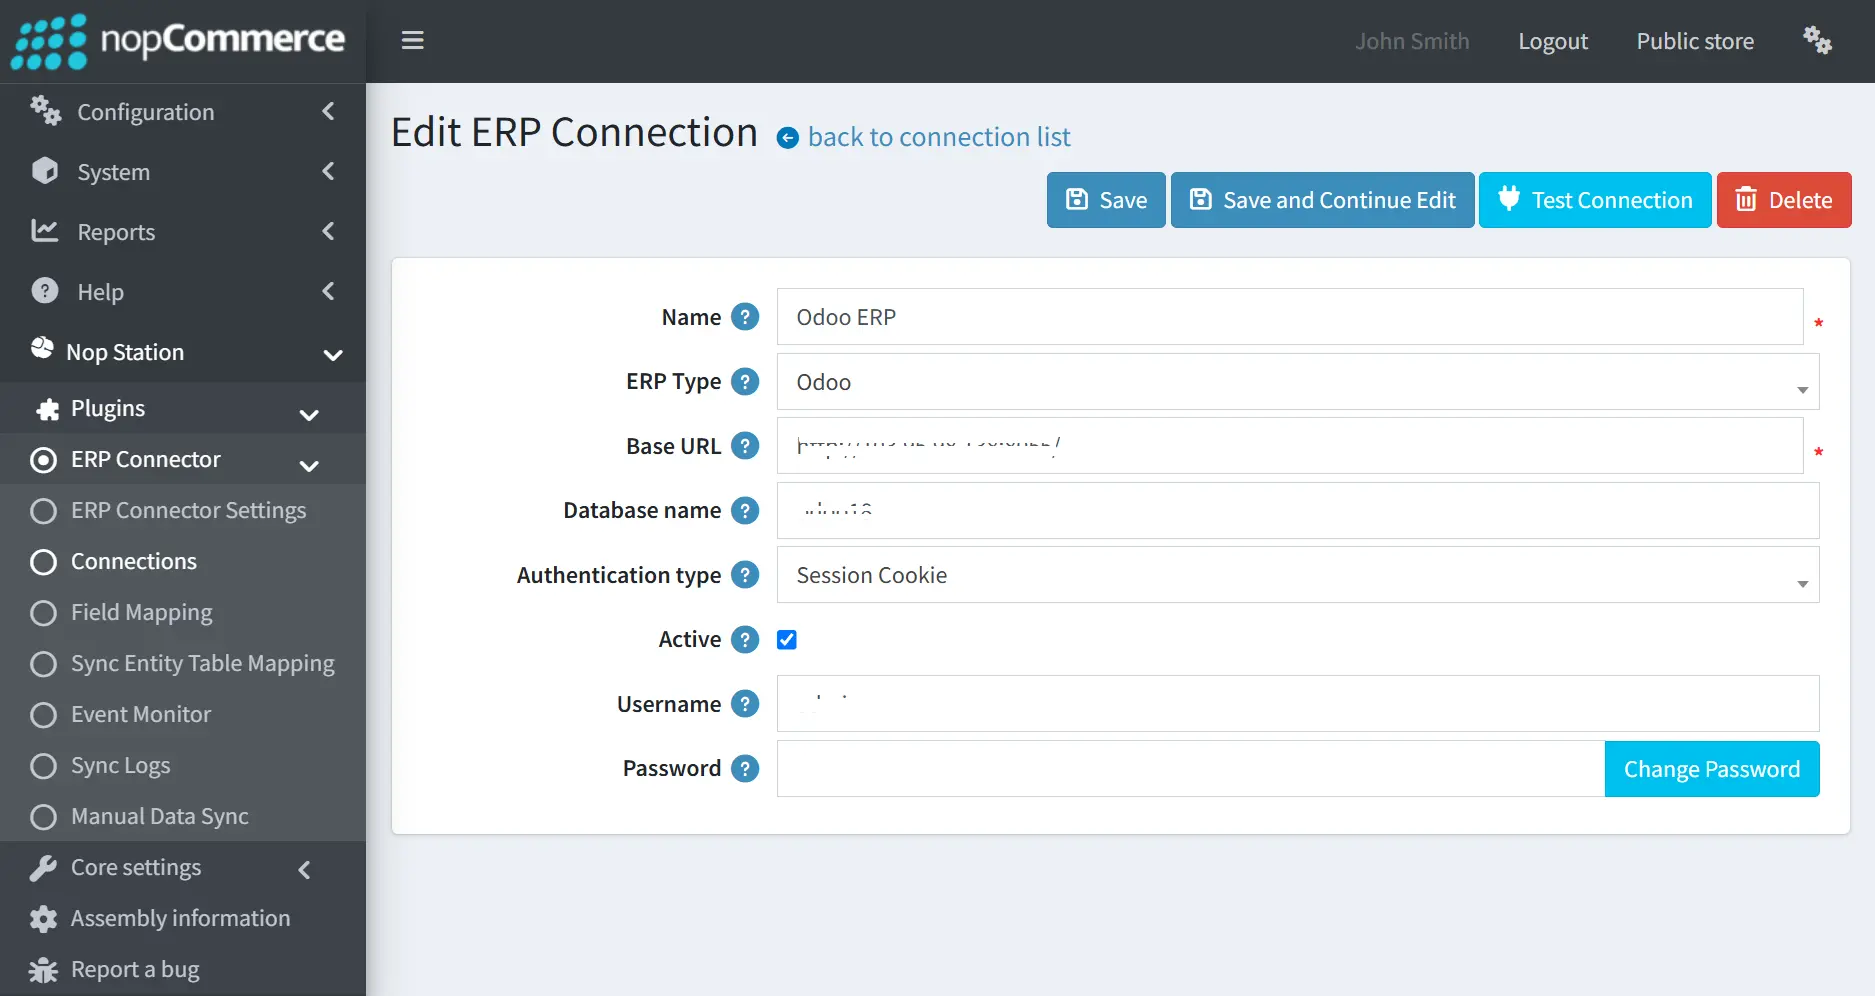
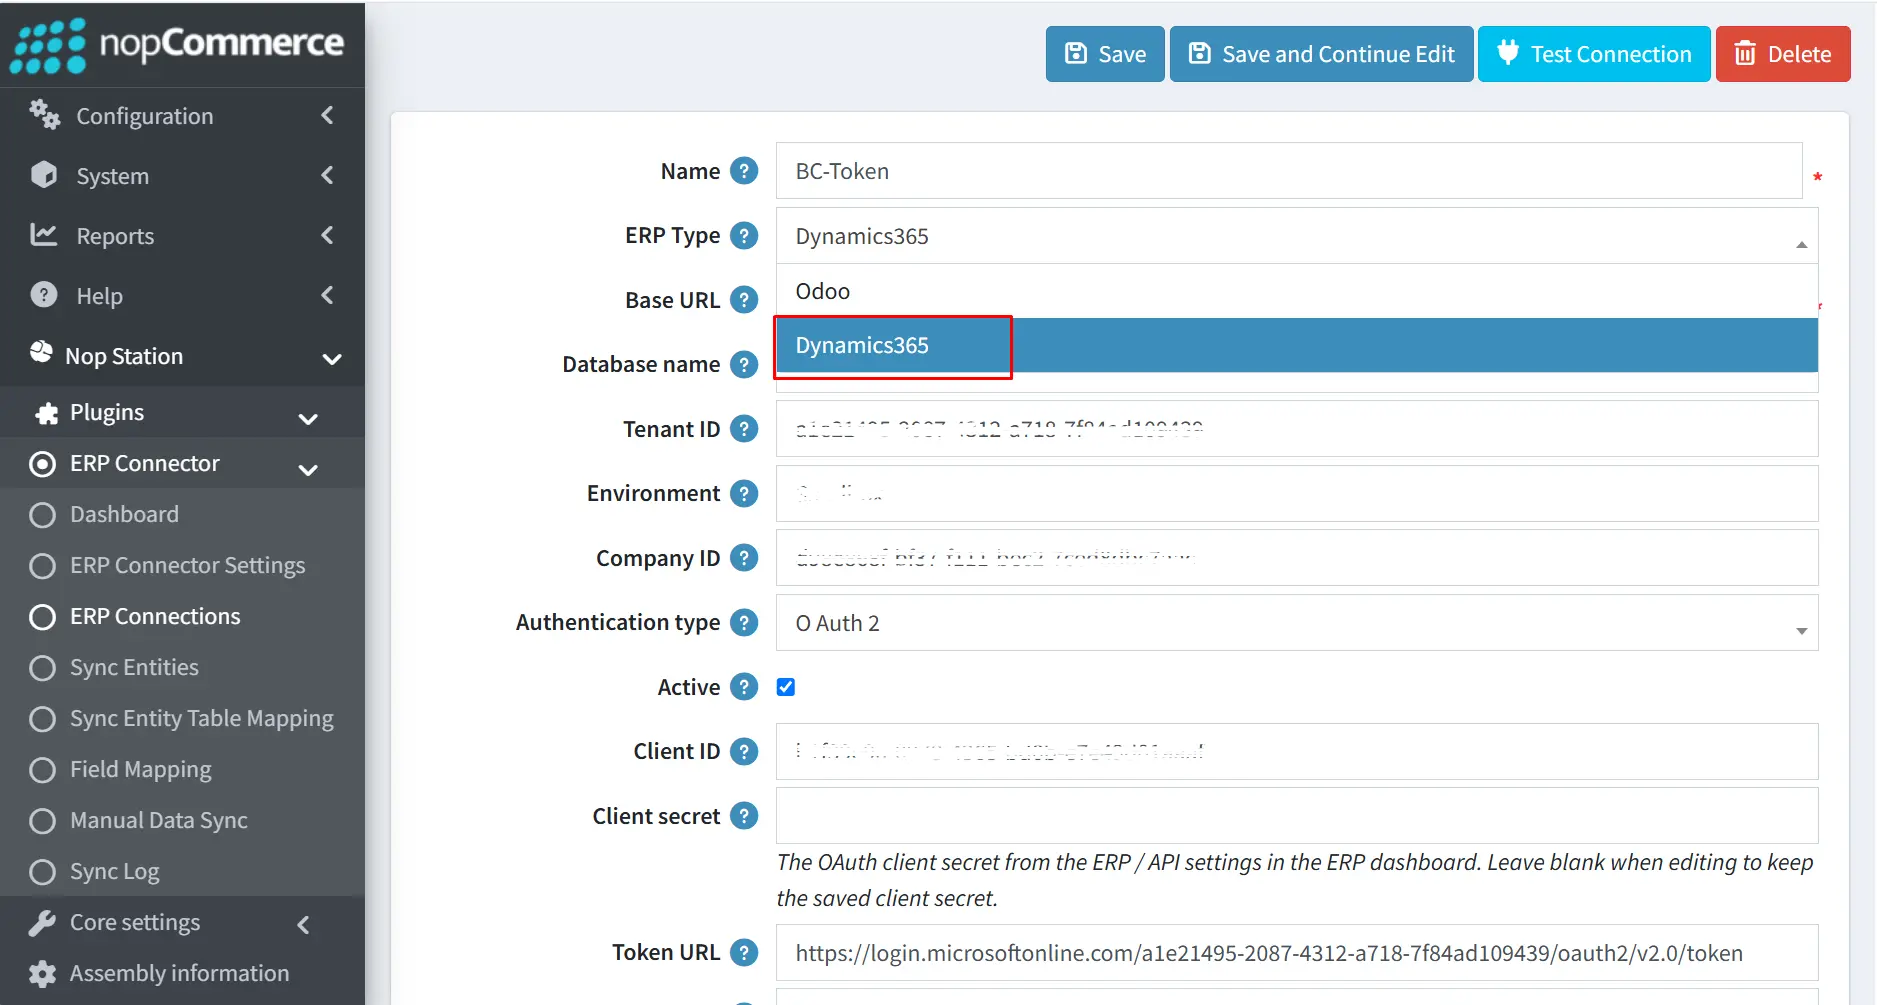
- Name: Identifies the ERP connection profile and allows administrators to distinguish between multiple ERP connections.
- ERP Type: Specifies the ERP system to be integrated with the connector, such as Odoo or Microsoft Dynamics 365. The available configuration fields vary depending on the selected ERP type.
- Base URL: Specifies the base URL of the ERP system or API endpoint used for communication with the connector.
- Database Name: Specifies the name of the ERP database to be accessed. This field is applicable to ERP systems such as Odoo that require a database name.
- Tenant ID: Specifies the Microsoft Entra ID (Azure AD) tenant identifier used for authenticating with Microsoft Dynamics 365.
- Environment: Specifies the Dynamics 365 environment where the connector will access ERP data, such as Sandbox or Production.
- Company ID: Specifies the unique company identifier within Microsoft Dynamics 365 that the connector will use for data synchronization.
- Authentication Type: Defines the authentication method used to establish a connection with the selected ERP system, such as Session Cookie for Odoo or OAuth 2 for Microsoft Dynamics 365.
- Active: Enables or disables the ERP connection. Only active connections can be used for ERP integration and synchronization.
Odoo Authentication
- Username: Specifies the username used to authenticate with the Odoo ERP system.
- Password: Specifies the password associated with the configured Odoo username. The Change Password option allows the administrator to update the stored password.
Microsoft Dynamics 365 Authentication
- Client ID: Specifies the application/client ID registered for the Microsoft Dynamics 365 integration.
- Client Secret: Specifies the client secret associated with the registered application. When editing an existing connection, leaving this field blank retains the previously saved client secret.
- Token URL: Specifies the OAuth 2.0 token endpoint used to obtain an access token for authenticating with Microsoft Dynamics 365.
Connection Actions
- Test Connection: Verifies whether the configured ERP connection details and authentication credentials are valid and that the connector can successfully communicate with the selected ERP system.
- Save: Saves the ERP connection configuration and returns to the connection list.
- Save and Continue Edit: Saves the current changes and keeps the administrator on the same ERP connection configuration page for further editing.
- Delete: Permanently removes the configured ERP connection.
Field Mapping
The Field Mapping section defines how data fields are mapped between nopCommerce and the connected ERP system. It supports two synchronization directions: Inbound and Outbound.
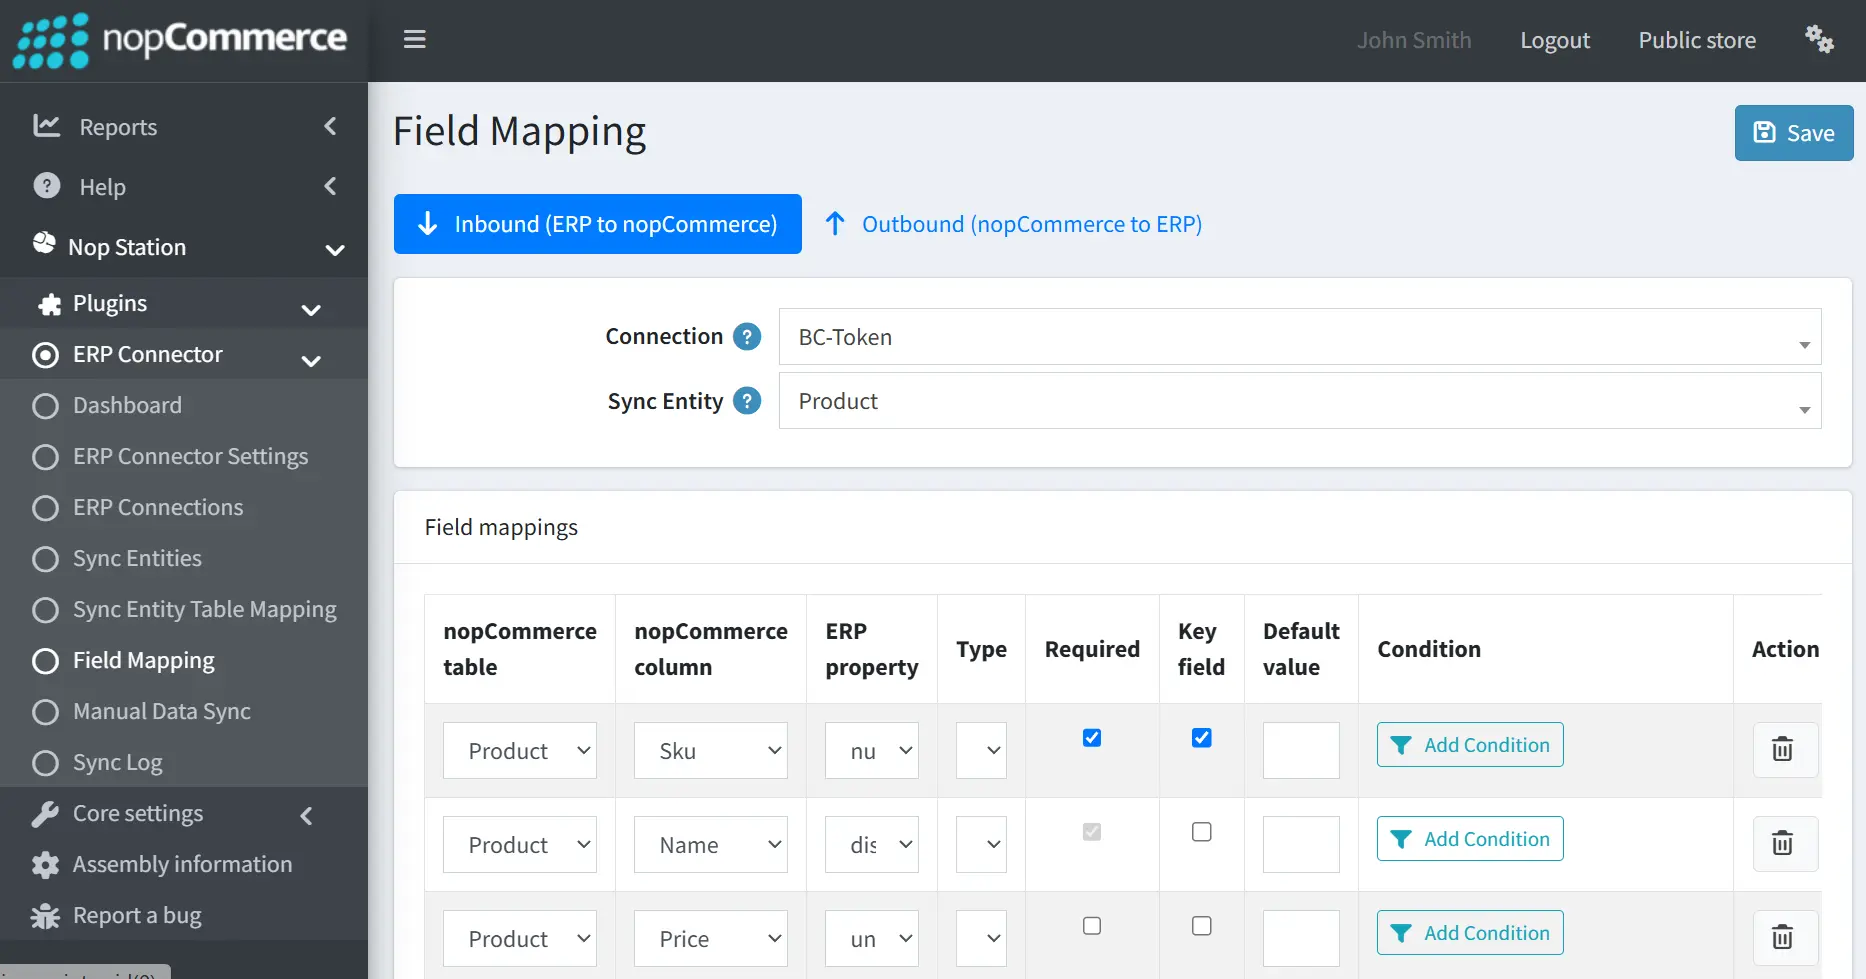
Inbound — ERP to nopCommerce
- Inbound: Defines the mapping used to transfer data from the ERP system to nopCommerce.
- Connection: Specifies the ERP connection for which the field mappings are configured.
- Sync Entity: Specifies the entity being synchronized, such as Product, Customer, Order, Image, Price, or Stock.
- nopCommerce Table: Specifies the nopCommerce database table that receives the ERP data.
- nopCommerce Column: Specifies the target column in the nopCommerce table.
- ERP Property: Specifies the corresponding property/field in the ERP entity.
- Type: Defines the data type or conversion type used for the mapped field.
- Required: Indicates whether the field is mandatory during synchronization.
- Key Field: Identifies the field used as a key for matching ERP records with nopCommerce records.
- Default Value: Specifies a fallback value when the ERP does not provide a value.
- Condition: Allows administrators to define conditions that determine when the field mapping should be applied.
- Save: Saves the configured inbound field mappings.
Outbound — nopCommerce to ERP
- Outbound: Defines the mapping used to transfer data from nopCommerce to the ERP system.
- Connection: Specifies the ERP connection for which the outbound field mappings are configured.
- Sync Entity: Specifies the entity whose data will be transferred to the ERP.
- nopCommerce Table: Specifies the source nopCommerce database table.
- nopCommerce Column: Specifies the source field/column from nopCommerce.
- ERP Property: Specifies the corresponding destination property/field in the ERP entity.
- Type: Defines the data type or conversion type required by the ERP field.
- Required: Indicates whether the mapped field is mandatory when sending data to the ERP.
- Key Field: Identifies the field used to match an existing ERP record with the corresponding nopCommerce record.
- Default Value: Specifies a fallback value if the nopCommerce field does not contain a value.
- Condition: Allows administrators to define rules that control when the field should be synchronized.
- Save: Saves the configured outbound field mappings.
Sync Entities
The Sync Entities section allows administrators to define and manage the business entities that will be synchronized between nopCommerce and the connected ERP system. Each sync entity represents a specific type of data, such as Product, Customer, Order, Image, Price, or Stock.
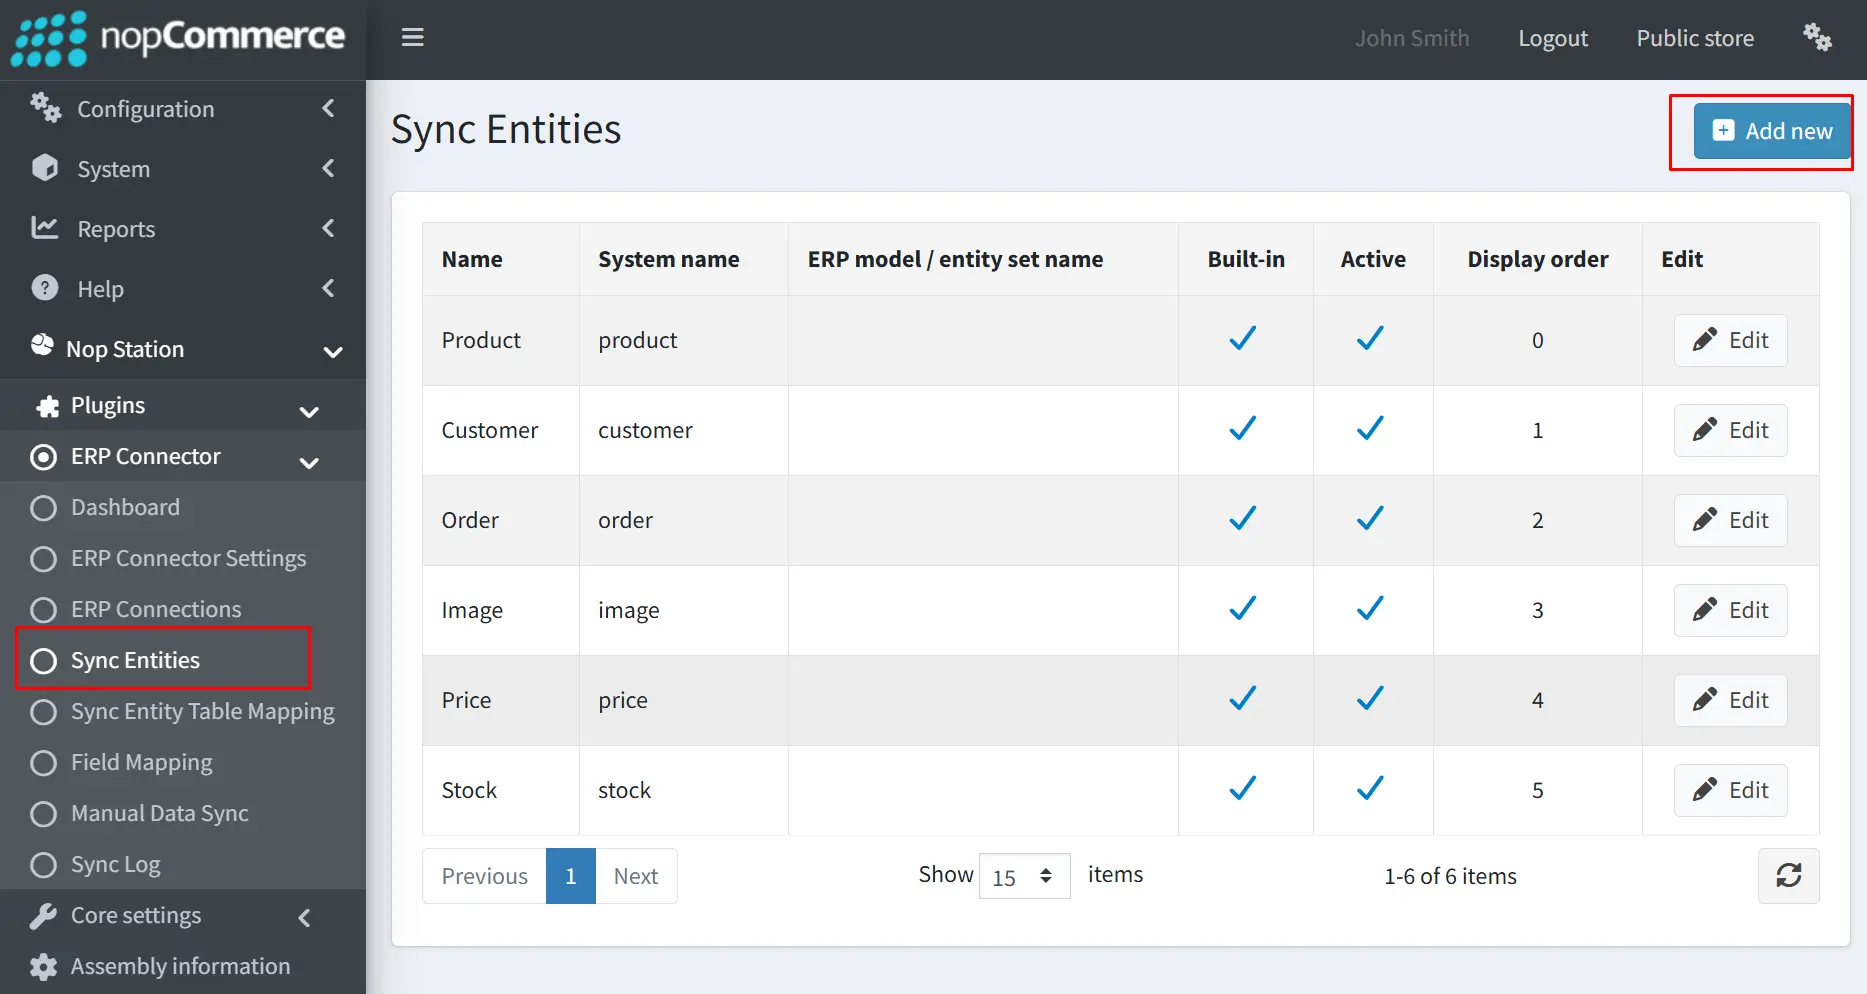
Sync Entity List
- Name: Displays the user-friendly name of the synchronization entity, such as Product, Customer, Order, Image, Price, or Stock.
- System Name: Specifies the unique system identifier used internally to reference the sync entity.
- ERP Model / Entity Set Name: Specifies the corresponding model or entity set name in the connected ERP system. The value depends on the selected ERP, for example, an Odoo model such as res.partner.bank or a Dynamics 365 Business Central entity such as vendors.
- Built-in: Indicates whether the sync entity is a predefined system entity. Built-in entities are provided by the ERP Connector and are available by default.
- Active: Indicates whether the sync entity is enabled for synchronization. Only active entities can participate in the synchronization process.
- Display Order: Determines the order in which sync entities are displayed in the administration interface.
- Edit: Allows administrators to modify the configuration of an existing sync entity.
- Add New: Allows administrators to create a new custom sync entity.
Create / Edit Sync Entity
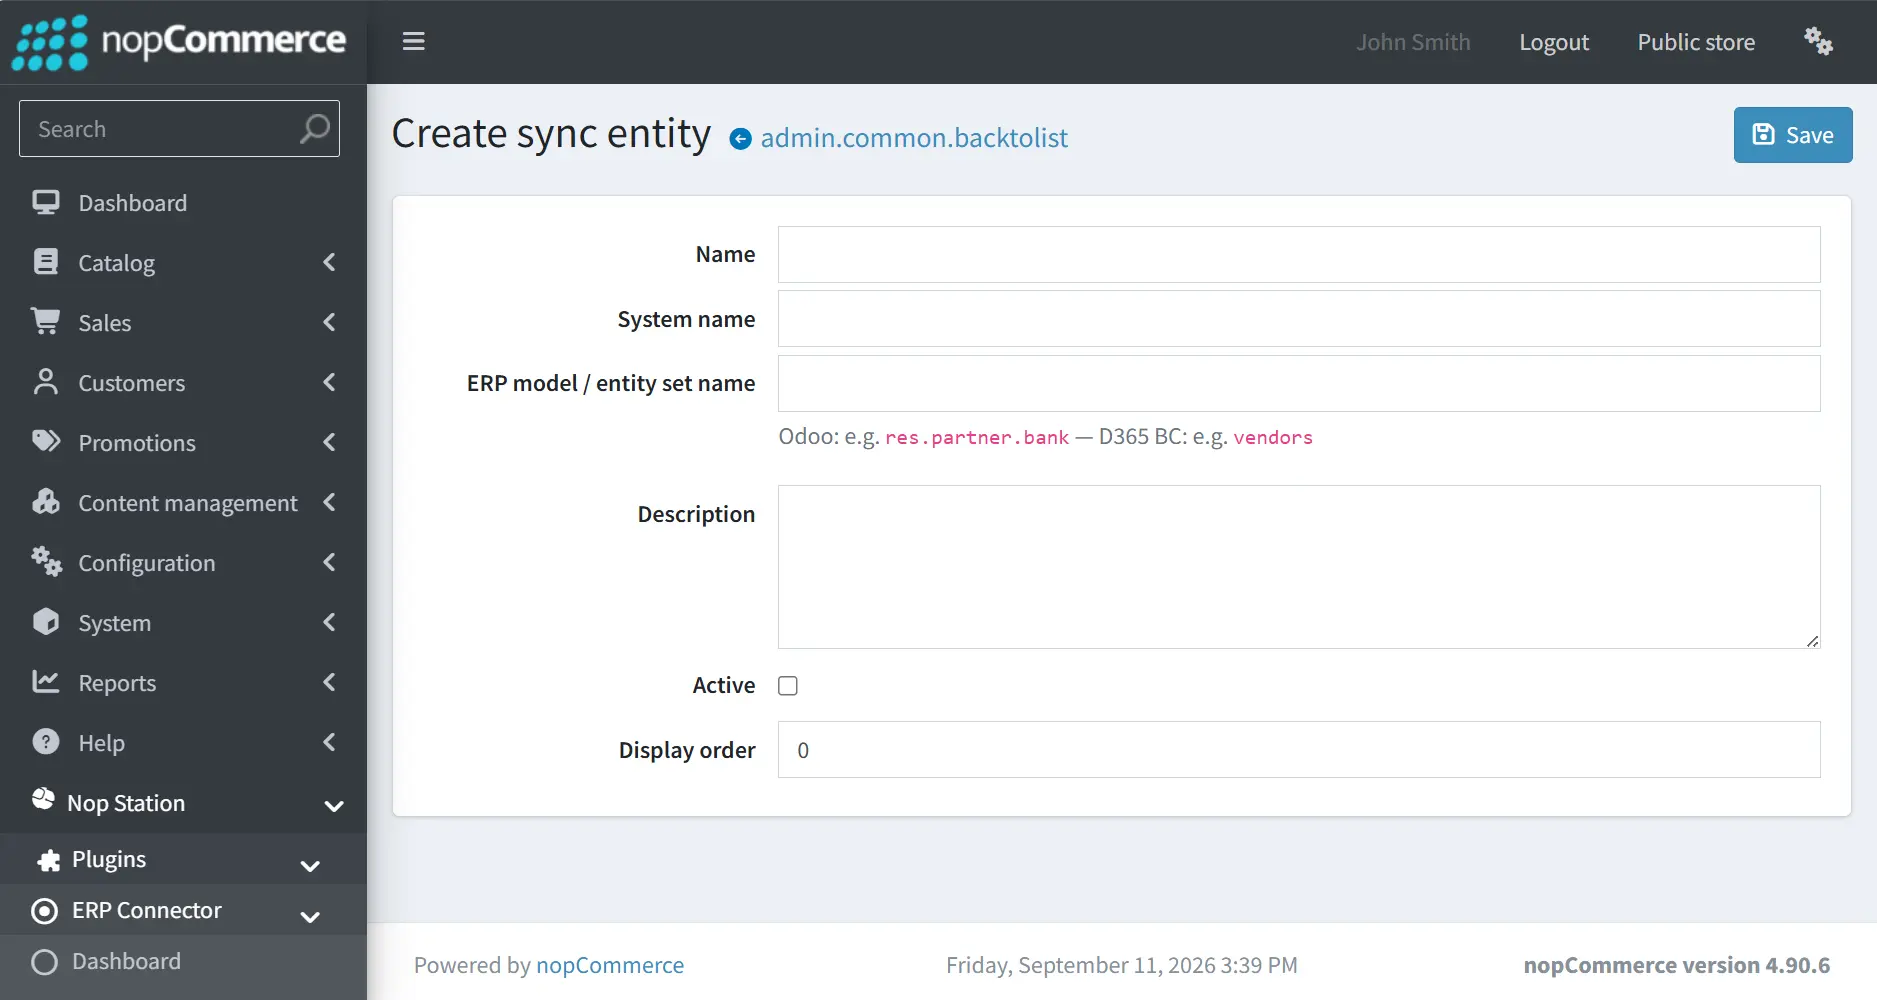
- Name: Defines the display name of the sync entity.
- System Name: Defines the unique internal identifier for the sync entity.
- ERP Model / Entity Set Name: Defines the corresponding ERP model or entity set that will be used for synchronization. The expected value depends on the selected ERP system.
- Description: Provides additional information about the purpose or usage of the sync entity.
- Active: Enables or disables the sync entity.
- Display Order: Defines the position of the sync entity in the list.
Sync Entity Table Mapping:
- Go to Admin → NopStation → Plugins → ERP Connector→ Sync entity table mapping
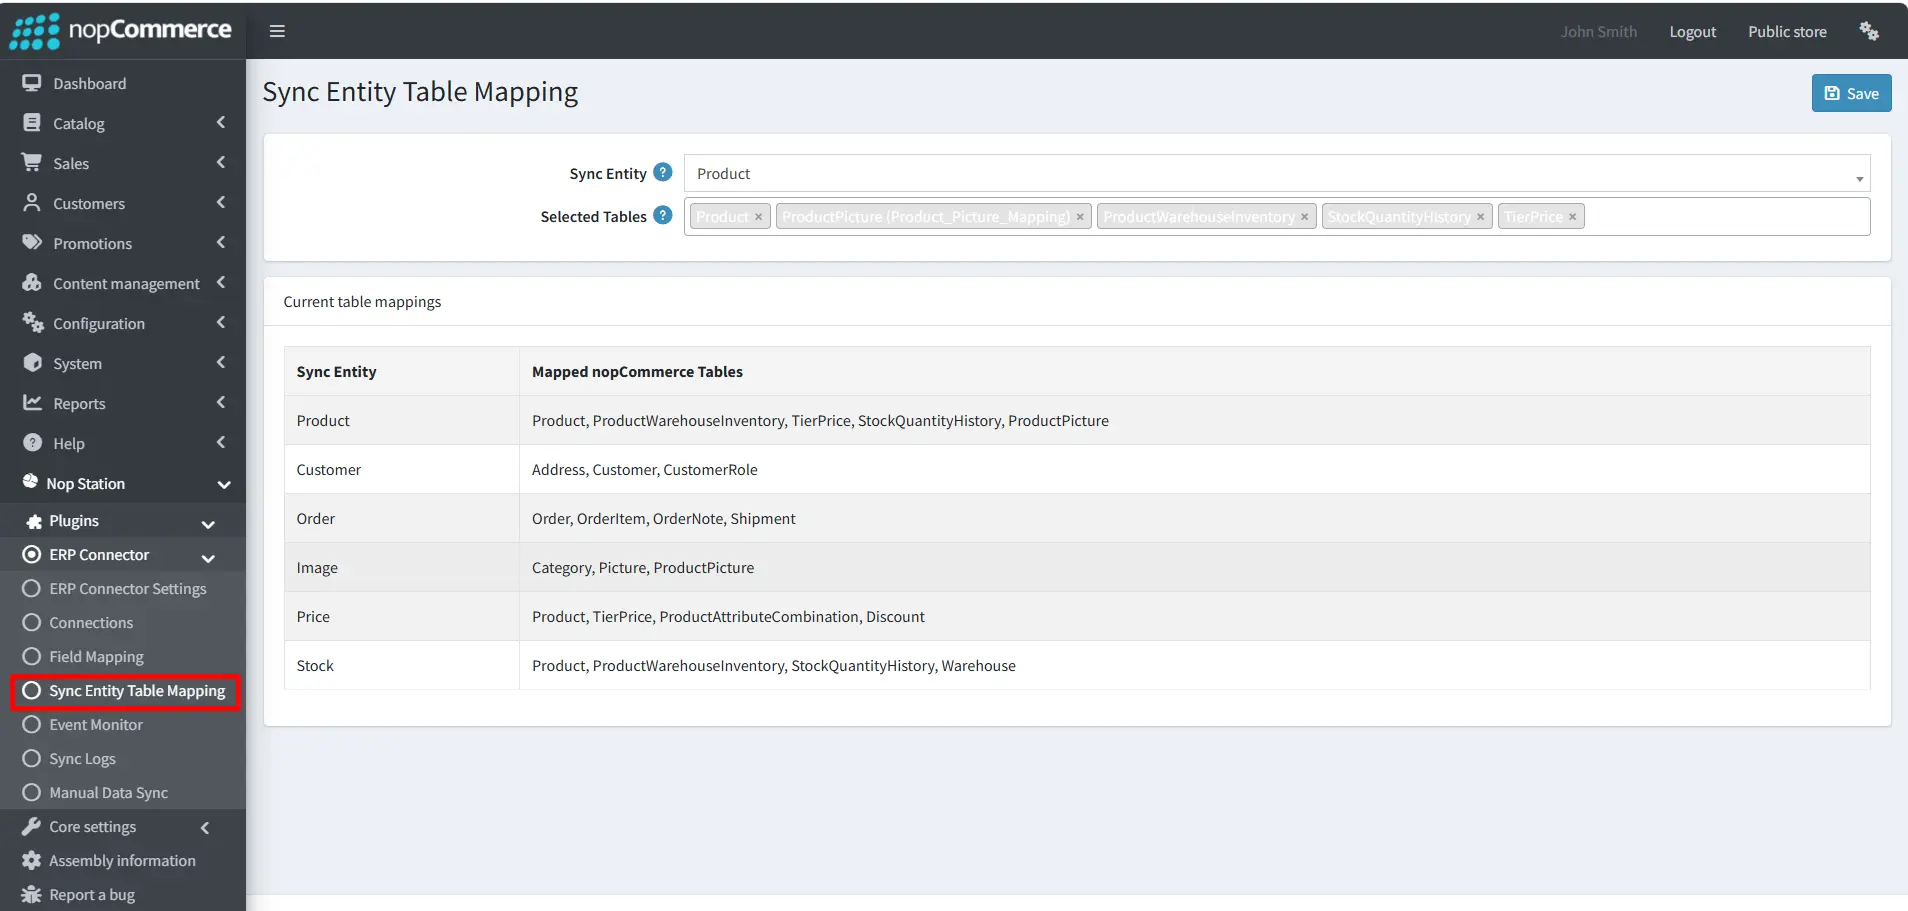
- Sync Entity: Selects the business data entity for which the table mapping will be configured, such as Product, Customer, Order, Image, Price, or Stock.
- Selected Tables: Selects the nopCommerce database tables that are involved in the synchronization of the selected entity.
- Current Table Mappings: Displays the existing table mappings configured for each synchronization entity.
- Mapped nopCommerce Tables: Shows the nopCommerce tables currently associated with each sync entity.
- Saves the selected table mappings and keeps the configuration for future synchronization.
Dashboard:
- Go to Admin → NopStation → Plugins → ERP Connector→ Dashboard. To check event monitor in dashboard you have to run manual data sync first.
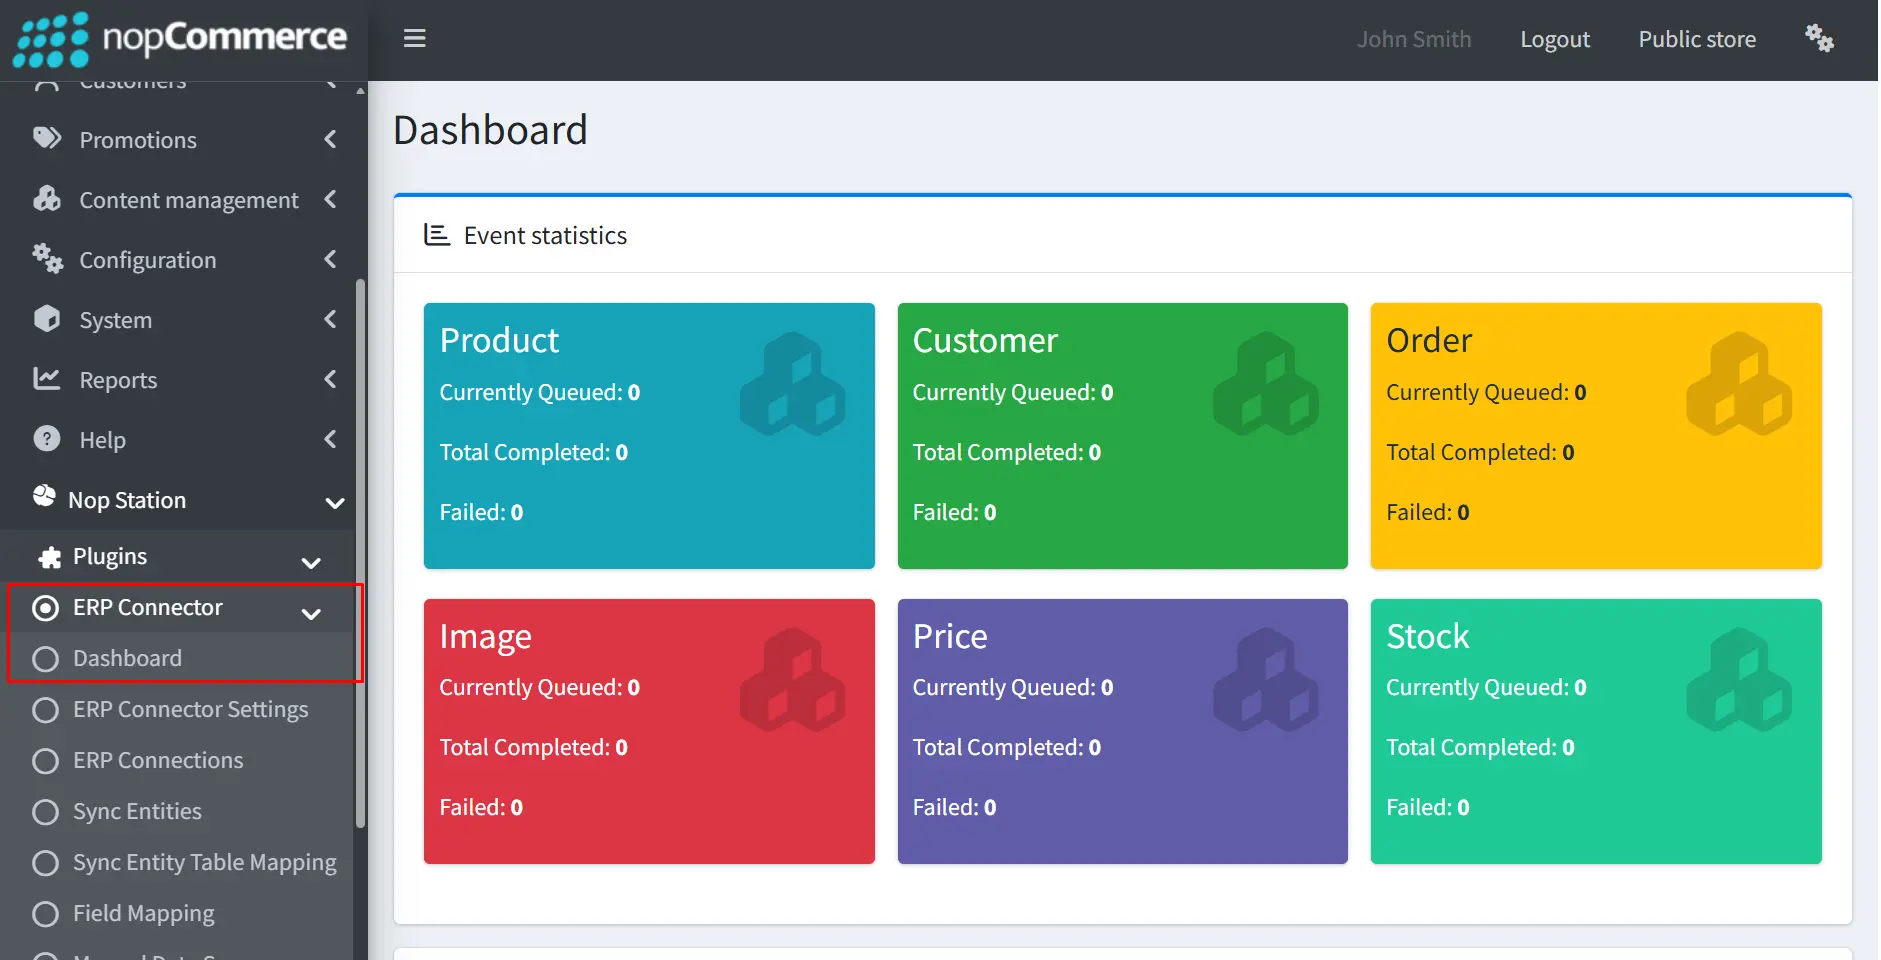
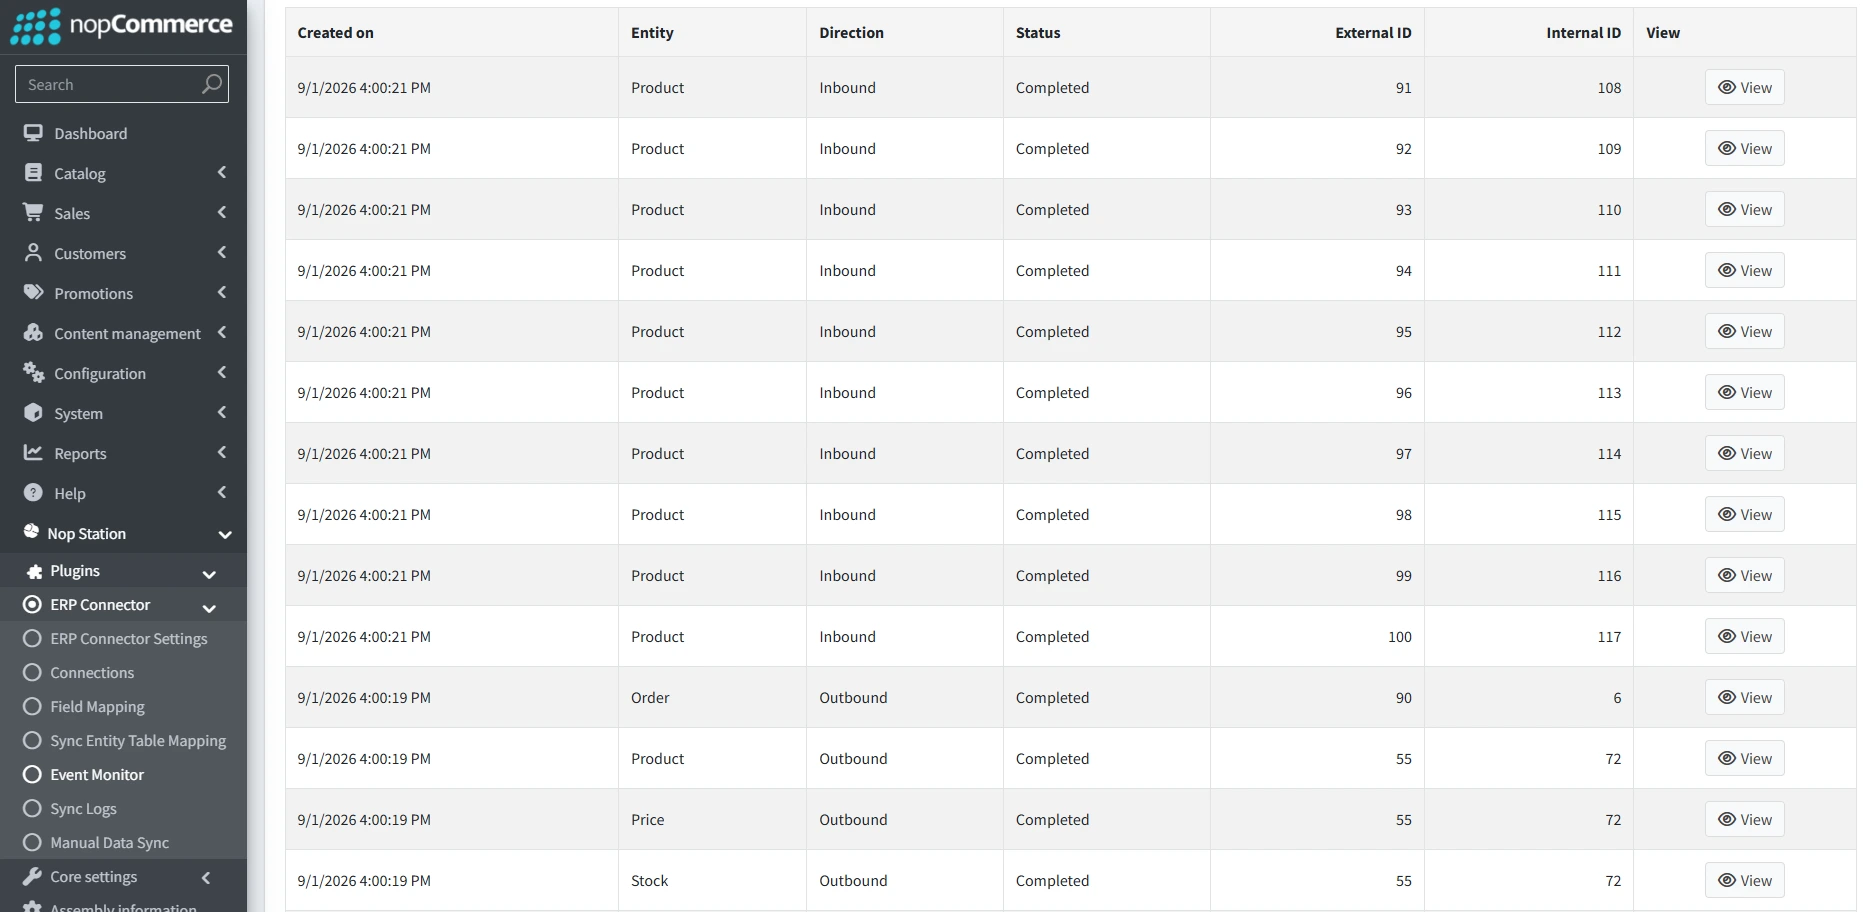
- Event Statistics: Provides an overview of synchronization activity for each entity, including queued, completed, and failed events.
- Currently Queued: Shows the number of events waiting to be processed.
- Total Completed: Shows the total number of successfully processed events.
- Failed: Shows the total number of events that failed during processing.
- Connection: Filters events based on the selected ERP connection.
- Entity: Filters events by synchronization entity, such as Product, Customer, Order, Image, Price, or Stock.
- Status: Filters events based on their current processing status, such as Completed or Failed.
- Direction: Filters events based on the data flow direction:
- Inbound: Data is synchronized from the ERP to nopCommerce.
- Outbound: Data is synchronized from nopCommerce to the ERP.
- Correlation ID: Allows users to search for a specific group or transaction of related integration events.
- Search: Applies the selected filters and displays the matching events.
- Created On: Shows the date and time when the integration event was created.
- Entity: Identifies the type of data involved in the event, such as Product, Customer, or Order.
- Direction: Shows whether the event is Inbound (ERP → nopCommerce) or Outbound (nopCommerce → ERP).
- Status: Shows the current processing result of the event, such as Completed or Failed.
- External ID: Displays the record ID from the ERP system.
- Internal ID: Displays the corresponding record ID in nopCommerce.
- View: Opens the event details, allowing users to review the event information, processing details, and any errors.
Sync Logs:
- Go to Admin → NopStation → Plugins → ERP Connector→ Sync logs.
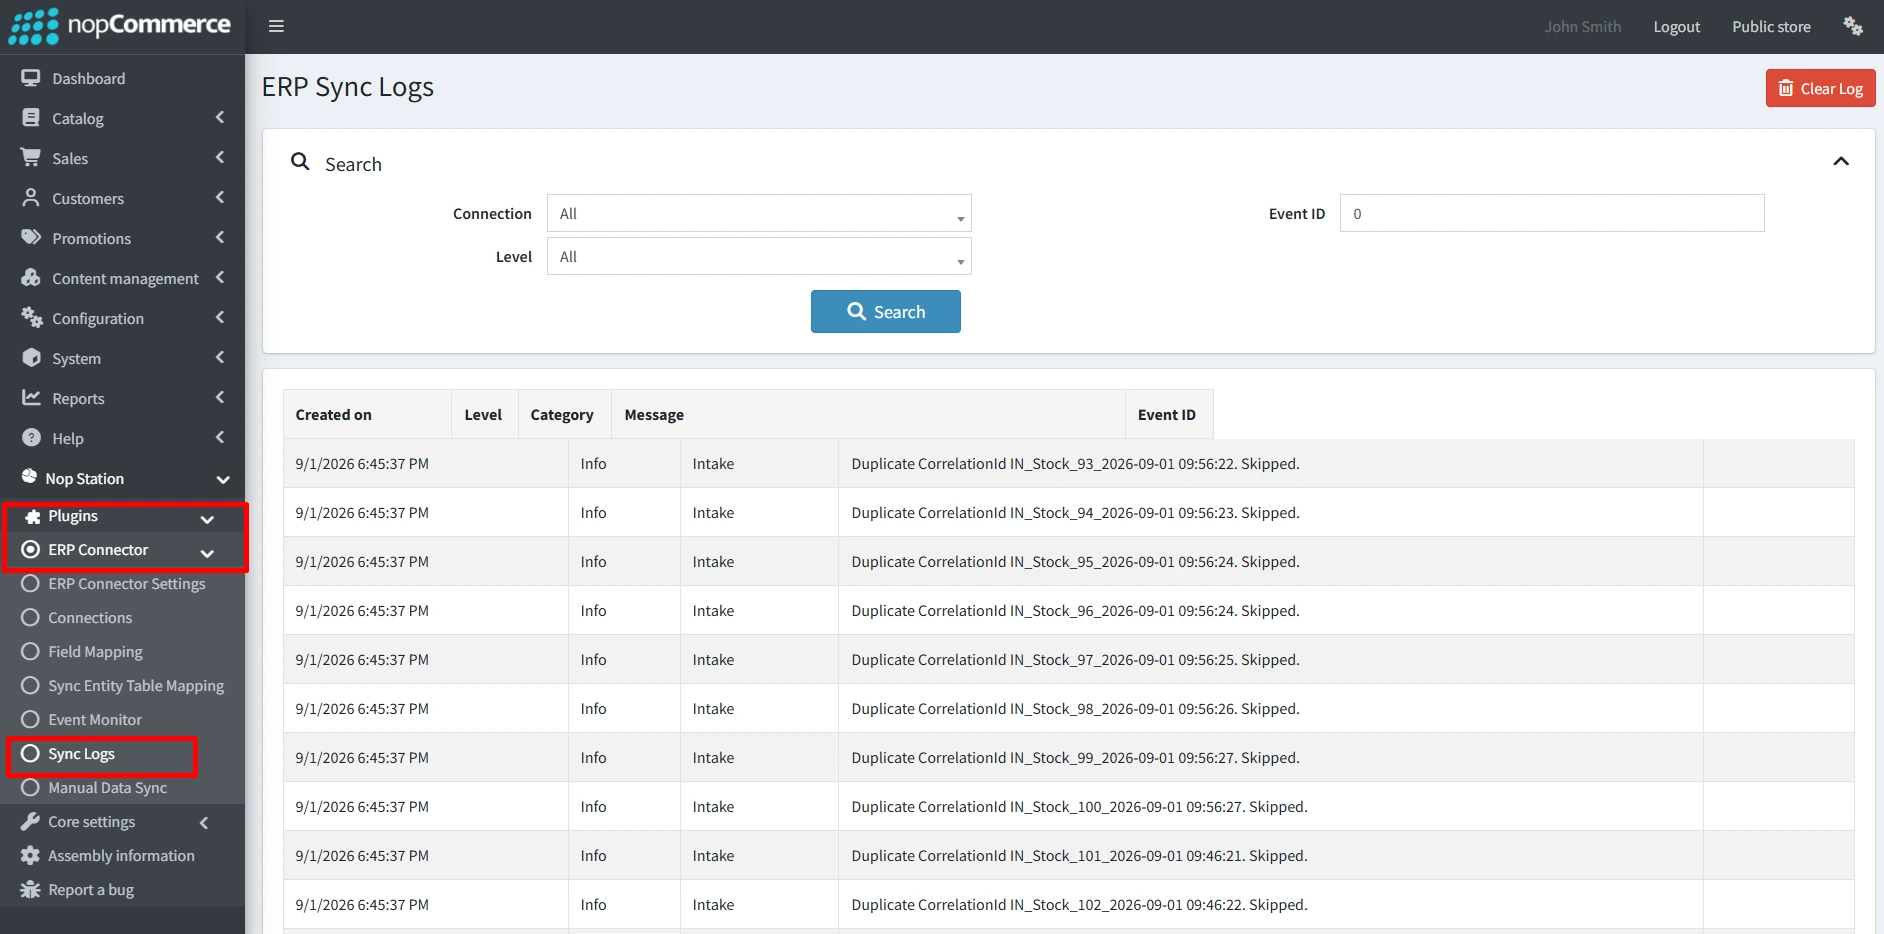
- Connection: Filters sync logs based on the selected ERP connection.
- Level: Filters logs by their severity or log level, such as Info, Warning, or Error.
- Event ID: Allows users to search for logs associated with a specific ERP event.
- Search: Applies the selected filters and displays the matching sync logs.
- Clear Log: Removes the existing synchronization log records.
- Created On: Shows the date and time when the log entry was created.
- Level: Indicates the severity level of the log entry.
- Category: Identifies the area or stage of the integration where the log was generated, such as Intake.
- Message: Provides details about the integration activity, result, warning, or error.
- Event ID: Identifies the ERP event associated with the log entry.
Manual Data Sync:
- Go to Admin → NopStation → Plugins → ERP Connector→ Manual Data Sync
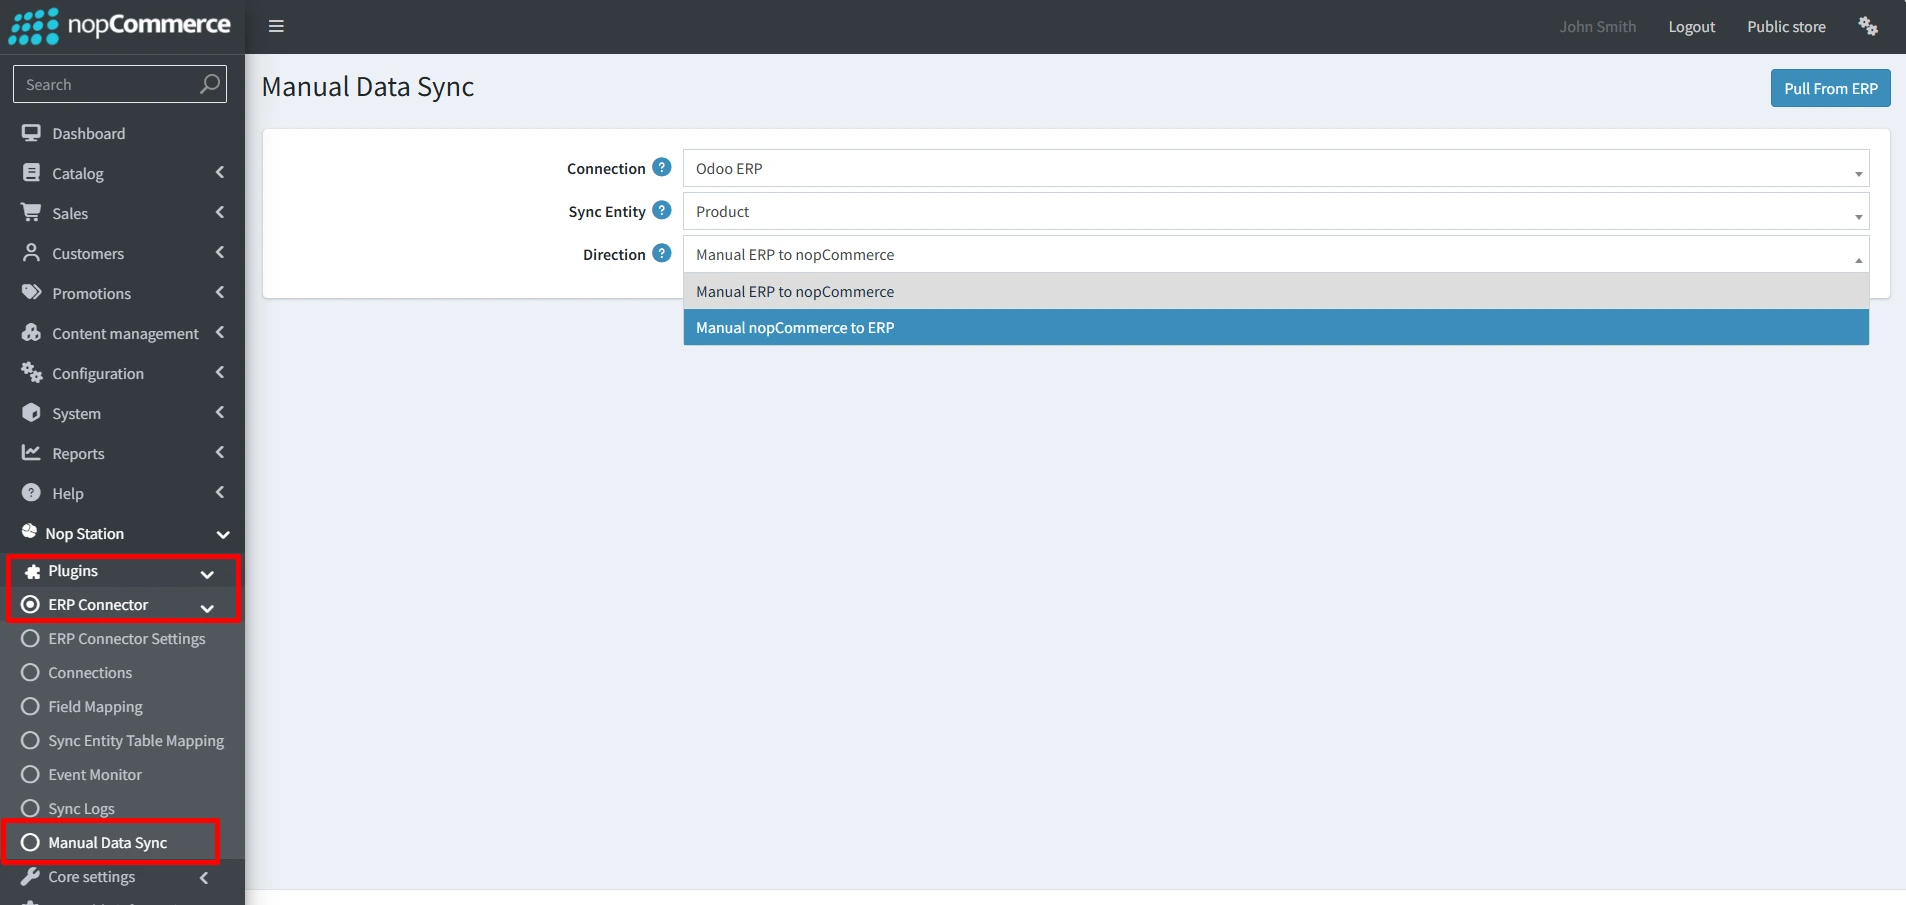
- Connection: Selects the ERP connection that will be used for the manual synchronization.
- Sync Entity: Selects the type of data to synchronize, such as Product, Customer, Order, Image, Price, or Stock.
- Direction: Defines the direction in which the data will be manually synchronized:
- Manual ERP to nopCommerce: Retrieves the selected data from the ERP and synchronizes it to nopCommerce.
- Manual nopCommerce to ERP: Sends the selected data from nopCommerce to the ERP.
- Pull From ERP: Starts a manual data synchronization from the selected ERP to nopCommerce based on the selected connection and sync entity.