


REST API
- The acronym REST stands for Representational State Transfer, and it's a web service architecture.
- The REST API specifies the ways via which developers can send and receive requests and responses.
- We utilize it for a variety of purposes when we need to transfer JSON-based data from one application to another.
REST SERVICE SPECIFICATION
- Platform-agnostic which means it makes no difference whether the server is Windows, the client is Linux/Android, or something else
- Language-independent communication (C# can communicate with Java, for example).
- Based on industry standards (runs on top of HTTP).
- Even in the presence of firewalls, it is simple to utilize.
JWT(JSON Web Token)
- JSON Web Token (JWT) is a URL-safe way of describing claims to be exchanged between two parties in a concise format.
- The claims in a JWT are encoded as a JavaScript Object Notation (JSON) object, which can then be used as the payload of a JSON Web Signature (JWS) structure or as the plaintext of a JSON Web Encryption (JWE) structure, allowing them to be digitally signed, MACed, and/or encrypted.
- Think of JWT as a simple way to convey information in a clear form (typically in the form of a URL) that can be trusted.
PRE-REQUISITES
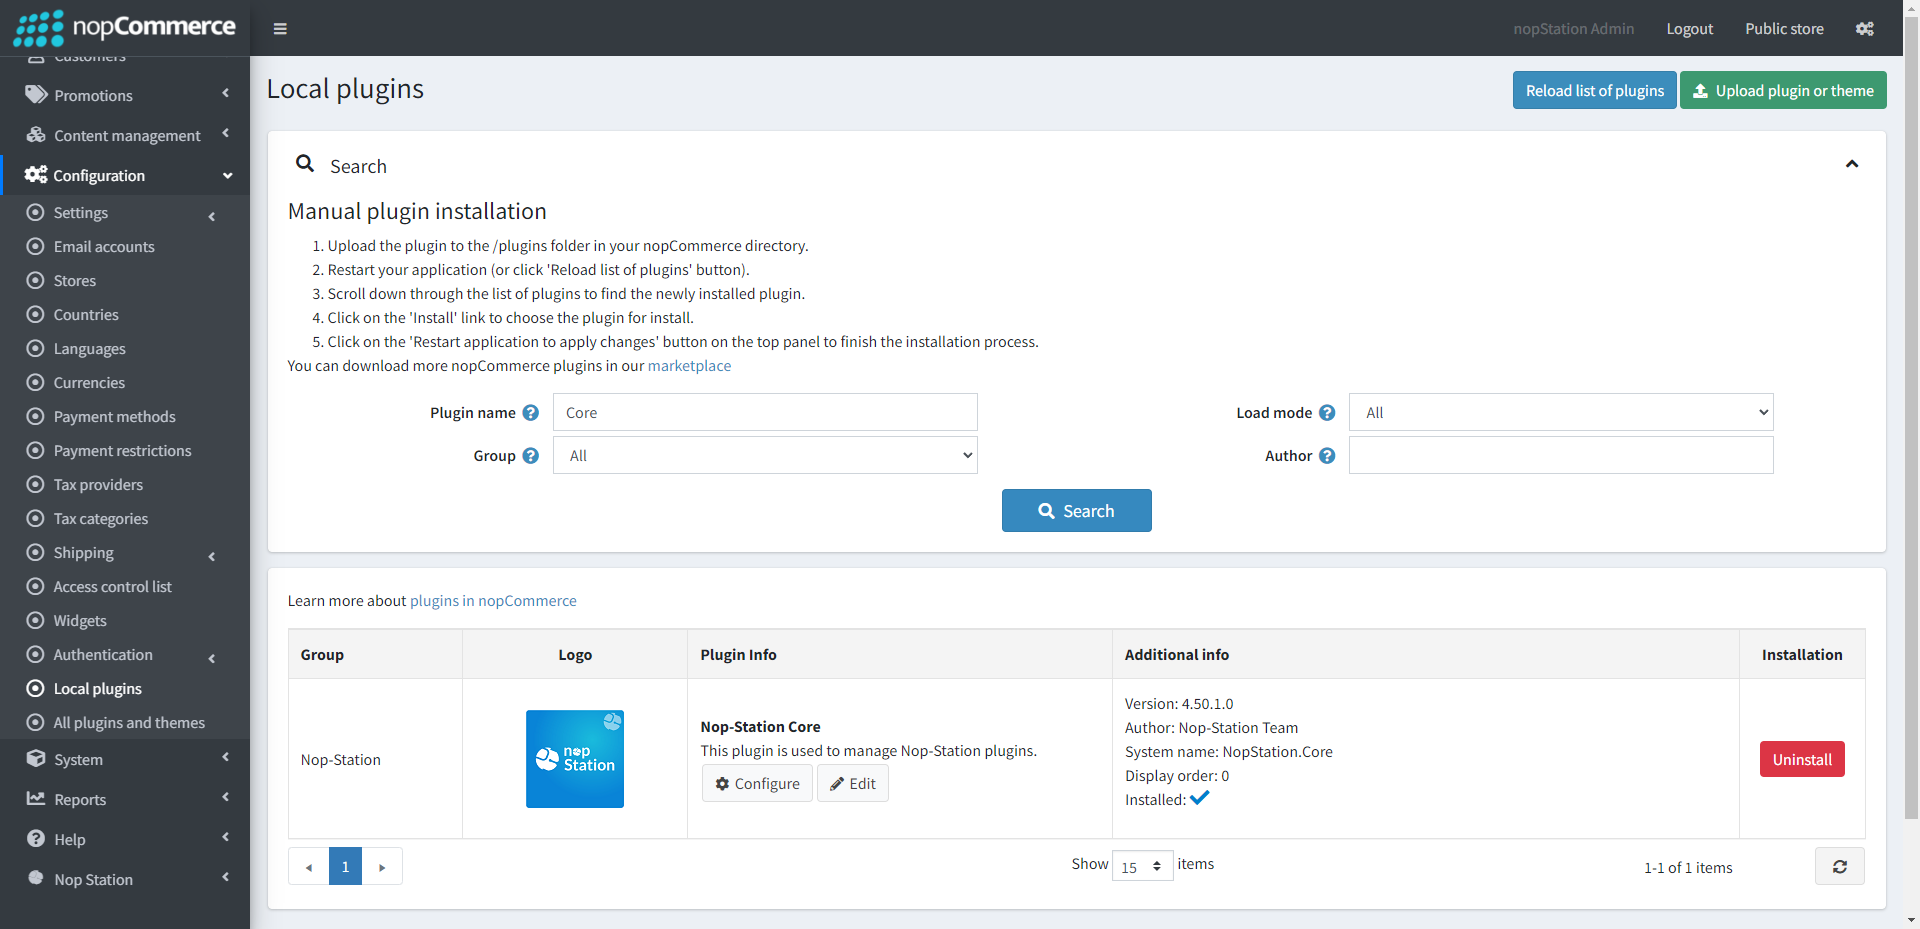
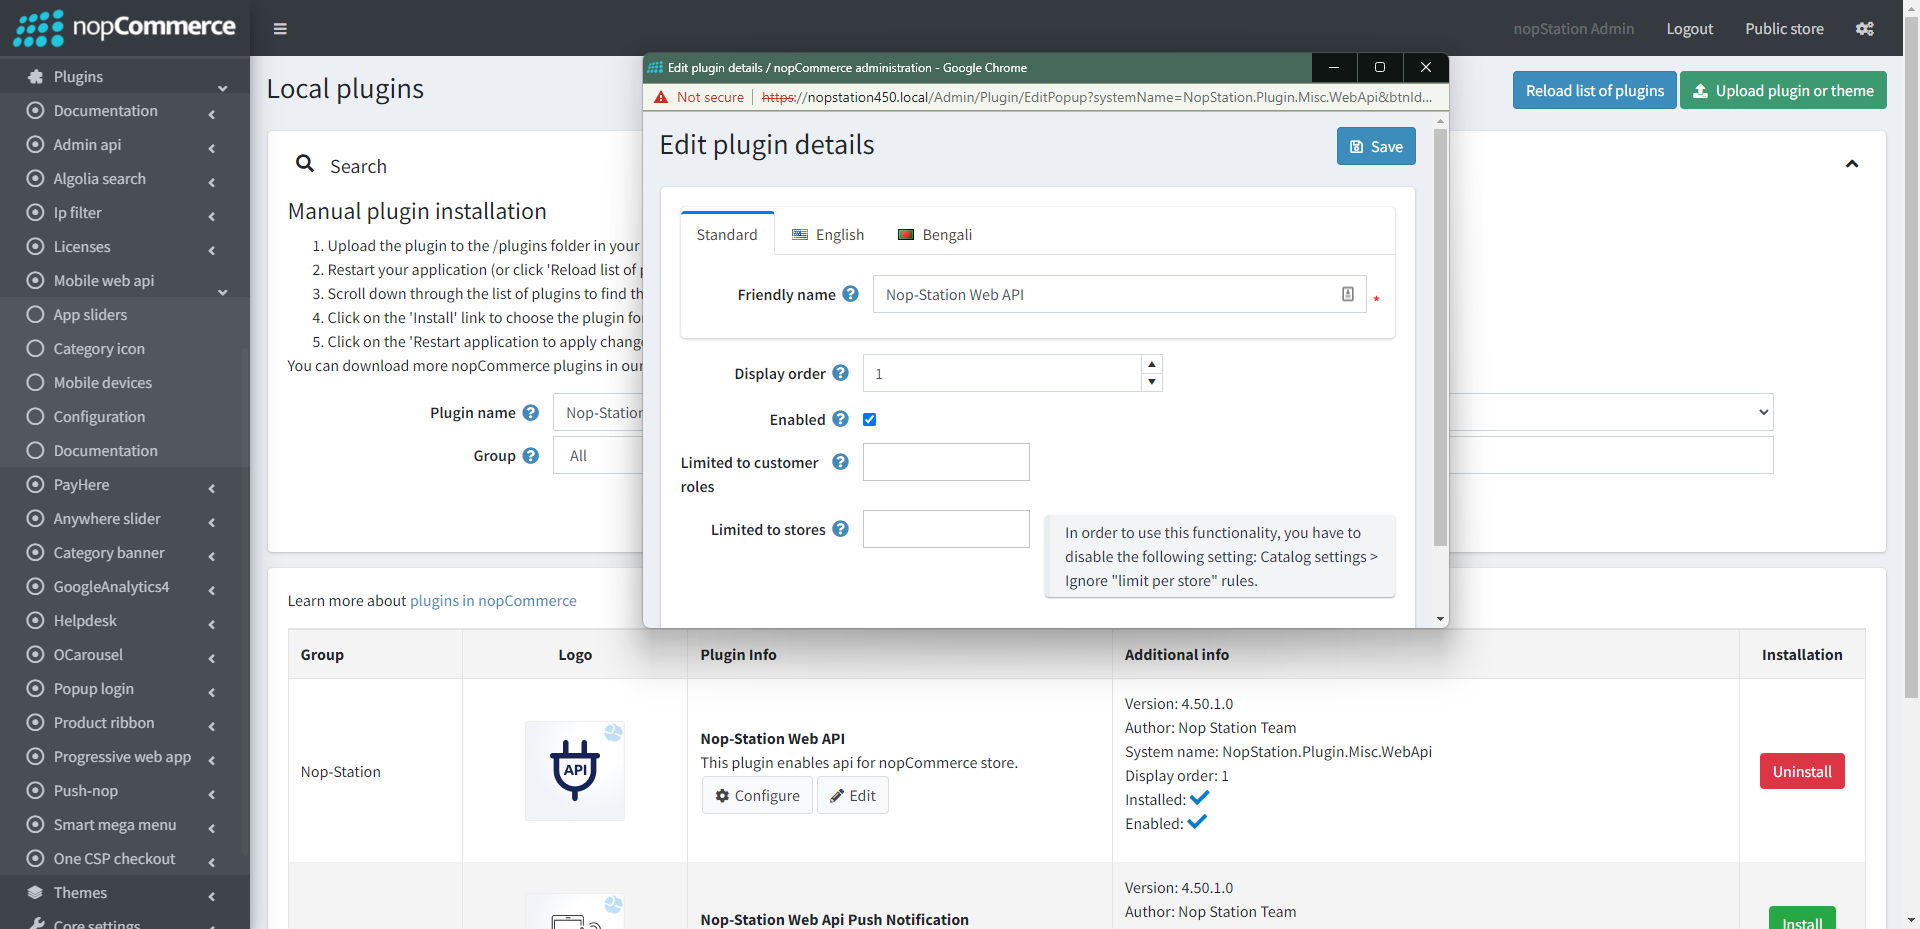
- The plugin requires you to install the Nop-Station Core plugin first.
- The plugin requires you to install the Nop-Station Web API plugin
- For push notification, the plugin requires you to install the Nop-Station App Push Notification plugin
INSTALLATION
- Download the Web API Plugin from our store https://nop-station.com/customer/downloadableproducts
- Upload the NopStation.WebApi zip file using the "Upload plugin or theme" button
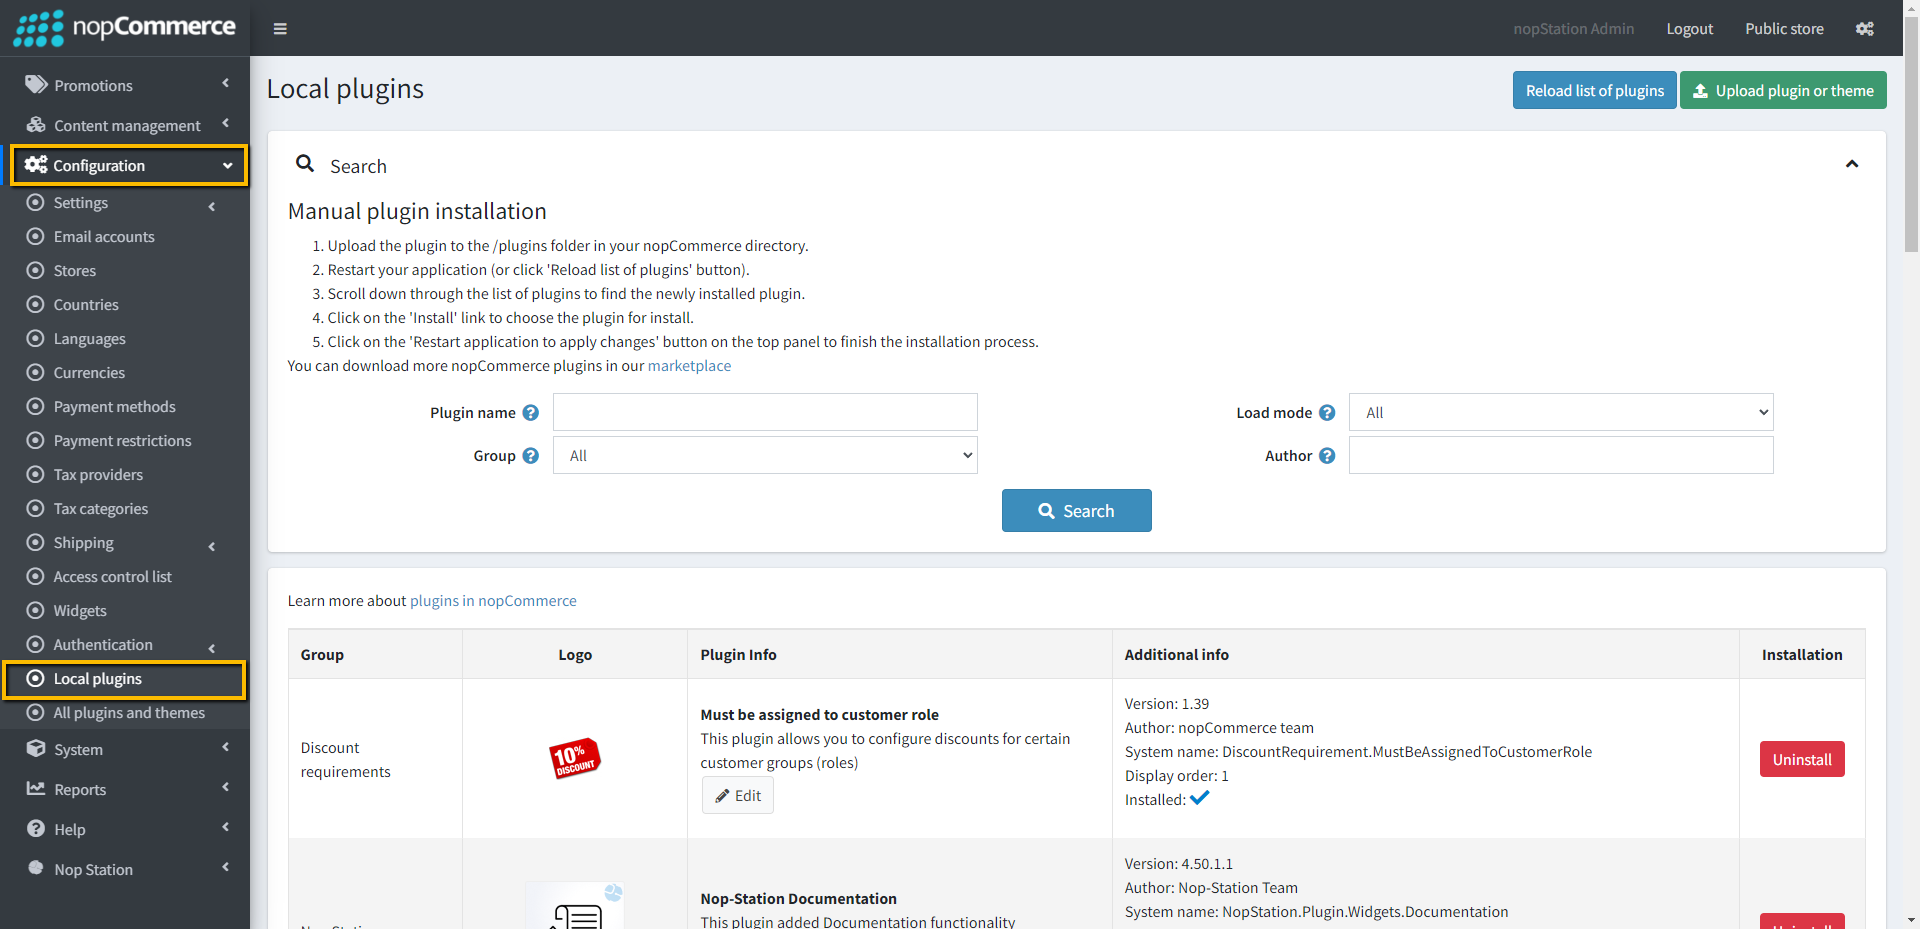
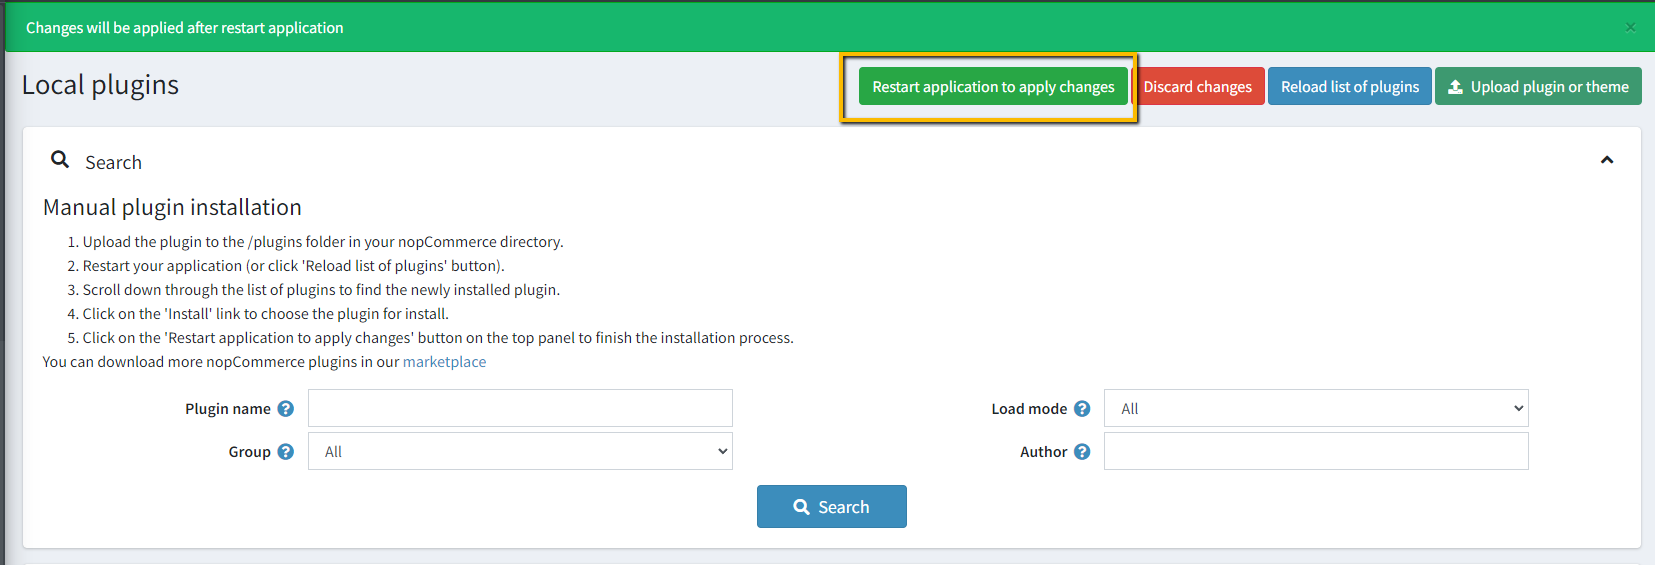
- Go to Administration, reload the 'list of plugins'. Install 'Nop-Station Core' Plugin first, after that install 'Nop-Station Web API' and finally 'Nop-station App Push Notification'
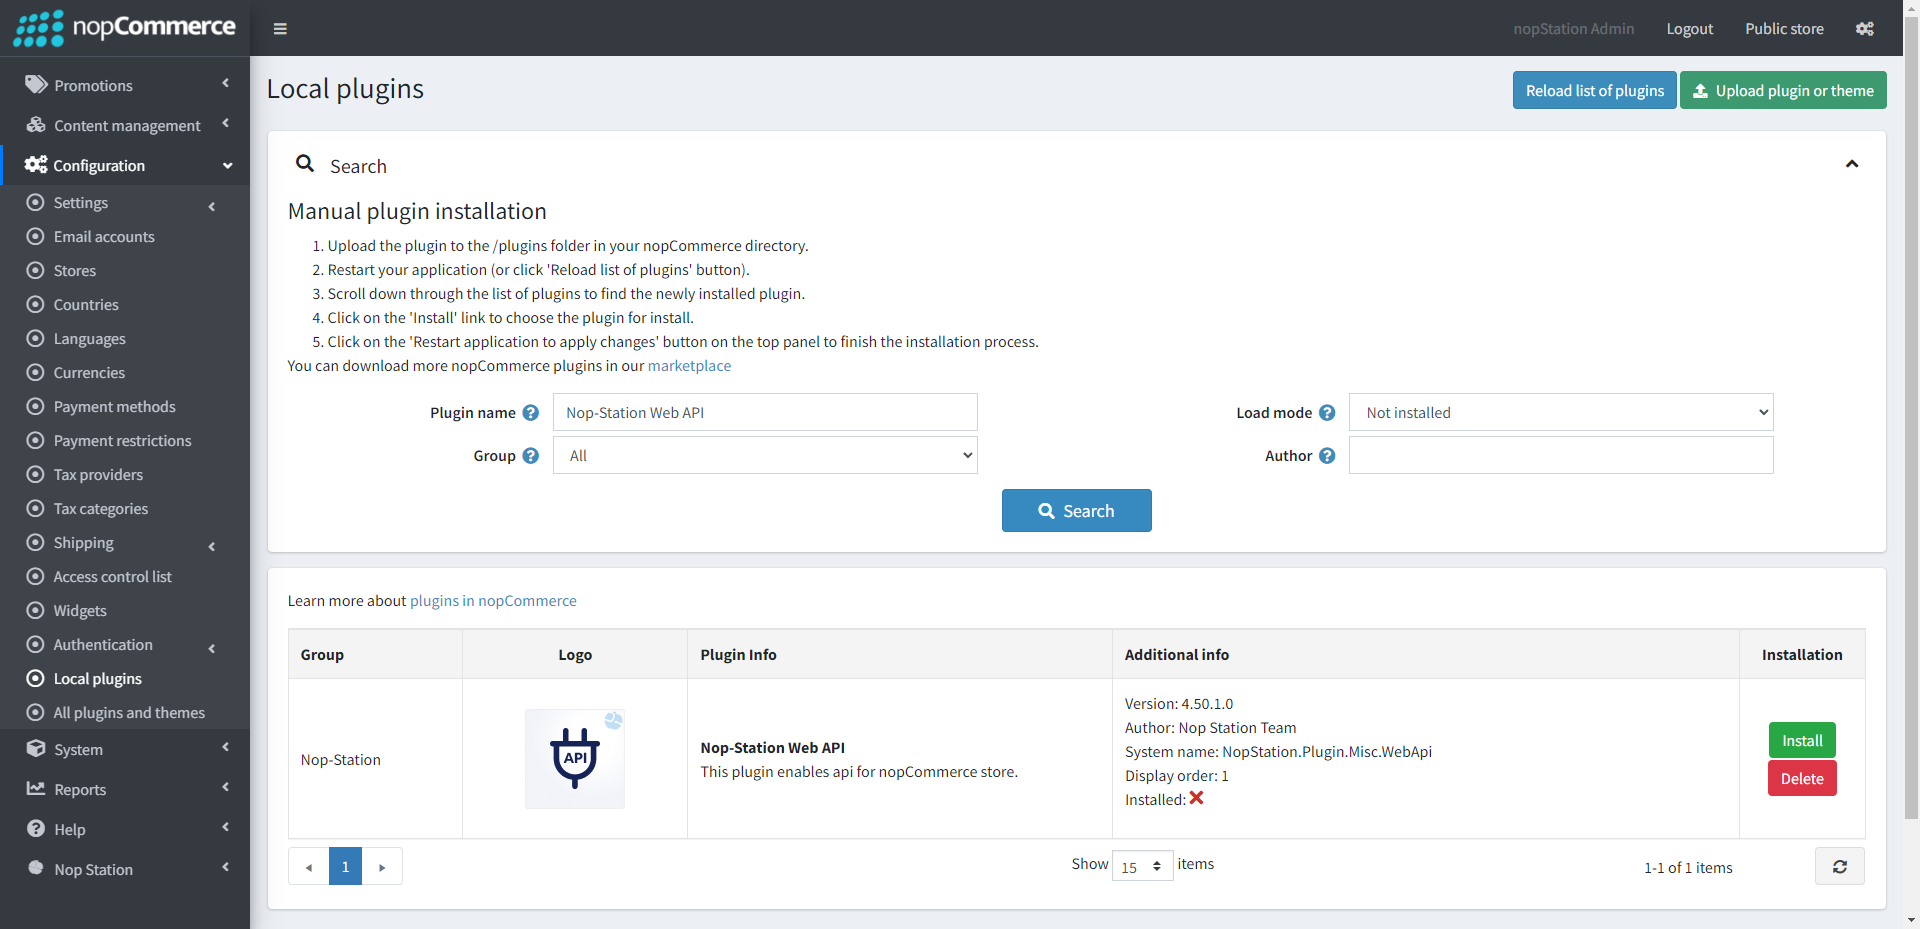

- To make the plugins functional, restart the application
- Enable the plugin with 'Edit' option and Configure it
API DOCUMENTATION
- Postman
- Download Postman Collection.
- Then just import to the postman and select 'nopStation' environment.
NST Documentaion
- NST Documentation
- Check verison 1.0 API details here.
LANGUAGE SETUP DOCUMENTATION
FAQ
Q 1: How to change the base URL?
Native Android | com.bs.ecommerce.networking.NetworkConstants |
Native iOS | /Tools/API/API.swift |
Ionic | src\app\util\constant.ts |
Q 2: How to Change the JWT Key & Secret
Native Android | app.secret file under the root project directory |
Native iOS | /Tools/API/API.swift In this file JWT Key == Token Key, and Secret == TokenSecret |
Ionic | src\app\util\constant.ts |
Q 3: What will be the base URL after installing the MobileWebApi plugin?
- [SITE_URL]/api
Q 4: How to change the top bar logo?
- In Admin panel: Nop Station → Plugins → Mobile Web Api → Configuration → App Settings → Logo
Q 5: How to change the default category icons on the Category tree?
- In Admin panel: Nop Station → Plugins → Mobile Web Api → Configuration → Common → Default category icon
Q 6: How to set the category icons for mobile?
- [SITE_URL]/Admin/WebApiCategoryIcon/List
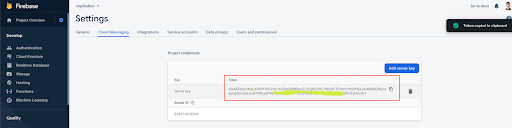
Q 7: How to set up the Firebase push notification?
- Go to Firebase Console and create a new project.
https://console.firebase.google.com/ - Go to project settings. On the Cloud Messaging tab, collect Server Token.
- Install the Nop-Station App Push Notification plugin (If not installed yet).
[SITE_URL]/Admin/Plugin/List - Go to configure enter Firebase Server Token into Google console api access key field.
[SITE_URL]/Admin/AppPushNotification/Configure - Done! Now you can create push notification campaign from here below:
[SITE_URL]/Admin/AppPushNotificationCampaign/List
Q 8: How To Change The Theme Colors?
- The color theme of the mobile app is configurable from Nop Station → Plugins → Mobile Web Api → Color Settings
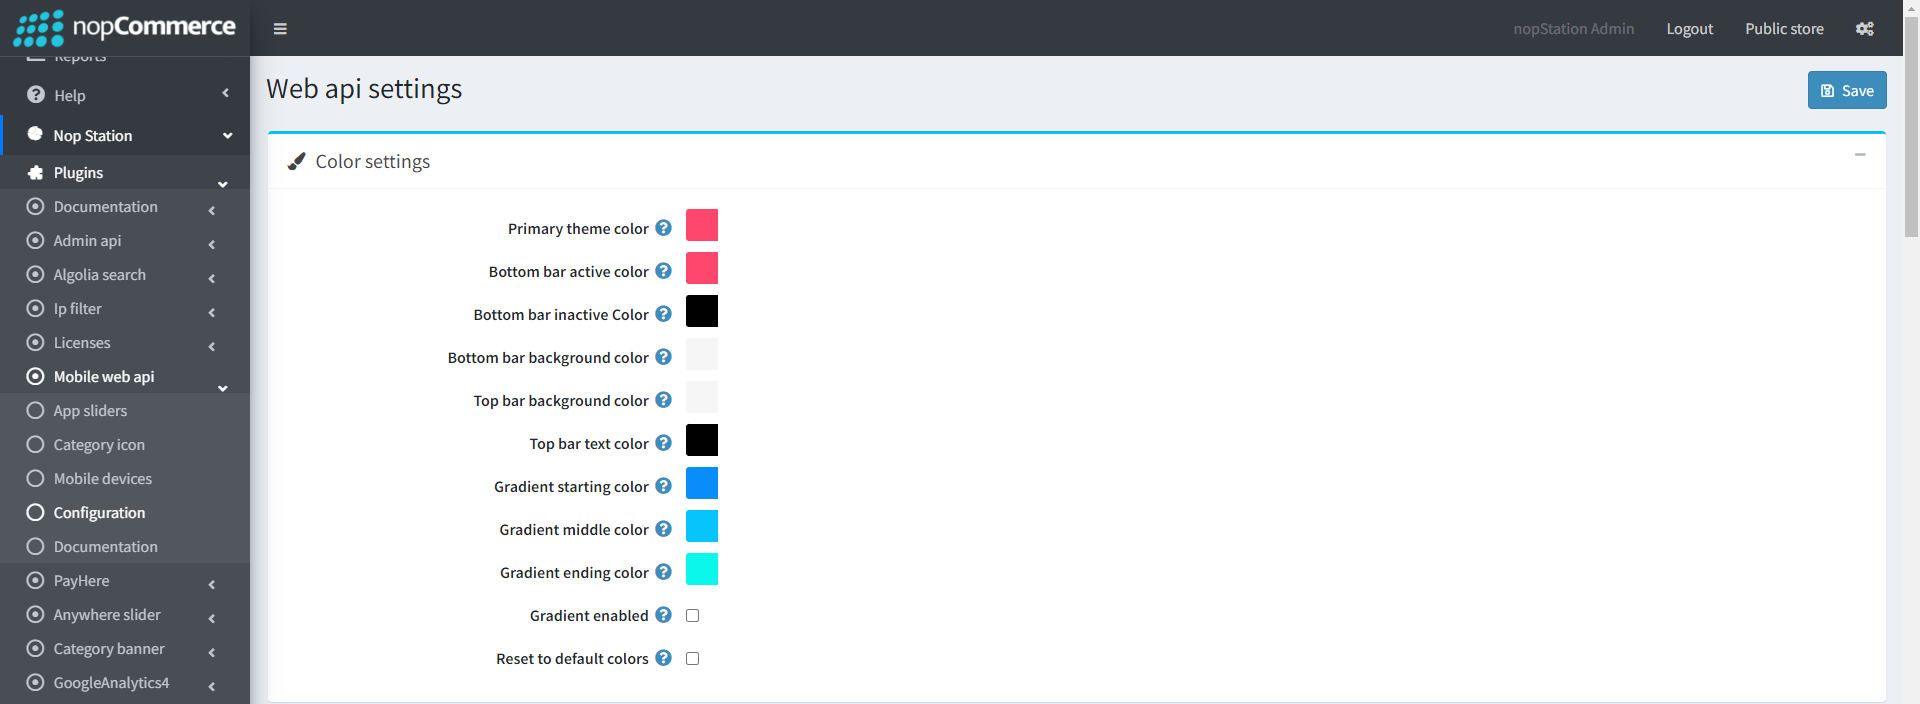
Primary Theme Color - This Color Is Implemented at:
- Button (filled) background-color
- Button (outlined) text color
- More screen - list icons color
- Account screen - list icons color
- Product price color
- Cart badge counter color
- Slider indicator color on Home screen & Product Details screen

Image: Bottom bar
- Bottom bar active color - Icon and text color of the selected bottom menu
- Bottom bar inactive color - Icon and text color of the unselected bottom menus
- Bottom bar background color - Background color of the bottom menu
_1000.png)
Image: Top bar
- Top bar background color - Background color of the top bar
- Top bar text color - Icon and text color of the top bar
- Gradient starting color, Gradient middle color, Gradient ending color- A gradient of these 3 colors will be implemented on the top bar if Gradient enabled is checked.
- If Gradient enabled is unchecked, Top bar background color will be set on top bar
Q 9: How To Add A Missing Translation
- If the value is missing for some string resource, like shown in the screenshot, follow the following approach to set the value for the resource key.
- Go to Administration → Nop Station → Plugins → Mobile web api → Configuration
- Go to the String resources section
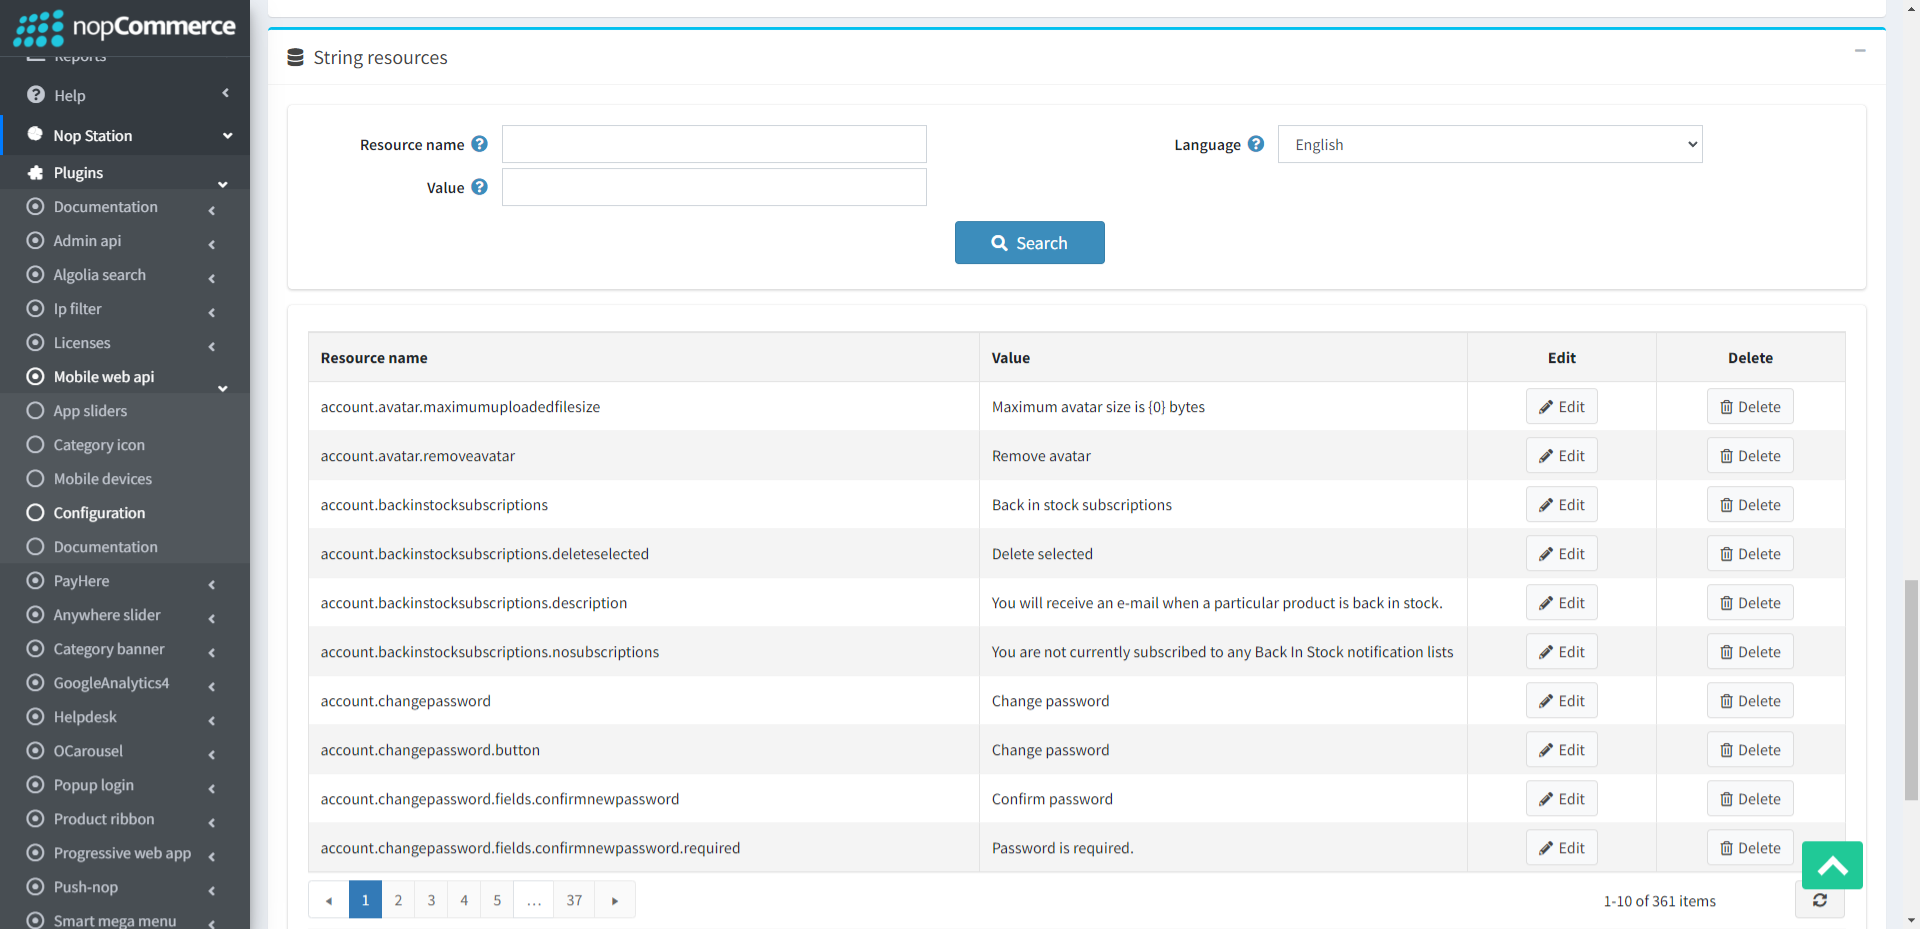
- Select the language for which the string is missing.
- Type the resource name and hit the search
- Edit and update the search result the desired value
- Now relaunch the app. The missing string will be visible
- If there is a missing string resource in your app which is available in English but not in another language, like shown in the screenshot below, follow the following approach to set the value for the resource key
- Go to Administration → Nop Station → Plugins → Mobile web api → Configuration
- Go to the String resources section
- Select the language for which the string is missing
- Type the resource value and hit the search
Checkout Steps
- In checkout, which steps to go after each step is decided from the server.
- Except for checkout/getbilling, all API responses contain a field named NextStep.
- This field indicates which step to go. The value of NextStep will be one of the following.
Value of NextStep | Action |
1 | Go to billing address step |
2 | Go to shipping address step |
3 | Go to shipping method step |
4 | Go to payment method step |
5 | Load payment info on webview |
6 | Go to confirm order step |
7 | Redirect to payment gateway (Load on webview) |
8 | Show order completed dialog |
0 | Leave checkout page |
- Example:
- If a user is on the billing address step (step 1) and selects ShipToSameAddress, the next step will not be 2. Because step 2 is Shipping address. It will be 3 or other.
- If a user is on the shipping address step (step 2) and selects PickupInStore the next step will not be 3. Because step 3 is shipping method and for store pick up no shipping method is needed.
Checkout/Getbilling
- This API is the entry point for the checkout steps. Returns the list of pre-saved addresses and the form fields for the new billing address.
Checkout/Savebilling
- Used for saving the billing address. Call this API to complete step 1
- Request body for saving an existing address for billing address -
- Here, Value is the ID of the selected address. If a user wants to ship to the same address, ShipToSameAddress will be true; false otherwise.
- Request body for saving a new billing address (See postman doc for details request body) -
- The response body will contain the field NextStep & all necessary information for that step.
Checkout/Saveshipping
- Used for saving the shipping address. Call this API to complete step 2.
- Request body for saving an existing address as shipping address -
- Request body for saving a pickup point store address as shipping address -
- Value should be in the following format:
- {Stote.Id}___Pickup.PickupInStore
- Request body for saving a new billing address (See postman doc for details request body) -
- The response body will contain the field NextStep & all necessary information for that step.
Checkout/Saveshippingmethod
- Used for saving the shipping method. Call this API to complete step 3
- Request body -
- Value should be in the following format:
- {ShippingMethod.Name}___{ShippingMethod.ShippingRateComputationMethodSystemName}
- The response body will contain the field NextStep & all necessary information for that step.
Checkout/Savepaymentmethod
- Used for saving the payment method. Call this API to complete step 4.
- Request body:
- Value for key paymentmethod is PaymentMethod.PaymentMethodSystemName
- Value for key UseRewardPoints will be true if the user wants to use rewards points for payment; False otherwise.
- The response body will contain the field NextStep & all necessary information for that step.
Payment Info
- When NextStep is 5, load the URL nopstationcheckout/paymentinfo on a webview
- When the webview redirects to a URL that contains ../step/{stepNumber} extract the step number from the URL
- Close the webview and go to the next step
Checkout/Confirmorder [GET]
- This API will be called when the user is on confirm order page and clicks the confirm order button
- Request body:
Request body:
None
Response:
- The response body will contain the field NextStep & all necessary information for that step
Redirect To Payment Gateway
- When NextStep is 7, load the URL nopstationcheckout/redirect on a webview
- When the webview redirects to the URL that contains ../checkout/completed or ../orderdetails close the webview and show order completed dialog
Checkout/Completed
- This API needs to be called in two scenarios
- When NextStep is 8 show the order completed dialog. On dismiss of the dialog call this API
- OR
- When the order completed dialog is shown after step 7, on dismiss of the dialog call this API
- Request body:
- None
- Response:
- The response body will contain the field NextStep & all necessary information for that step. If NextStep is 0, go to the Home page
CONFIGURE
- Go to Admin ≫ Nop Station ≫ Plugins ≫ Mobile web Api ≫ Configuration for configuration
- There are other configurable options as well which can be configured according to the linked documents
- App sliders
- Category icon
- Mobile devices
- Configuration